Raspberry Pi Machine Learning Workflow
Begin
14 pages · ~28 min
Raspberry Pi Machine Learning Workflow
Learn how to set up a Raspberry Pi for machine learning and deploy practical ML models through a hands-on workflow. Ideal for beginners and makers with basic Python knowledge.
What you’ll learn
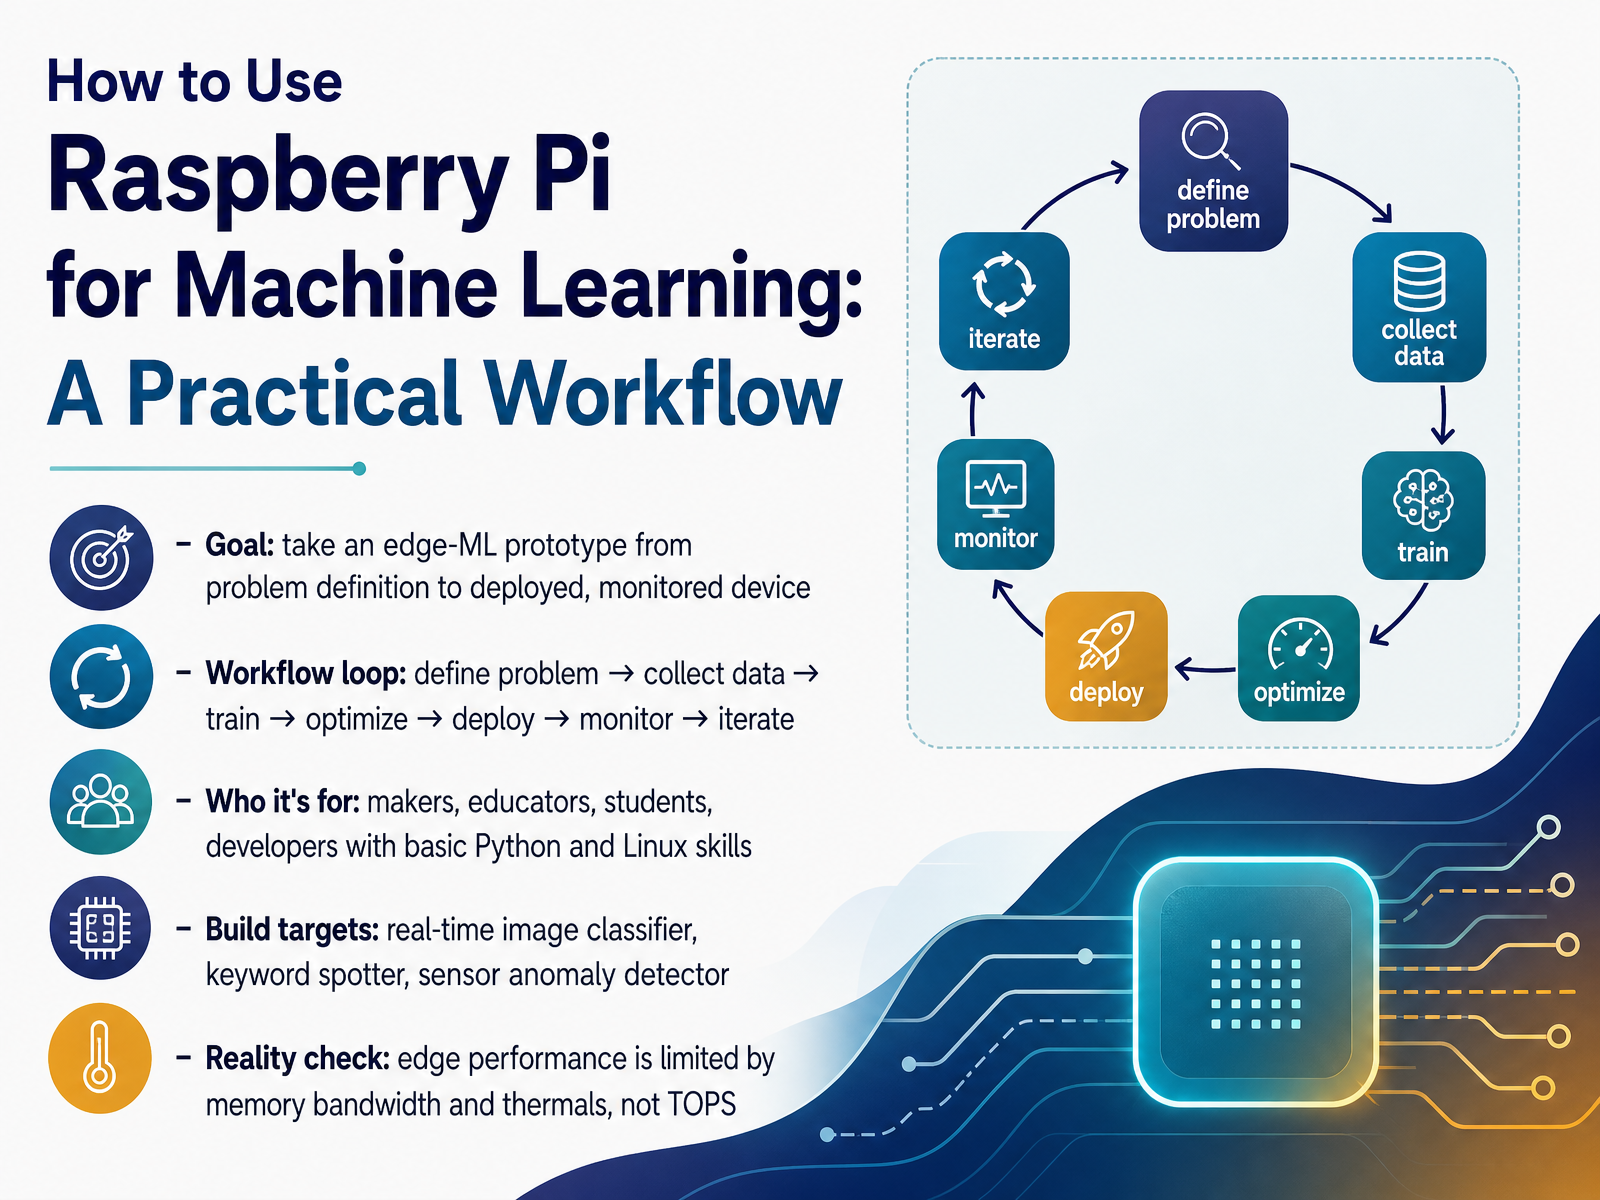
- 01How to Use Raspberry Pi for Machine Learning: A Practical WorkflowWelcome. Today we're taking an edge machine learning prototype all the way from a defined problem to a deployed, monitored device. Our workflow loops through six stages. We define the problem, collect data, train the model, optimize it, deploy it, and monitor it. Then we iterate. You'll be comfortable here if you know basic Python and Linux. We'll target three builds: a real-time image classifier, a keyword spotter, and a sensor anomaly detector. Before you move on, let's set one honest expectation. On a Raspberry Pi, edge performance is limited by memory bandwidth and thermals, not by the TOPS number on the box. Check that first, because it shapes every optimization choice later. Next, we'll choose the right Raspberry Pi board and accelerator.pamfinds.comcnx-software.comtomshardware.com+21 min
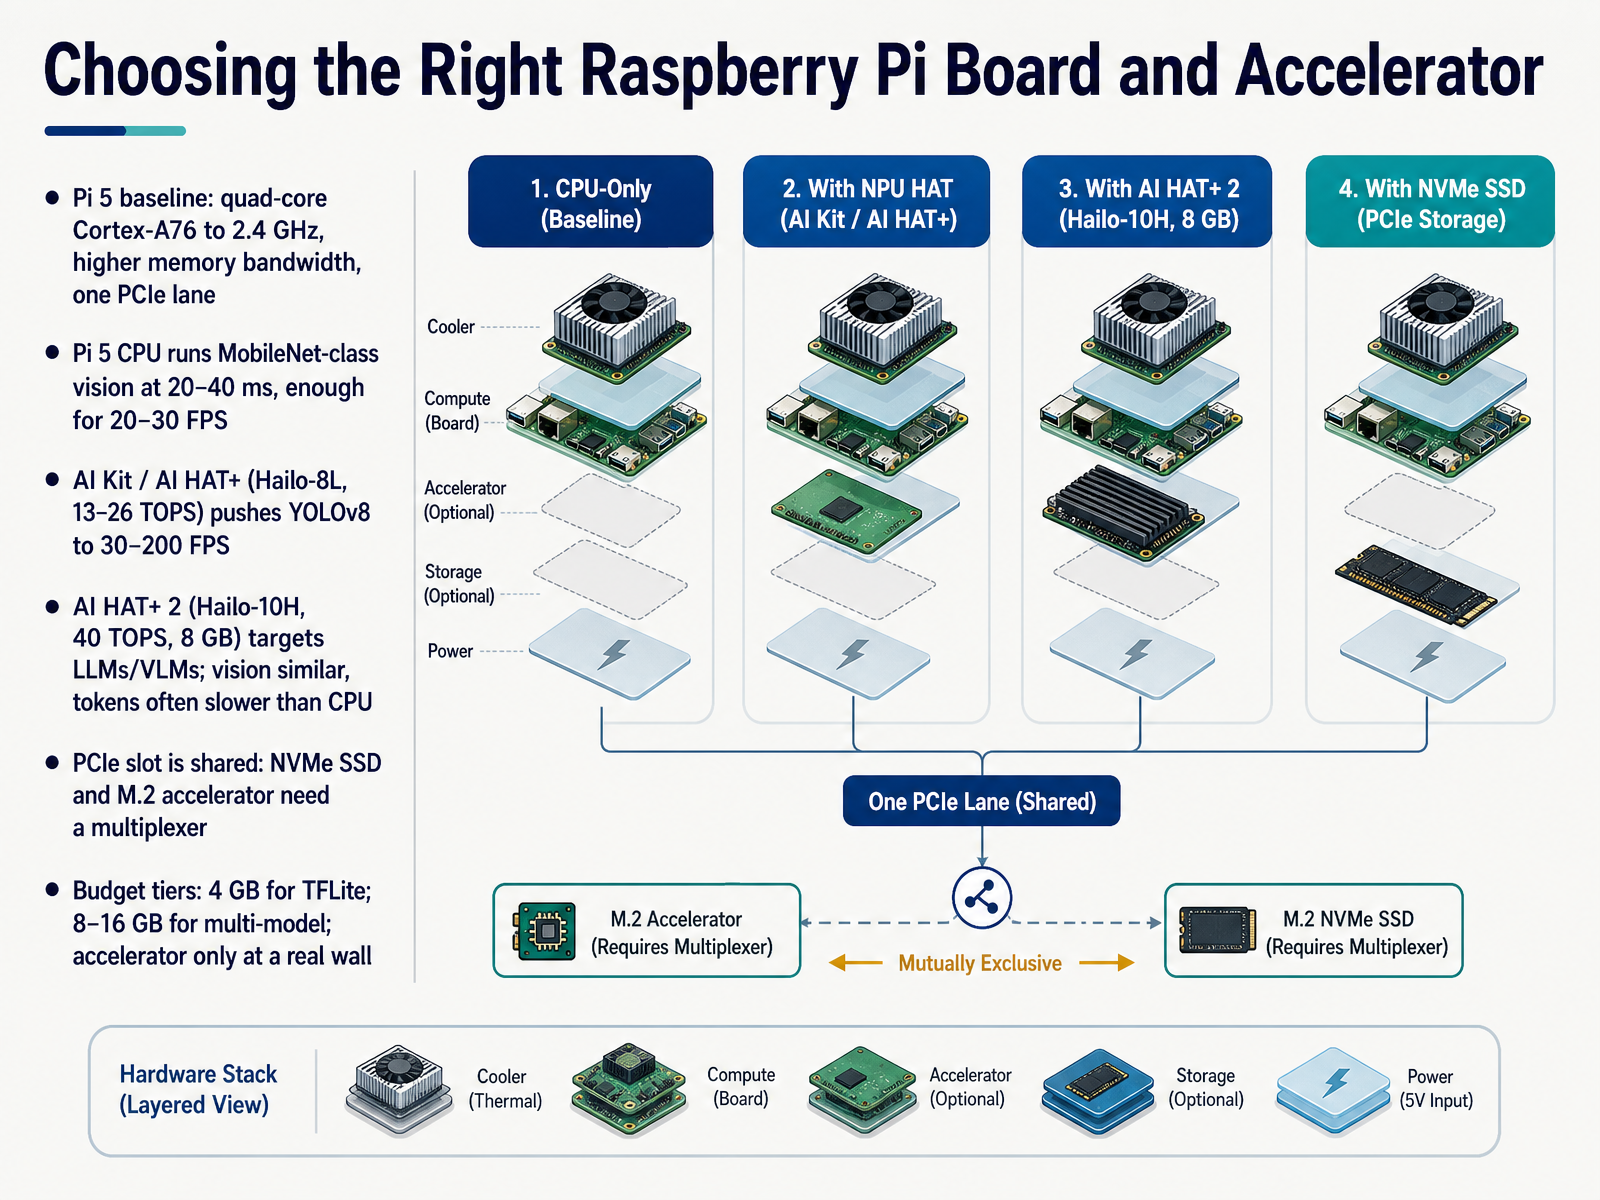
- 02Choosing the Right Raspberry Pi Board and AcceleratorNow let's pick the right board. Start with the Pi 5 as your baseline. The quad-core Cortex-A76 runs up to two point four gigahertz, with better memory bandwidth and one PCIe lane. On its own, the Pi 5 CPU already runs MobileNet-class vision in twenty to forty milliseconds. That is roughly twenty to thirty frames per second. Enough for many single-camera projects, so test your model on the base board first. Next, the AI Kit and AI HAT+ add a Hailo accelerator, from thirteen to twenty-six TOPS. That pushes YOLOv8 to thirty up to two hundred frames per second. Check your budget tier before you buy. Four gigabytes handles TensorFlow Lite models. Eight to sixteen gigabytes helps with multi-model pipelines. And only add an accelerator when you hit a real wall, not a guessed one. Two quick cautions. The AI HAT+ 2 targets large language models and vision-language models. Its vision speed matches the older HAT+, and token generation is often slower than the CPU, so buy it for offloading and low power, not raw chat speed. Also, the PCIe slot is shared. An NVMe SSD and an M.2 accelerator need a multiplexer to coexist. If you only need vision, the older HAT+ or AI Camera is cheaper for the same result. Next, we cover cooling, power, and storage for sustained inference.
 pamfinds.comcnx-software.comtomshardware.com+22 min
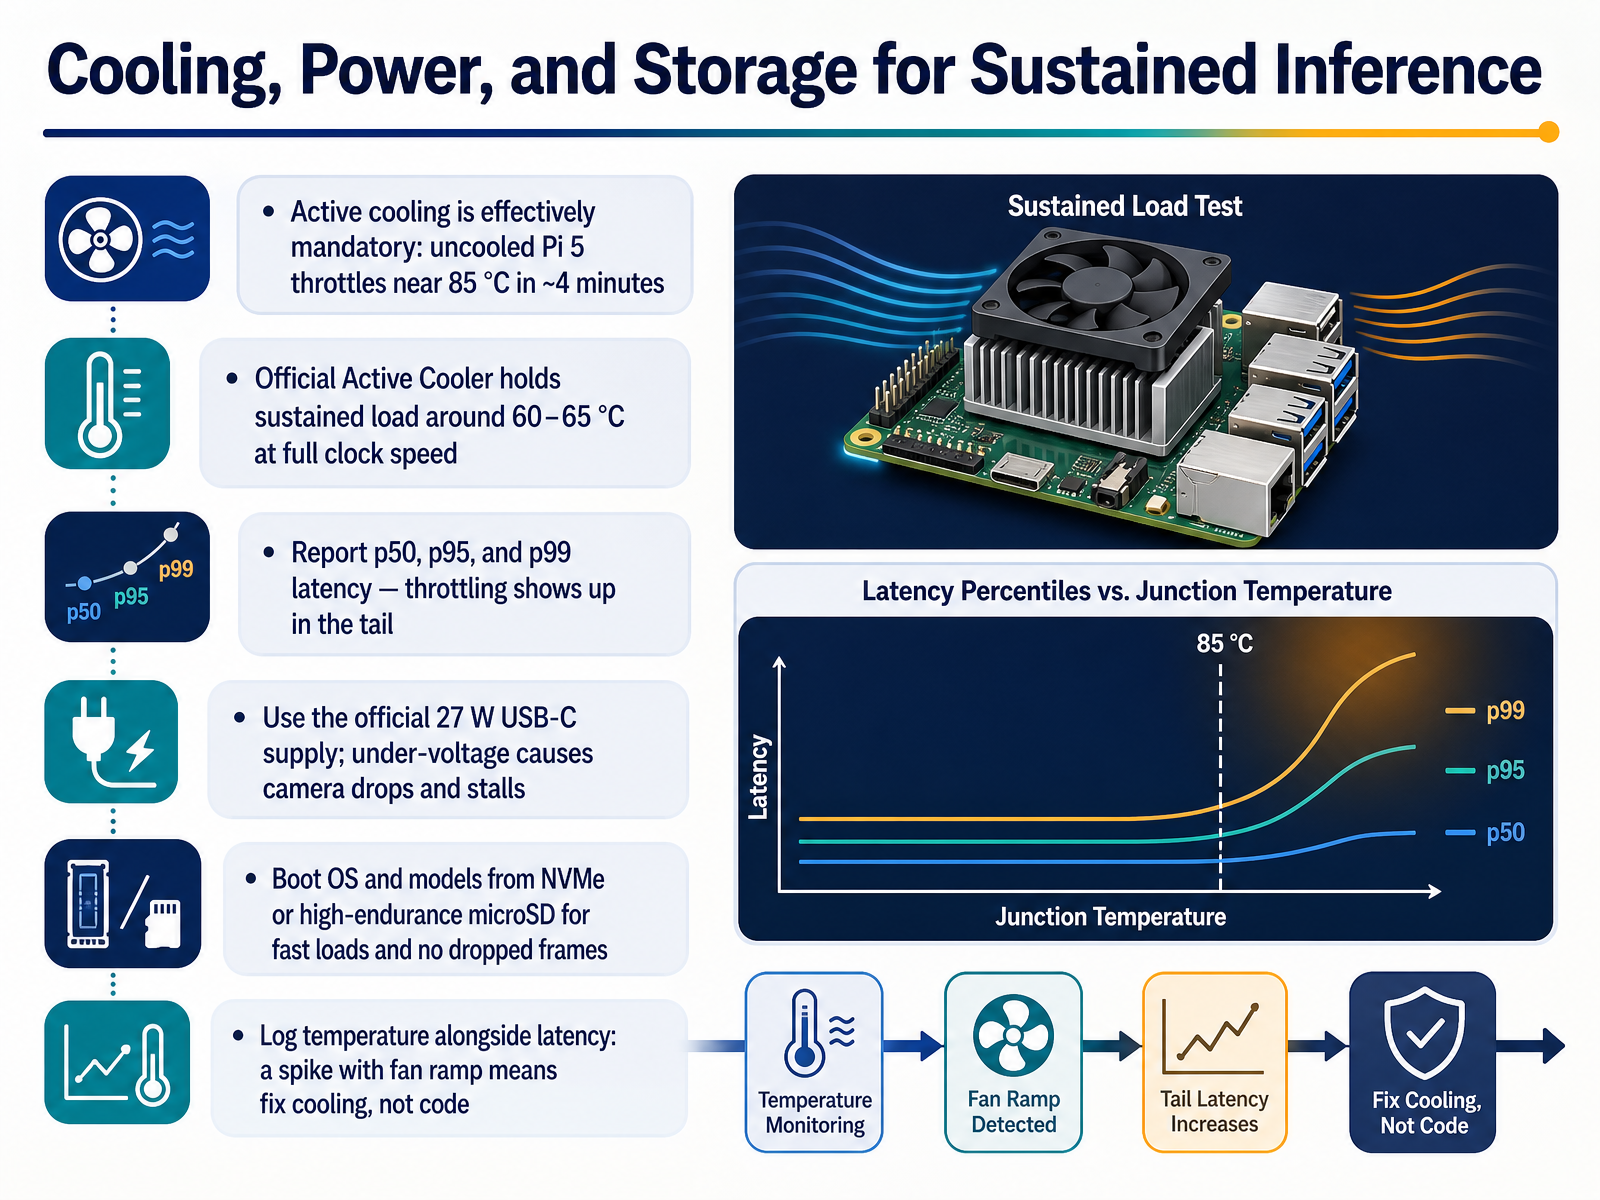
 - 03Cooling, Power, and Storage for Sustained InferenceNow that we've framed the workflow, let's talk about keeping the Pi alive under sustained inference. Active cooling is effectively mandatory on a Raspberry Pi 5. Uncooled, the CPU hits the eighty-five degree thermal limit in about four minutes, and then it throttles. The official Active Cooler holds sustained load around sixty to sixty-five degrees at full clock speed. Next, power. Use the official twenty-seven watt USB-C supply. An under-voltage supply causes camera drops and stalls. For storage, boot the OS and your models from NVMe or a high-endurance microSD card, so model loads stay fast and frames don't drop. Now, measure the right thing. Report p50, p95, and p99 latency, not just the mean. Throttling shows up in the tail, exactly when it hurts. Before you move on, log temperature alongside latency. If a latency spike lines up with the fan ramping up, fix cooling, not code. That pairing is the single most useful diagnostic here. Let's move on to setting up Raspberry Pi OS and the ML runtime stack.
 raspberrypi.comsingularitymoments.comfuturion.blog+22 min
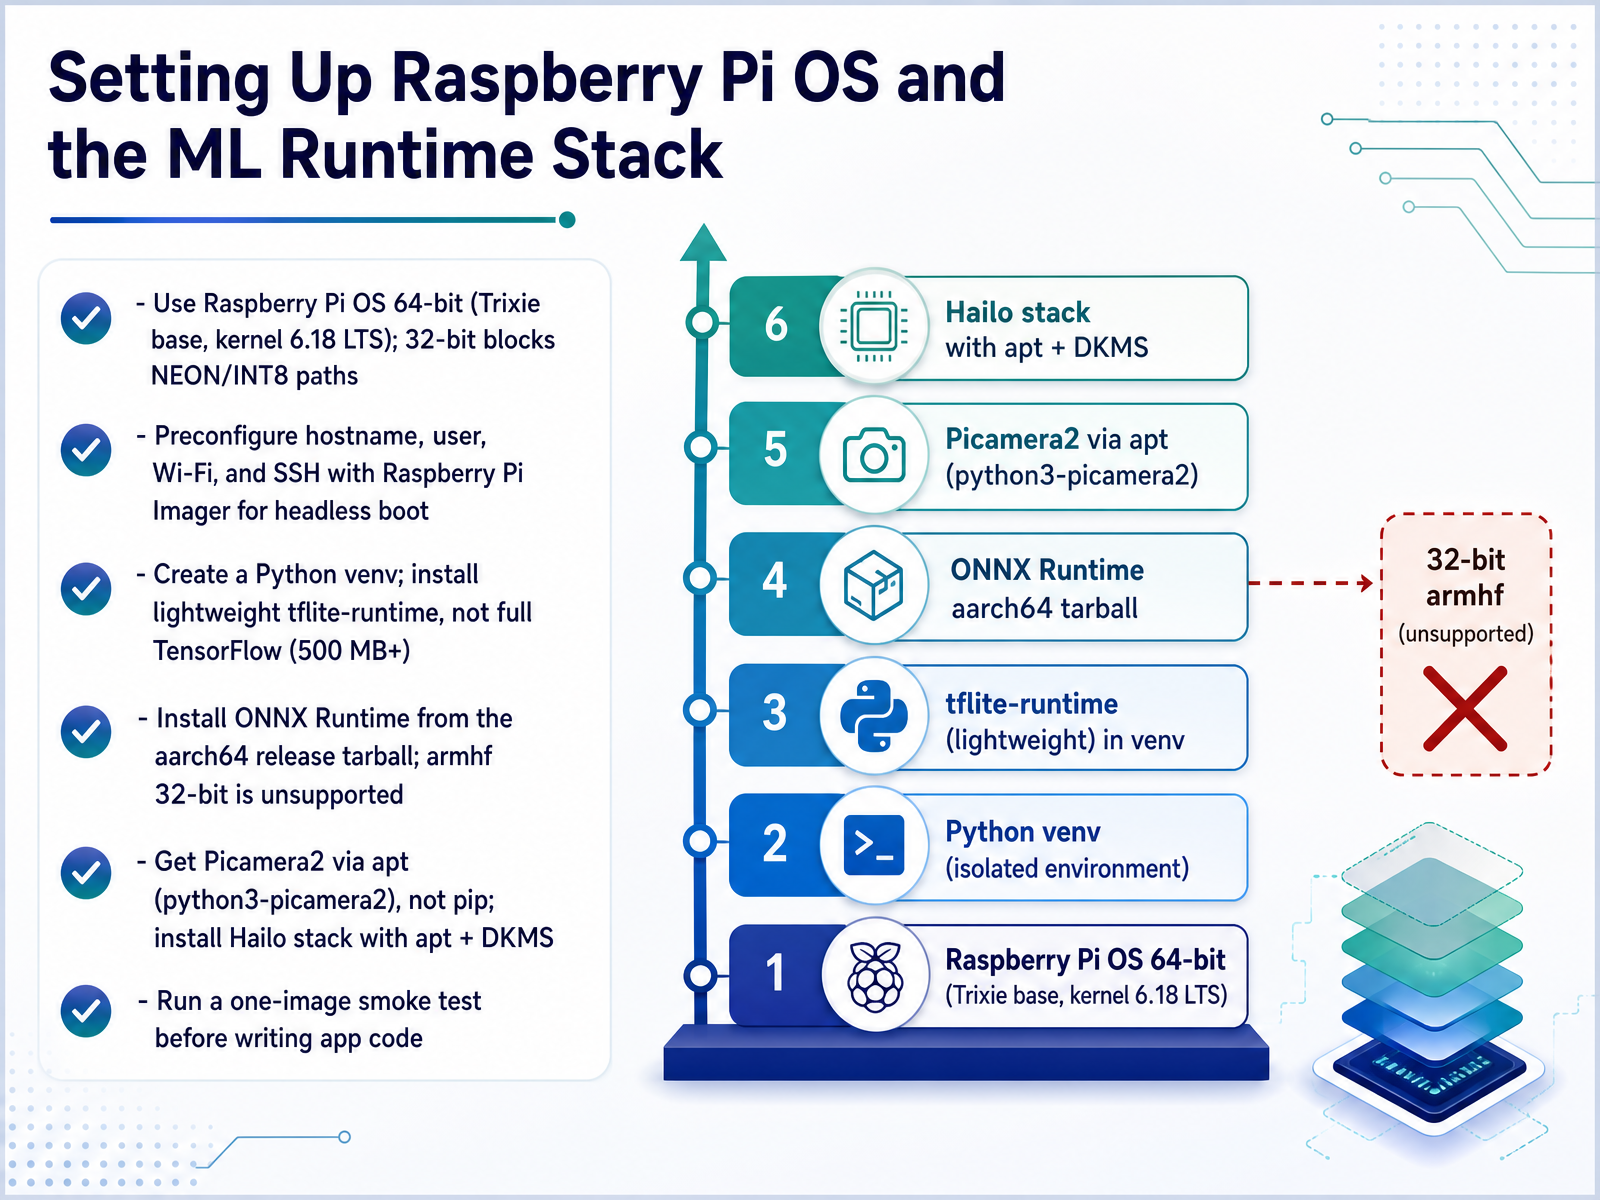
 - 04Setting Up Raspberry Pi OS and the ML Runtime StackNow let's set up the operating system and ML runtime. Flash Raspberry Pi OS 64-bit, the Trixie base with the six point eighteen long-term support kernel. Stay on 64-bit, because the 32-bit build blocks the NEON and INT8 fast paths we depend on. In Raspberry Pi Imager, preconfigure hostname, user, Wi-Fi, and SSH, so the board boots headless. Next, create a Python virtual environment. Install lightweight tflite-runtime, not full TensorFlow, which costs over five hundred megabytes. Then grab the ONNX Runtime aarch64 release tarball and copy the shared libraries into place. Note that 32-bit armhf is unsupported, so check that uname reports aarch64. Get Picamera2 through apt as python3-picamera2, not pip, so versions match libcamera. For a Hailo accelerator, install the stack with apt and DKMS, since the driver now builds against your kernel. Before you move on, run a one-image smoke test. Load a model, infer on a single photo, and check the output. Only then start writing app code. Next, we'll look at capturing images, audio, and sensor data on the device.
 raspberrypi.comhackster.iolinuxgratis.com+22 min
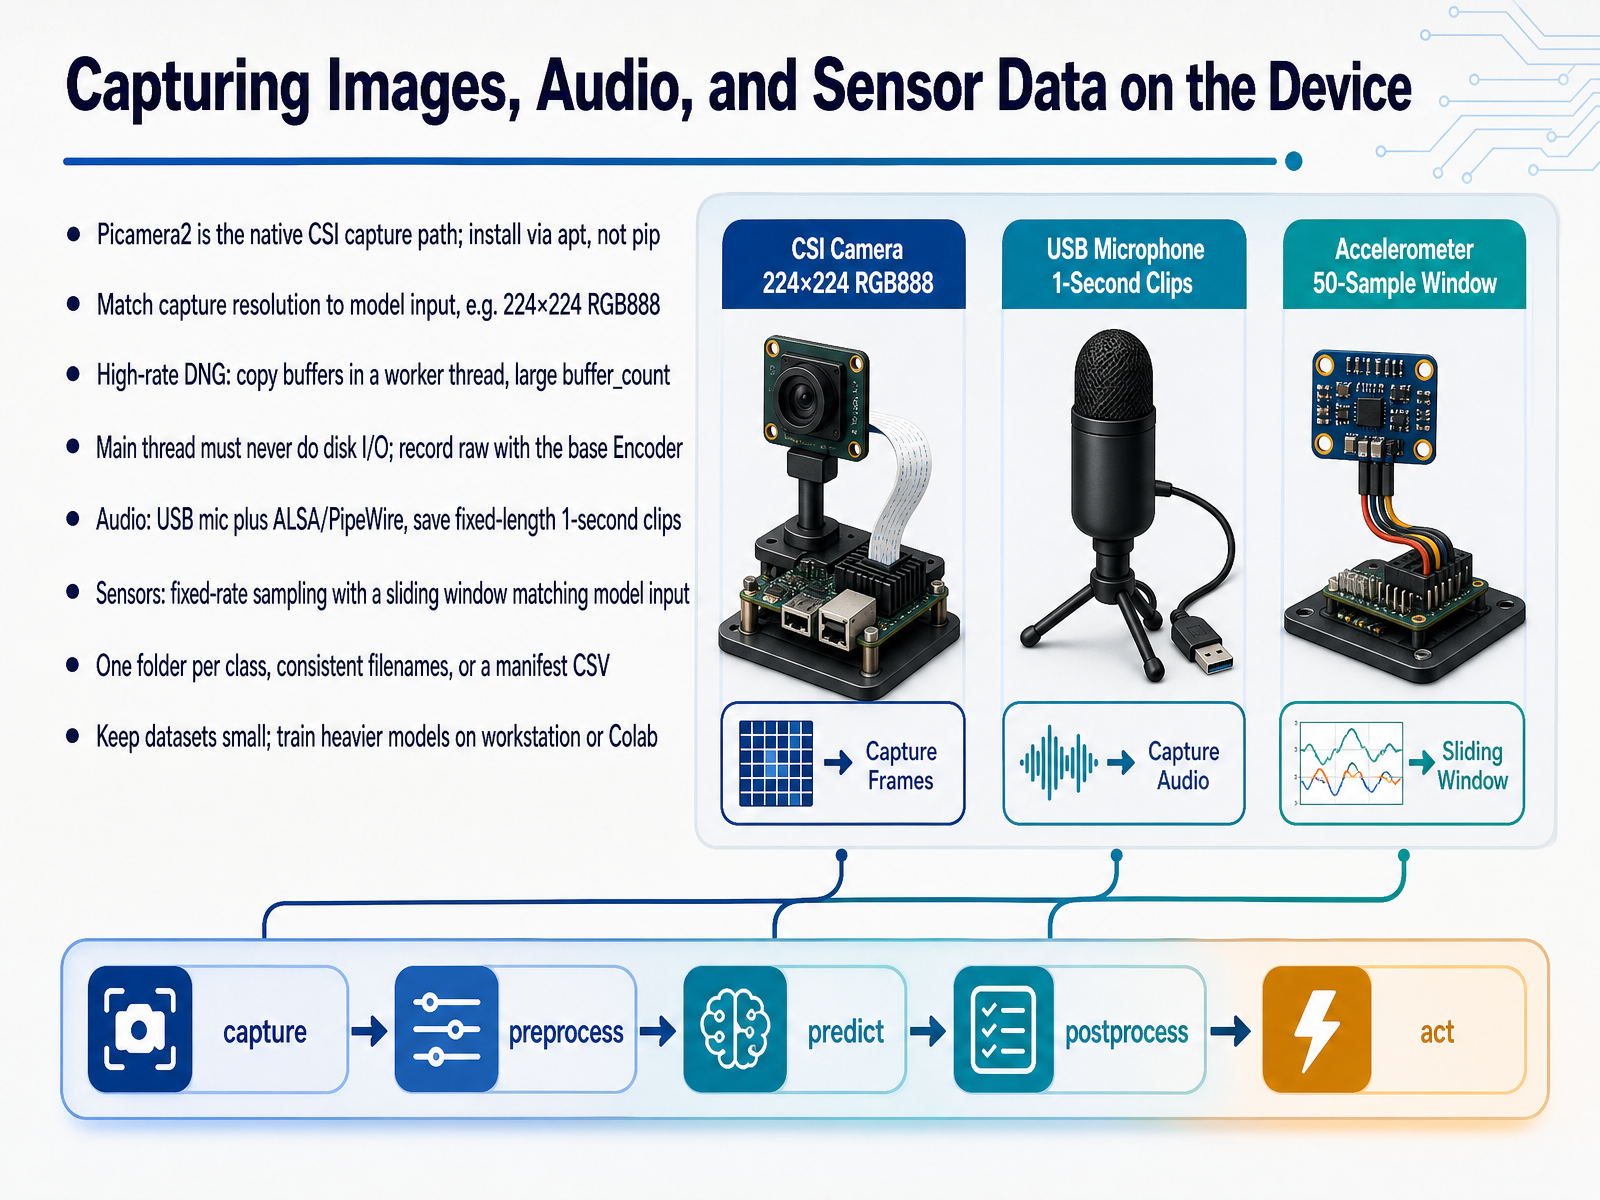
 - 05Capturing Images, Audio, and Sensor Data on the DeviceNow let's capture data on the device itself. Picamera2 is the native CSI path on the Pi, so install it with apt, not pip. Apt keeps Picamera2 and libcamera in versions that are known to work together. Next, match your capture resolution to your model input. If your model takes two hundred twenty four by two hundred twenty four RGB, request exactly that from the start. It saves you a resize later. Before you move on, remember one rule: the main thread must never do disk I/O. For raw capture, use the base Encoder class, which just forwards buffers, and copy buffers inside a worker thread. Set a large buffer count to absorb slow writes. Now for DNG files. Converting a full-resolution raw buffer to DNG is slow, often several seconds per frame. So save the raw buffers first, then convert them later. For audio, use a USB microphone through ALSA or PipeWire, and save fixed-length one-second clips. For sensors, sample at a fixed rate and build a sliding window that matches your model input length. Then organize everything cleanly. One folder per class, consistent filenames, or a manifest CSV. Keep your datasets small. Train heavier models on your workstation or Colab, then deploy the result back to the Pi. Next, we'll look at selecting and training an edge-friendly model.
 github.compip.raspberrypi.comhuggingface.co+22 min
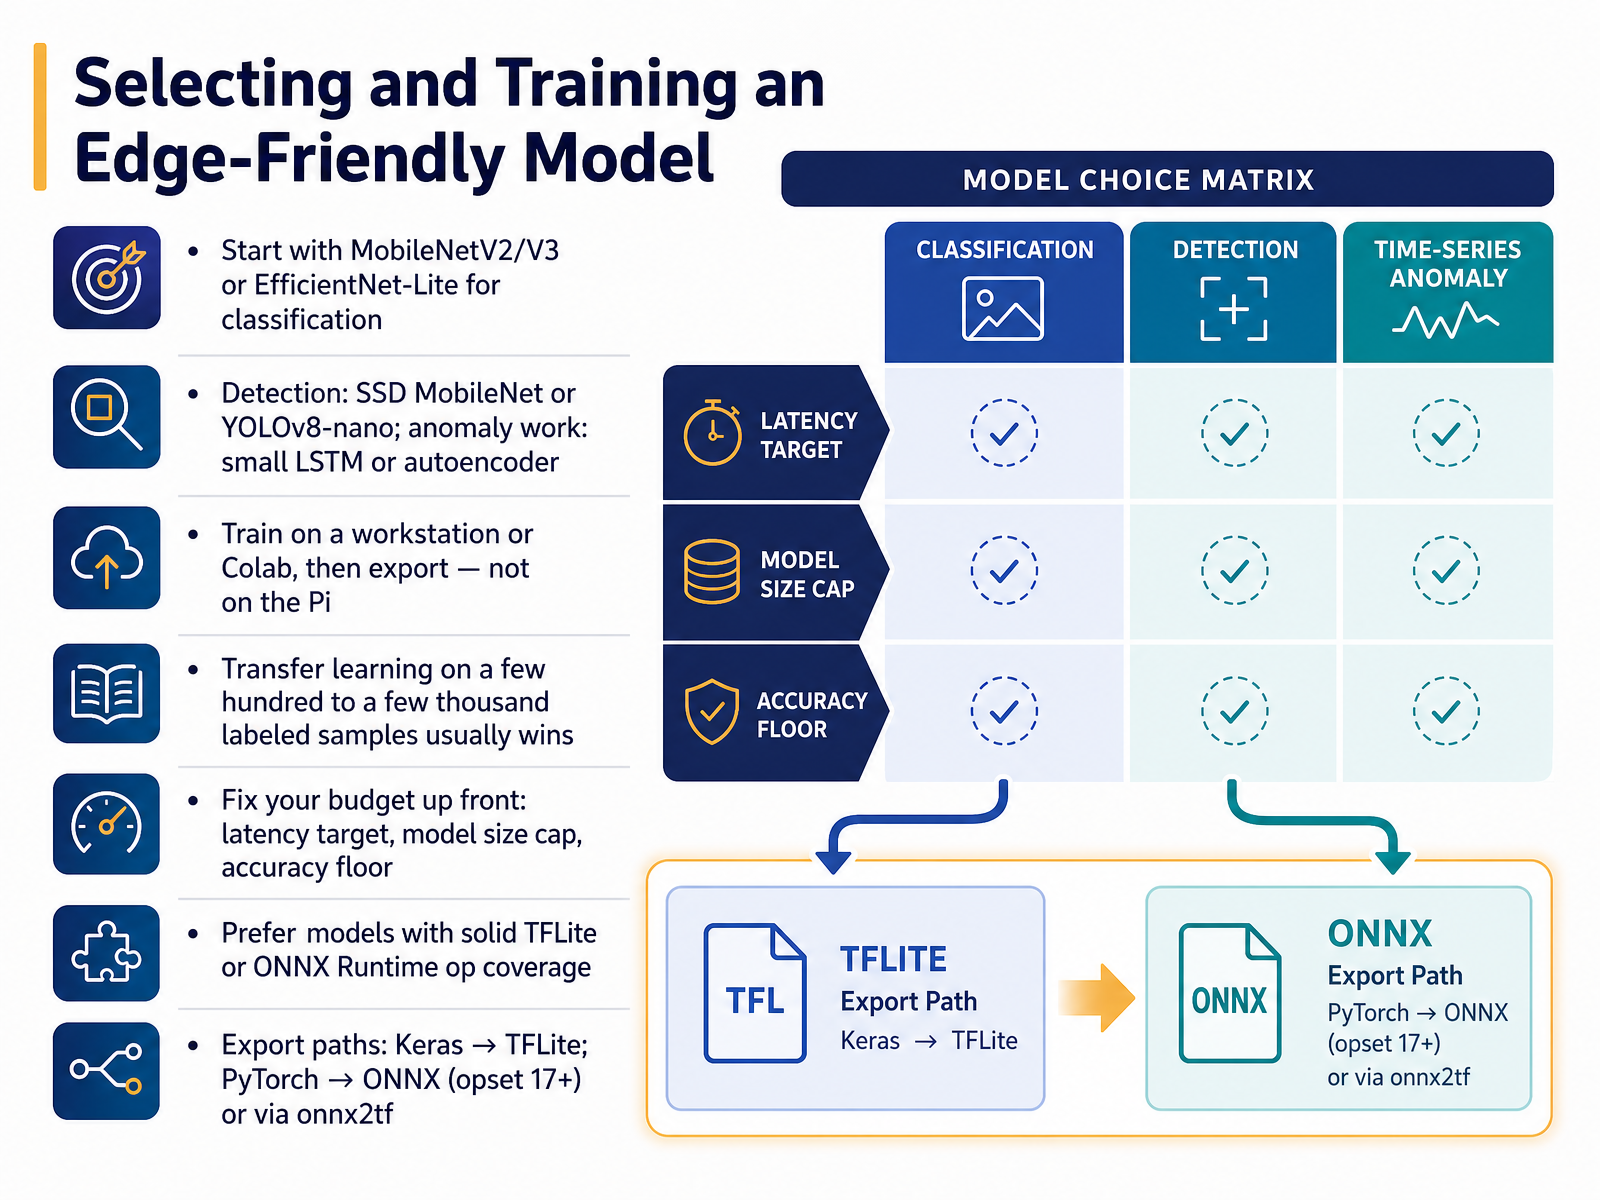
 - 06Selecting and Training an Edge-Friendly ModelNow let's choose a model we can actually run on the Pi. For classification, start with MobileNetV2, MobileNetV3, or EfficientNet-Lite. MobileNetV2 with INT8 quantization runs around twenty-four to thirty-five milliseconds on a Pi 5, so it's a safe default. If you need detection, pick SSD MobileNet or YOLOv8-nano. For anomaly work on sensor data, a small LSTM or autoencoder is enough. Here's the key rule. Train on your workstation or Colab, then export. Never train on the Pi itself. Next, use transfer learning. A few hundred to a few thousand labeled samples usually beats training from scratch. Before you move on, fix your budget up front. Set a latency target, a model size cap, and an accuracy floor. Otherwise you'll optimize forever. Check that your model has solid TensorFlow Lite or ONNX Runtime operator coverage. Unsupported ops will block you later. For export paths, Keras goes straight to TFLite. PyTorch goes to ONNX with opset seventeen or higher, or through onnx2tf if you need TFLite. Next, let's make it fast with optimization, quantization, compilation, and benchmarking.
 techbloat.com2 min
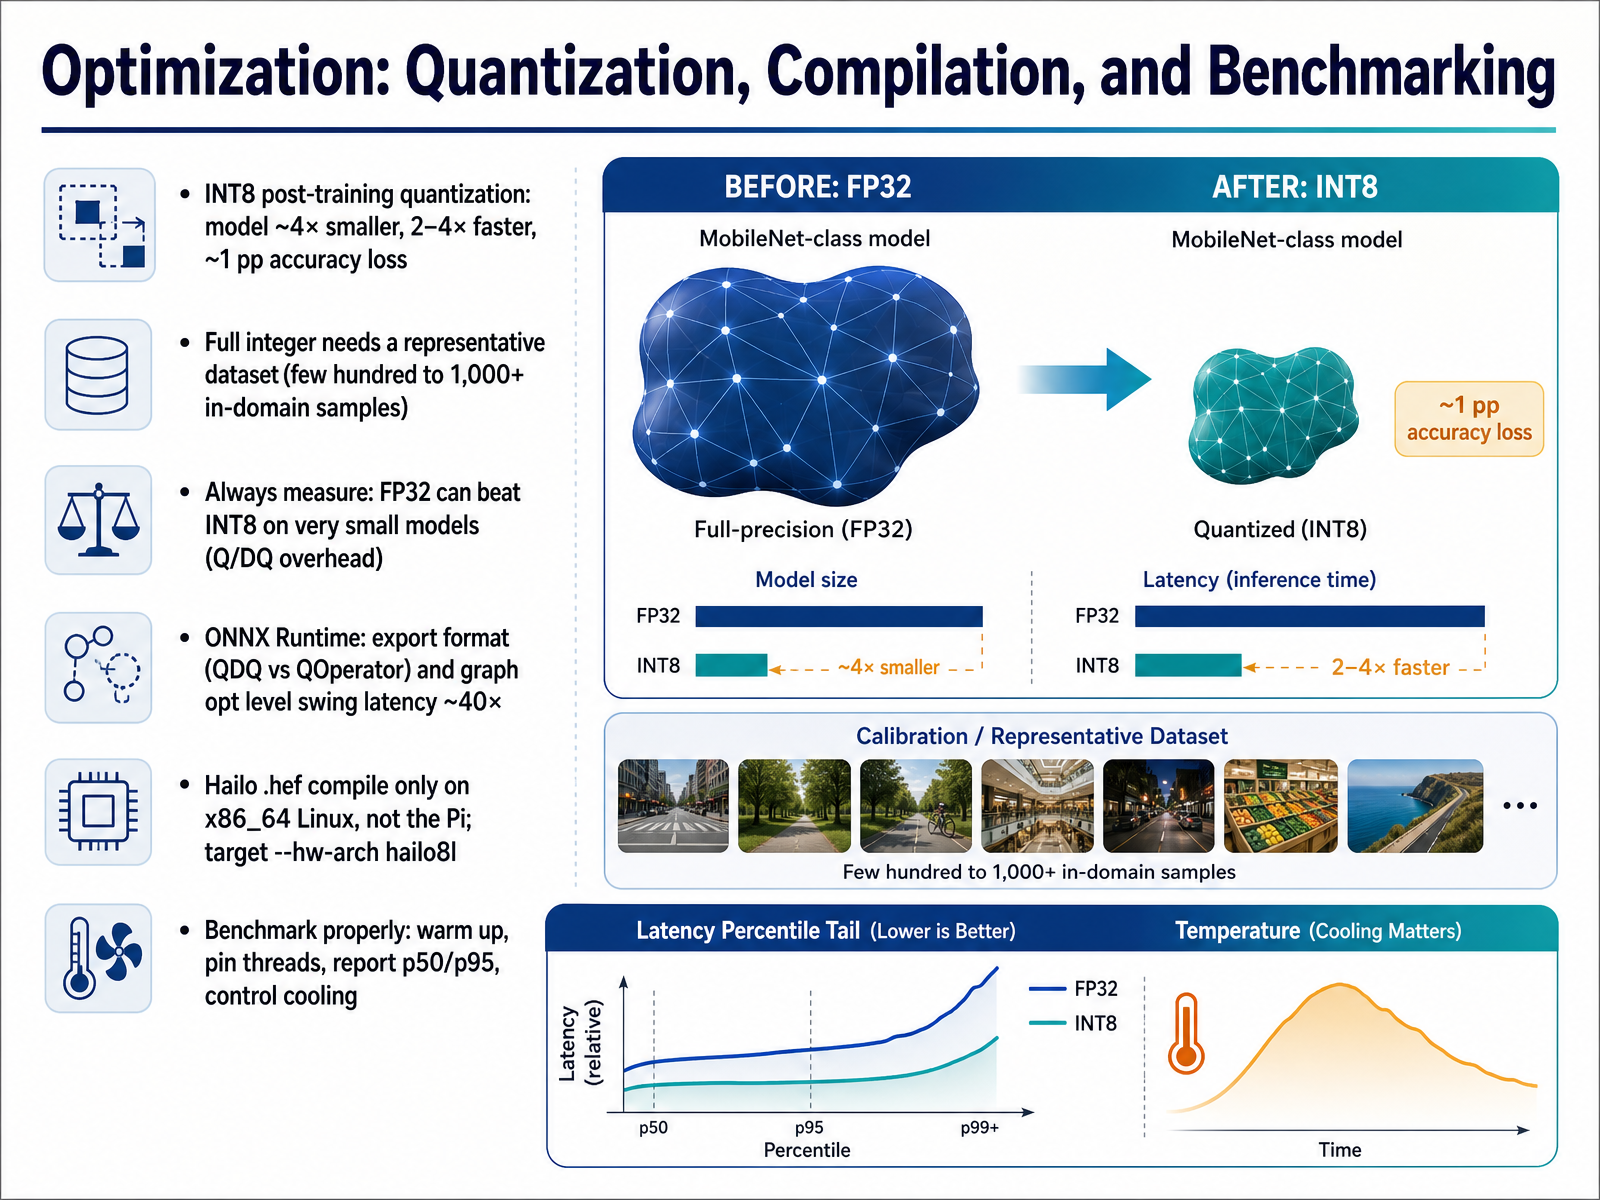
 - 07Optimization: Quantization, Compilation, and BenchmarkingNow let's optimize the model before it ever touches the Pi. First, try INT8 post-training quantization. That makes the model about four times smaller and two to four times faster, usually for around one percentage point of accuracy loss. Before you move on, know that full integer needs a representative dataset. A few hundred to one thousand in-domain samples is a good starting point. The catch: always measure. On very small models, FP32 can actually beat INT8, because quantize and dequantize overhead dominates. Next, check your ONNX Runtime settings. Export format, QDQ versus QOperator, and the graph optimization level can swing latency by roughly forty times. Now for Hailo. The .hef compile only runs on x86 64 Linux, not on the Pi itself. So target hw arch hailo8l. Finally, benchmark properly. Warm up, pin threads, report p50 and p95, and control your cooling. Next, we'll look at deploying the inference application, covering loops, threading, and GPIO.
 techbloat.com2 min
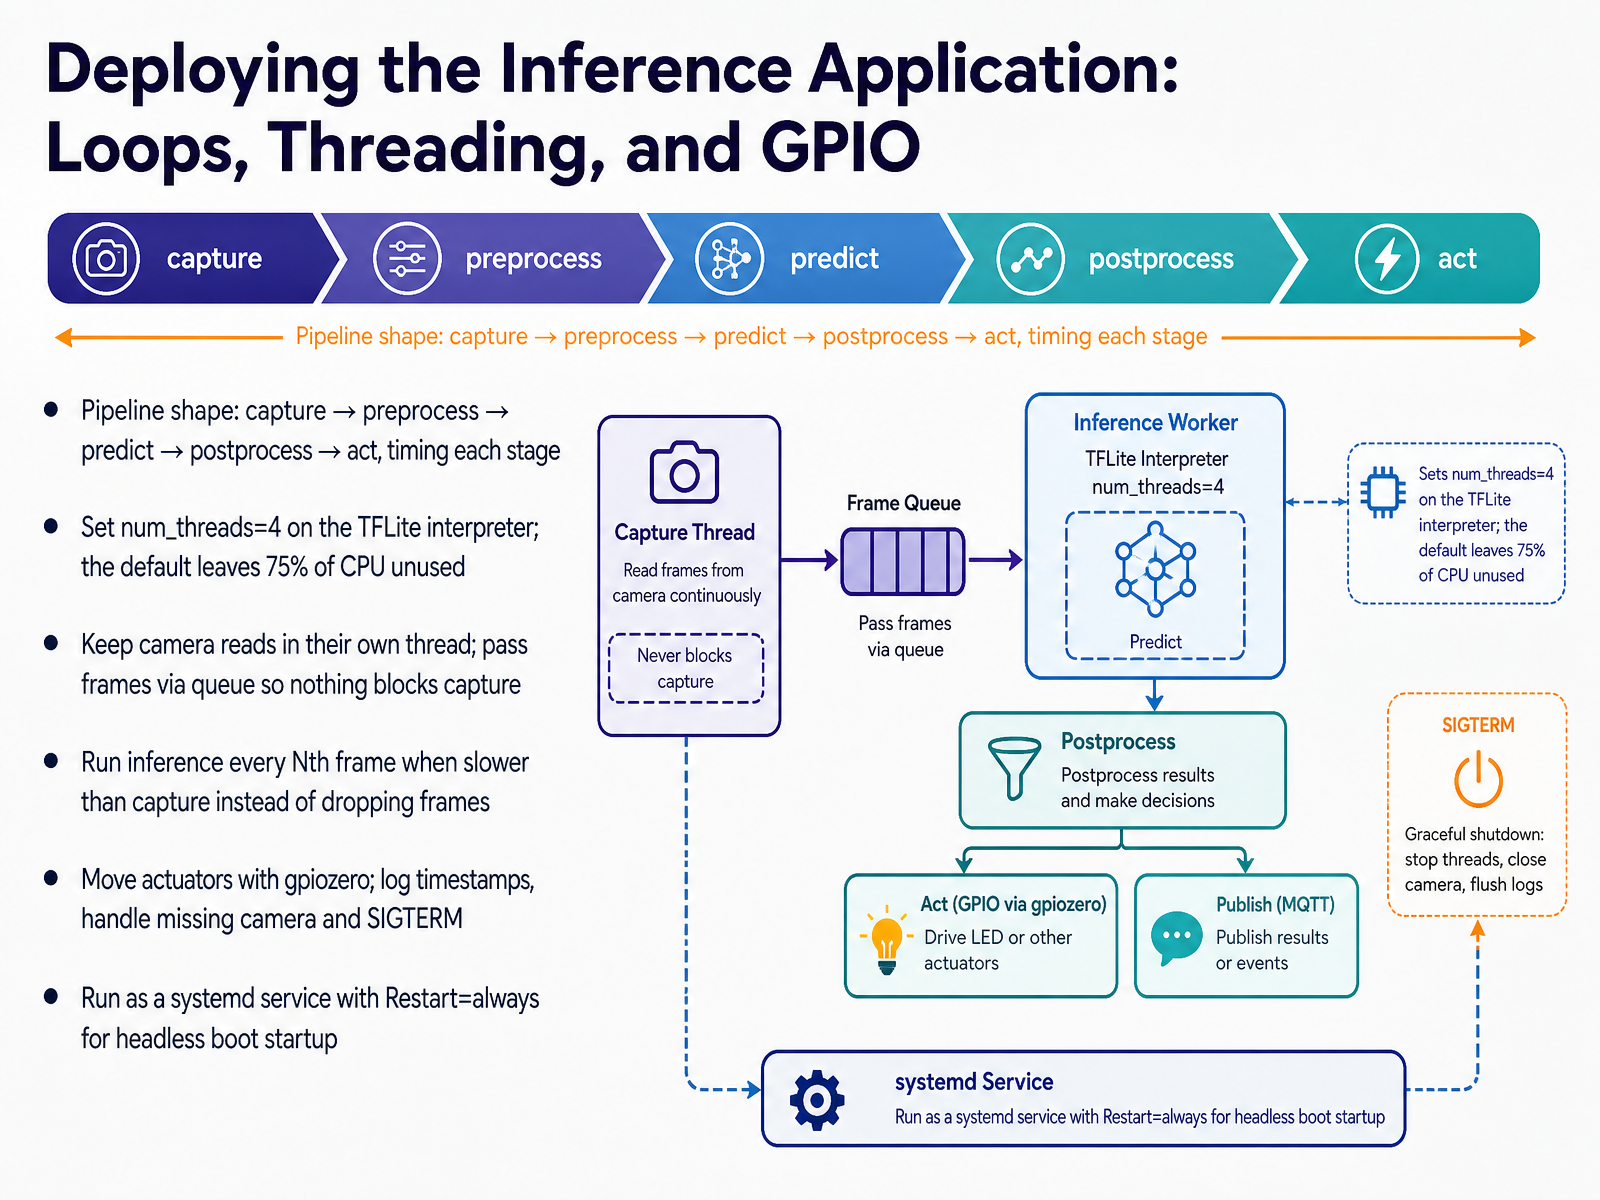
 - 08Deploying the Inference Application: Loops, Threading, and GPIONow let's deploy the inference application itself. The pipeline has five stages: capture, preprocess, predict, postprocess, then act. Time each stage separately, so you know where the milliseconds actually go. First, set num_threads equals four on your TensorFlow Lite interpreter. The default of one thread leaves seventy-five percent of your CPU unused, and on a Pi 5 that costs you real frames. Next, keep camera reads in their own thread. Pass frames through a queue, so capture never blocks behind inference. If inference is slower than capture, run it every Nth frame instead of dropping frames. That keeps your stream steady. Use gpiozero for your actuators. Log timestamps for every stage, and handle two failure points directly: a missing camera and a SIGTERM signal on shutdown. Before you move on, test that your process exits cleanly. Finally, run everything as a systemd service with Restart equals always, so it starts headless on boot and recovers from crashes. Quick takeaway: thread your capture, cap your threads, and supervise the process. Next, we'll look at containerizing and service-managing the edge app.
 techbloat.com2 min
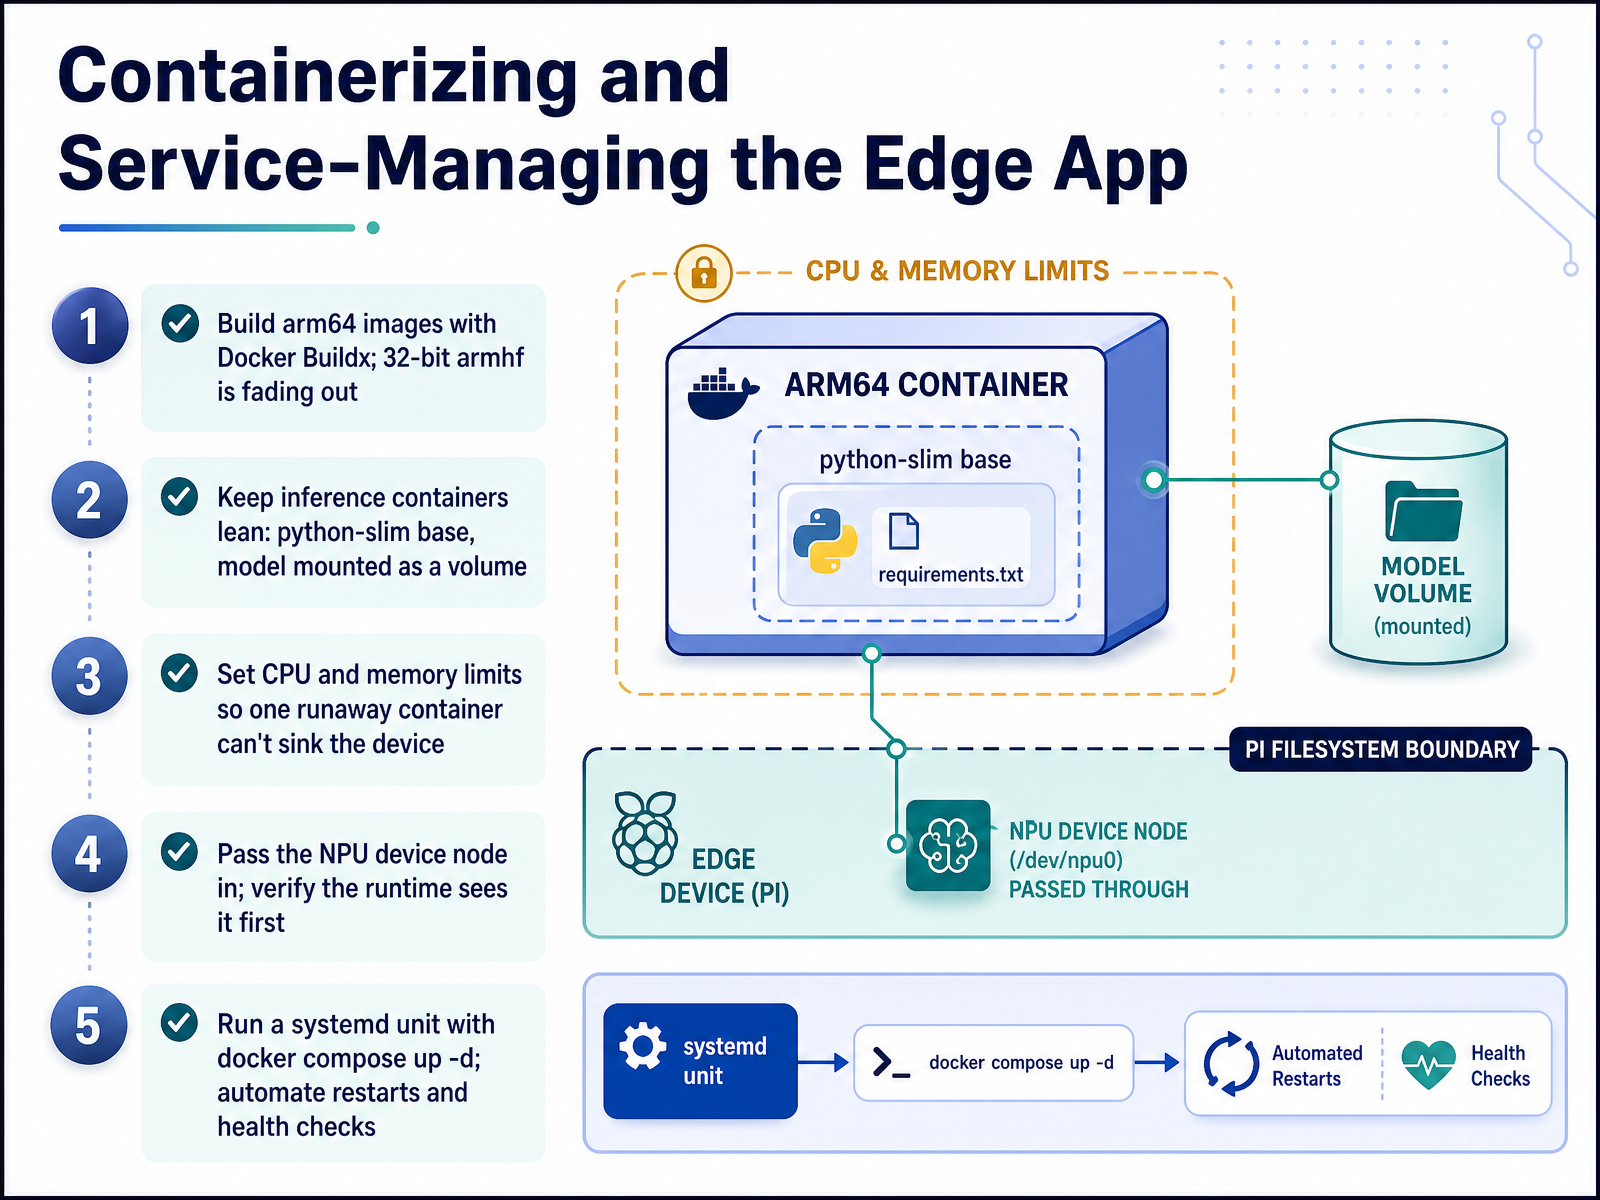
 - 09Containerizing and Service-Managing the Edge AppNow let's containerize our edge app and keep it running. Build for arm64 with Docker Buildx. The older 32-bit armhf images are fading out, so do not build on them. Next, keep inference containers lean. Start from a python-slim base and mount your model as a volume instead of baking it in. Before you move on, set CPU and memory limits. That way one runaway container cannot sink the whole device. Then pass the NPU device node into the container, and verify the runtime actually sees it. Run the NPU provider check first. A quick workaround: if the device is missing, confirm the vendor driver is loaded on the host before restarting. Finally, supervise the stack with a systemd unit running docker compose up dash d. Add restarts and a simple health check endpoint. That gives you clean startup, automatic recovery, and rollback if a release goes bad. In short, lean images, hard limits, verified NPU access, and systemd supervision. That is what makes your prototype production-minded. Next, we will look at monitoring, update strategy, and fleet maintenance.
 techbloat.com2 min
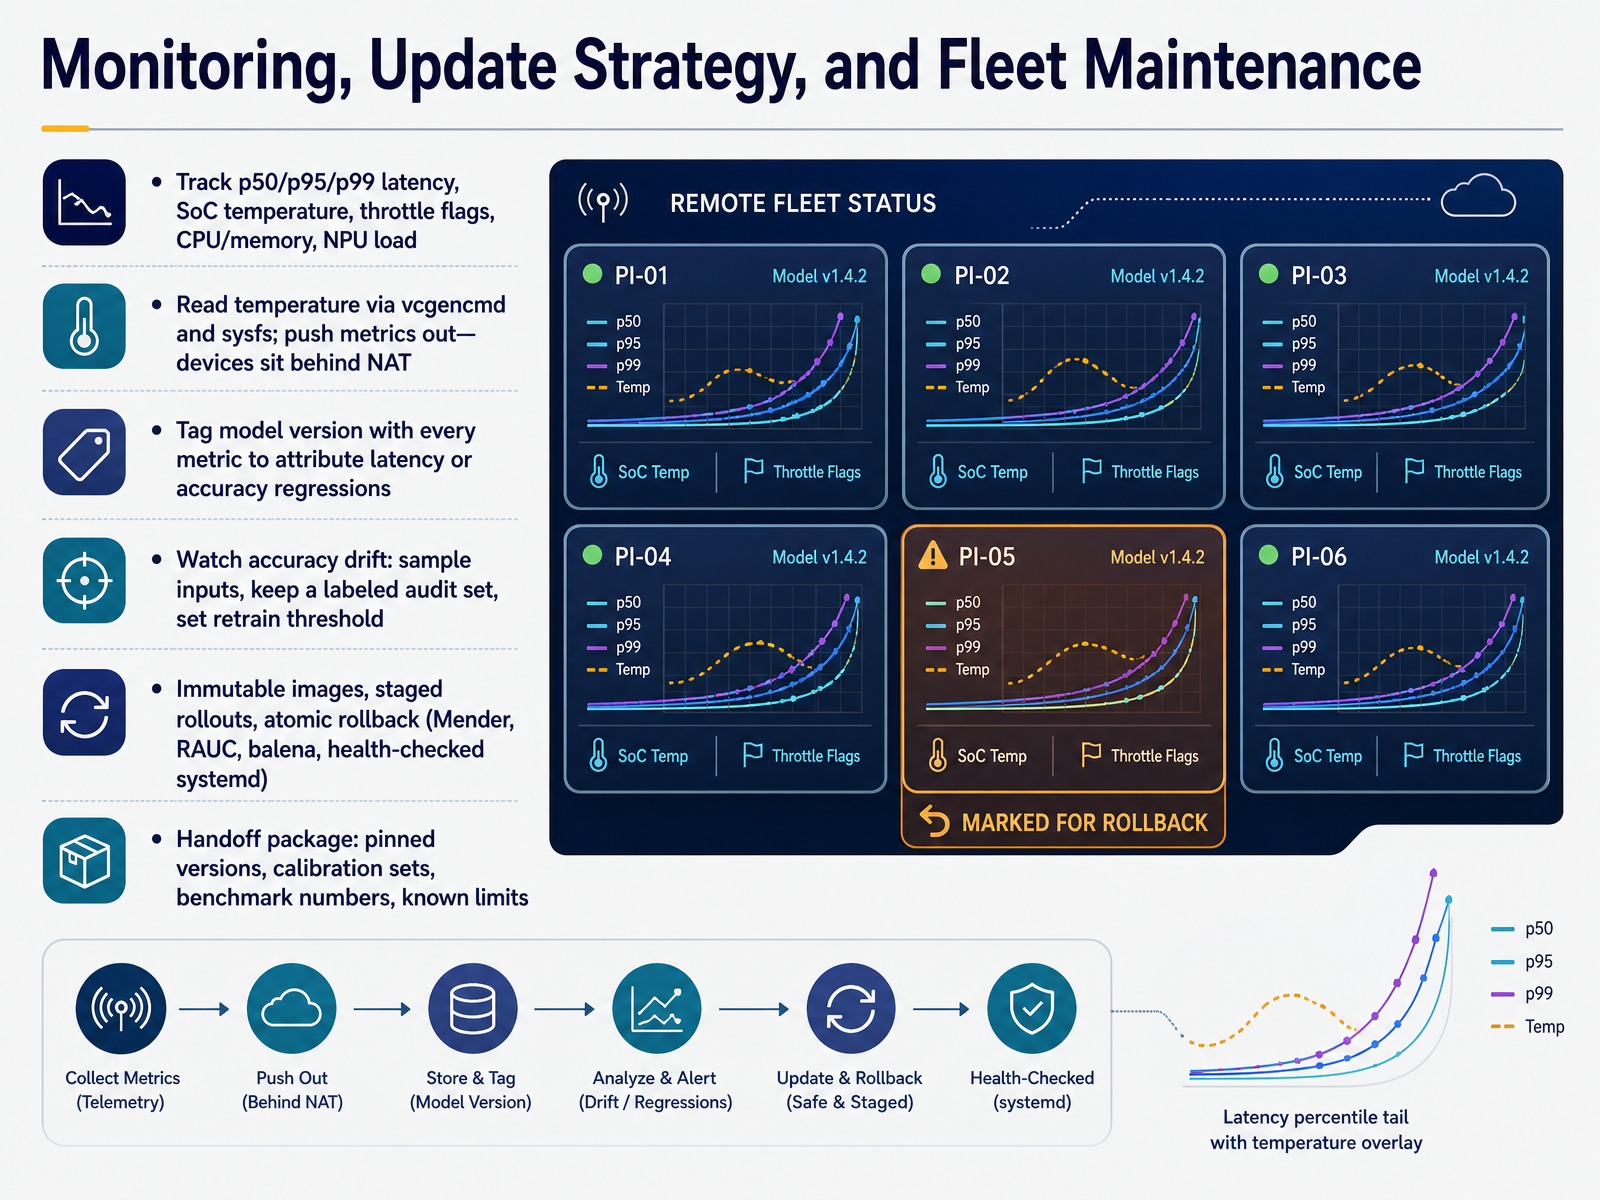
 - 10Monitoring, Update Strategy, and Fleet MaintenanceNow let's talk about keeping devices healthy once they're deployed. We track latency at the fiftieth, ninety-fifth, and ninety-ninth percentiles, plus SoC temperature, throttle flags, CPU and memory, and NPU load. Read temperature with vcgencmd and sysfs. Next, push those metrics out. Devices usually sit behind NAT, so scraping them directly won't work. Use Prometheus remote write or a push gateway. Tag every metric with the model version. Otherwise, you can't attribute a latency or accuracy regression to a specific model. Before you move on, watch for accuracy drift. Sample inputs, keep a small labeled audit set, and set a retrain threshold. For updates, use immutable images, staged rollouts, and atomic rollback. Tools like Mender, RAUC, and balena handle this well. Health-checked systemd units work too. Finally, package a clean handoff: pinned versions, calibration sets, benchmark numbers, and known limits. Next, we'll build a real-time image classifier with the Pi Camera.
 2 min
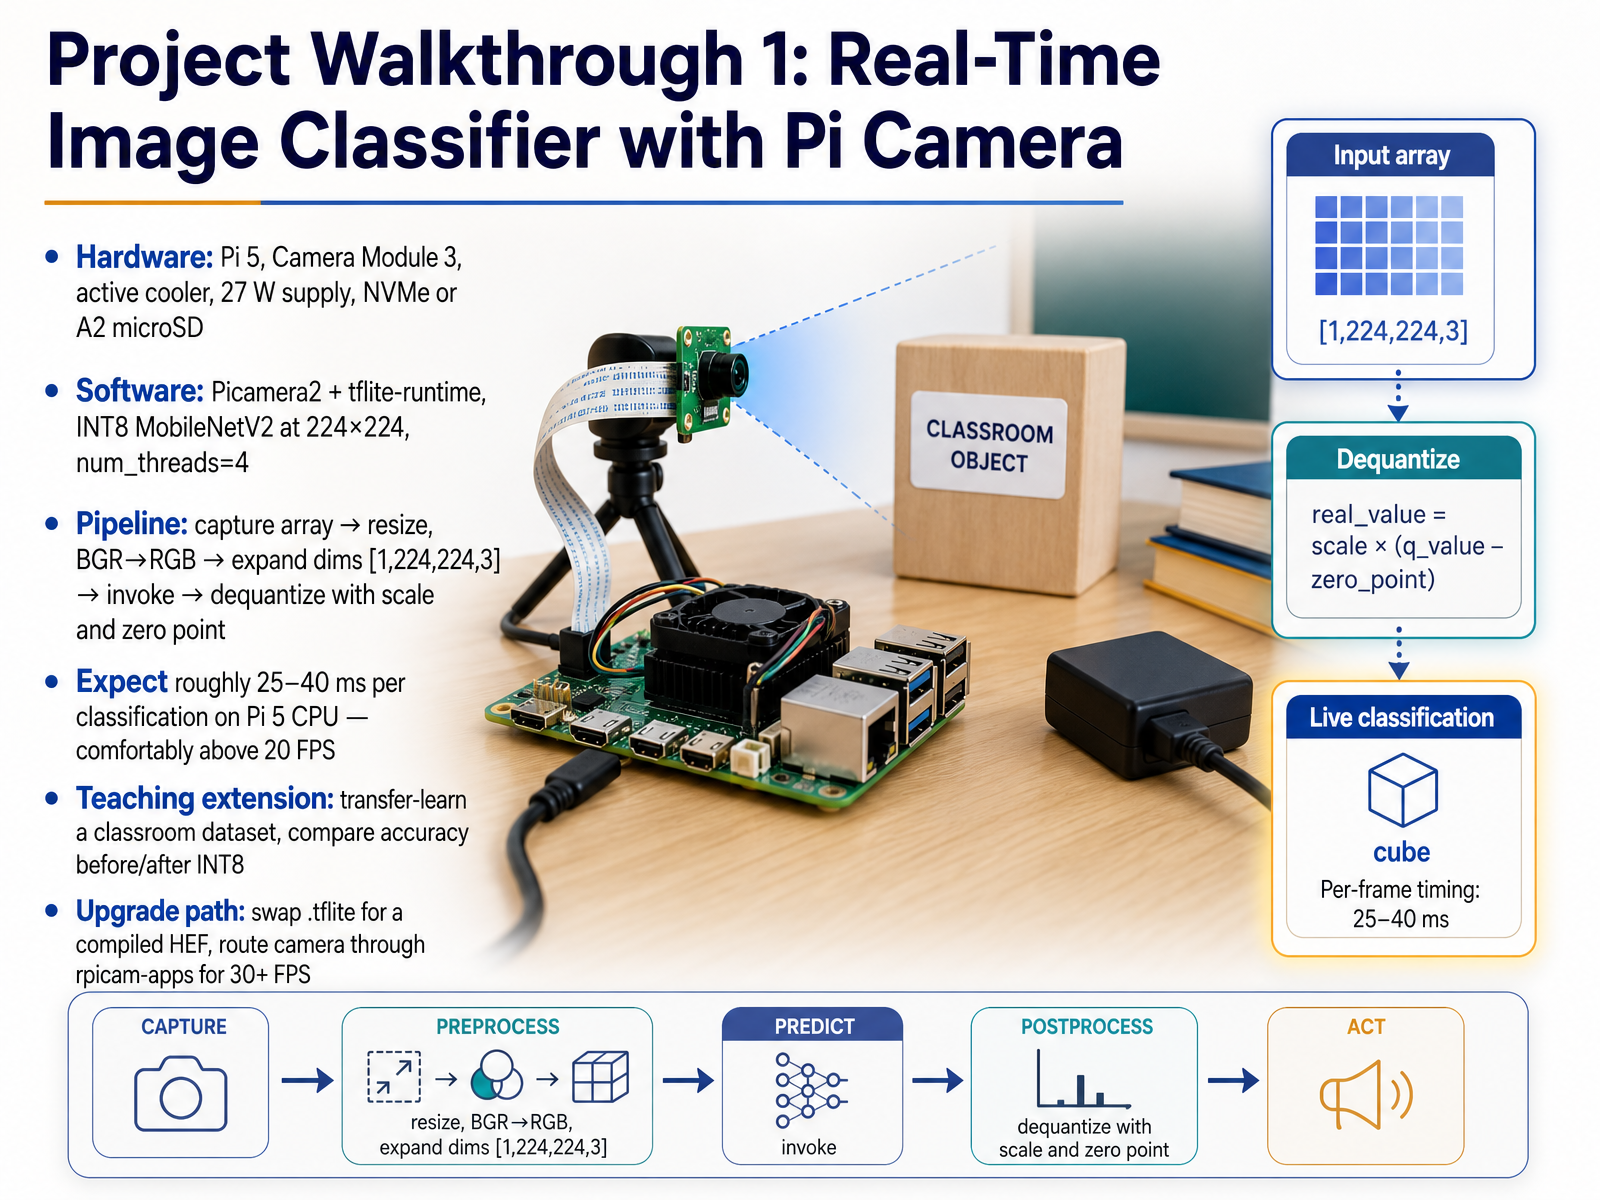
2 min - 11Project Walkthrough 1: Real-Time Image Classifier with Pi CameraNow we will build our first complete project: a real-time image classifier with the Pi Camera. For hardware, use a Raspberry Pi 5, a Camera Module 3, the active cooler, and the official twenty seven watt supply. Storage matters too, so use an NVMe drive or an A2 microSD card. For software, we install Picamera2 and tflite-runtime. We will run an INT8 quantized MobileNetV2 at two hundred twenty four by two hundred twenty four, with num_threads set to four. Next, wire up the pipeline carefully. Capture a frame as an array, resize it, convert BGR to RGB, then expand dimensions to one by two hundred twenty four by two hundred twenty four by three. Invoke the interpreter, then dequantize the output using its scale and zero point. On the Pi 5 CPU, expect roughly twenty five to forty milliseconds per classification. That is comfortably above twenty frames per second. If your first inference looks slow, warm up the interpreter before you measure. For a teaching extension, transfer-learn a classroom dataset, then compare accuracy before and after INT8. As an upgrade path, swap the dot tflite for a compiled HEF, and route the camera through rpicam-apps for thirty frames per second or more. Next, we move to Project Walkthrough 2: Keyword Spotting and Project 3: Sensor Anomaly Detection.
 techbloat.com2 min
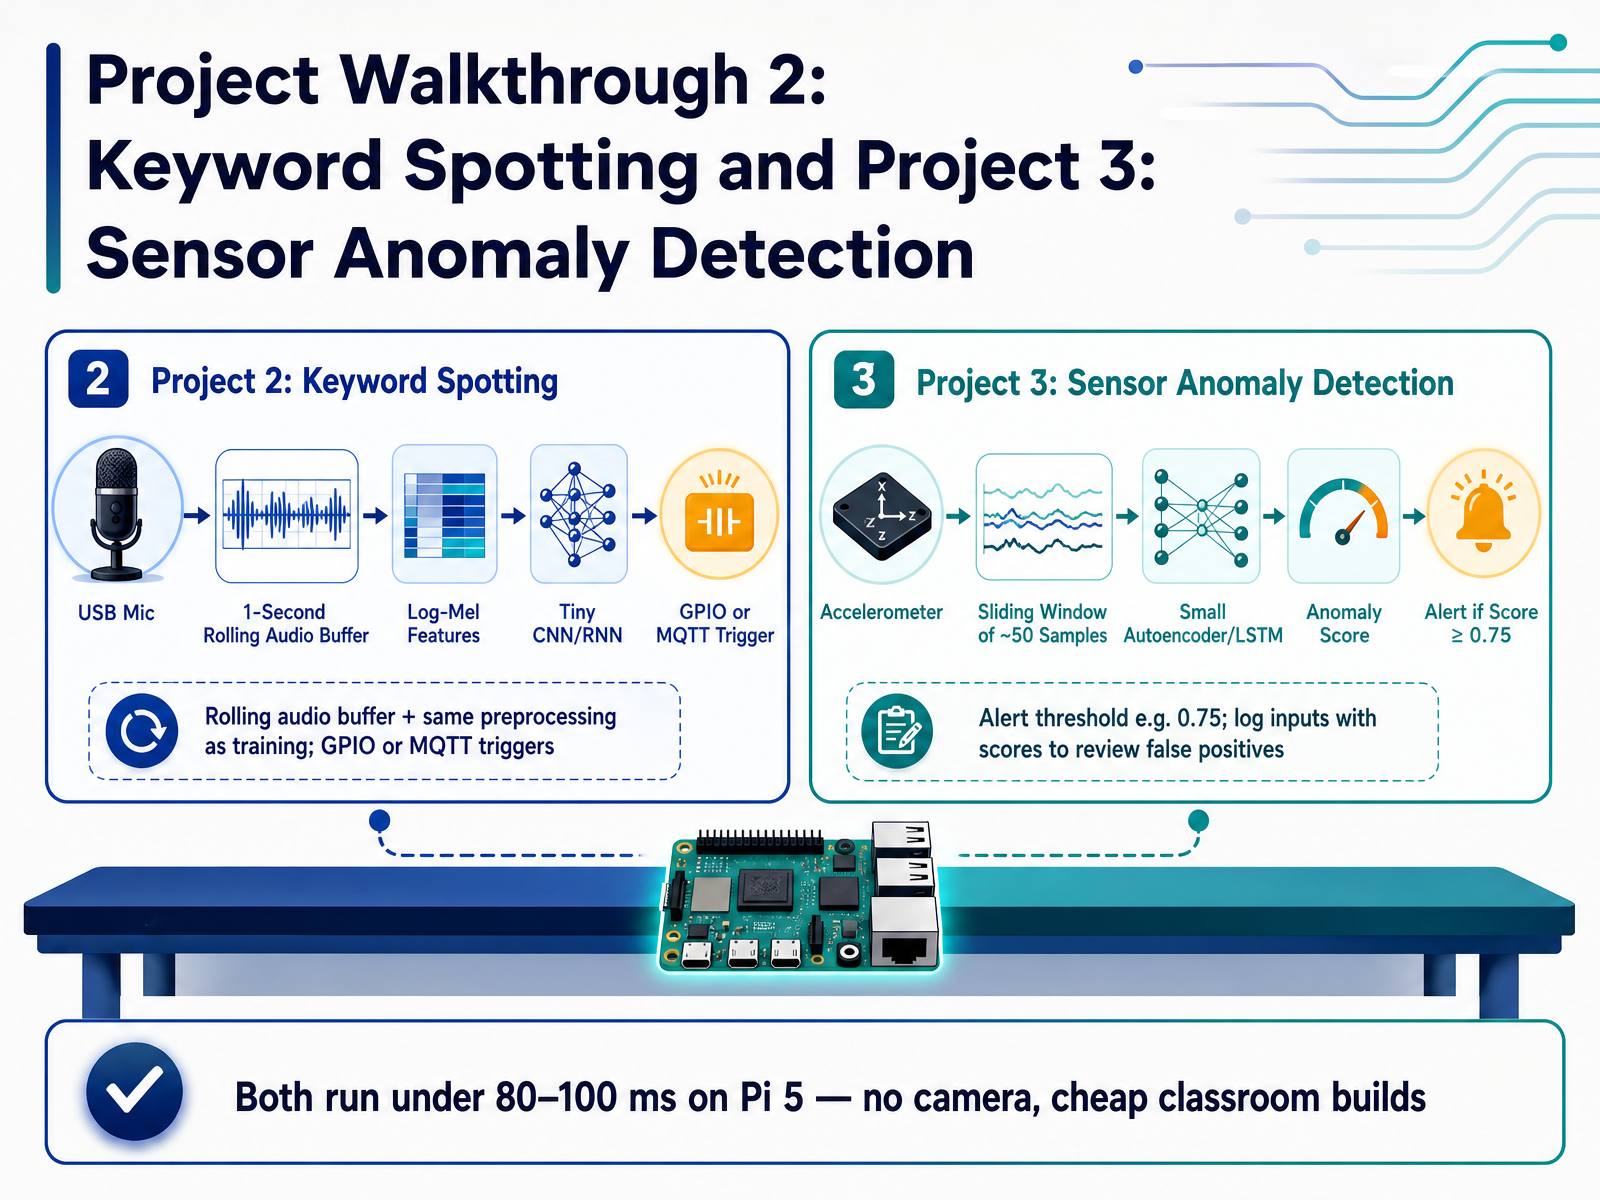
 - 12Project Walkthrough 2: Keyword Spotting and Project 3: Sensor Anomaly DetectionLet's move into two more builds. First, keyword spotting. You capture one second clips from a USB microphone, compute log-mel features, and feed them to a tiny CNN or RNN. In deployment, keep a rolling audio buffer and reuse the exact same preprocessing you trained with. That match matters. Then trigger on a match through GPIO or an MQTT message. Next, our sensor anomaly detector. We slide a window of about fifty samples into a small autoencoder or LSTM. It outputs an anomaly score between zero and one. Set your alert threshold around zero point seven five. Before you move on, log every input alongside its score, so you can review false positives later. Here's the good news. Both run under eighty to one hundred milliseconds on a Raspberry Pi 5. No camera needed, which keeps these builds cheap for a classroom. Just remember, noisier data means more false triggers, so tune slowly. Next, we'll cover common pitfalls, troubleshooting, and a decision checklist.
 2 min
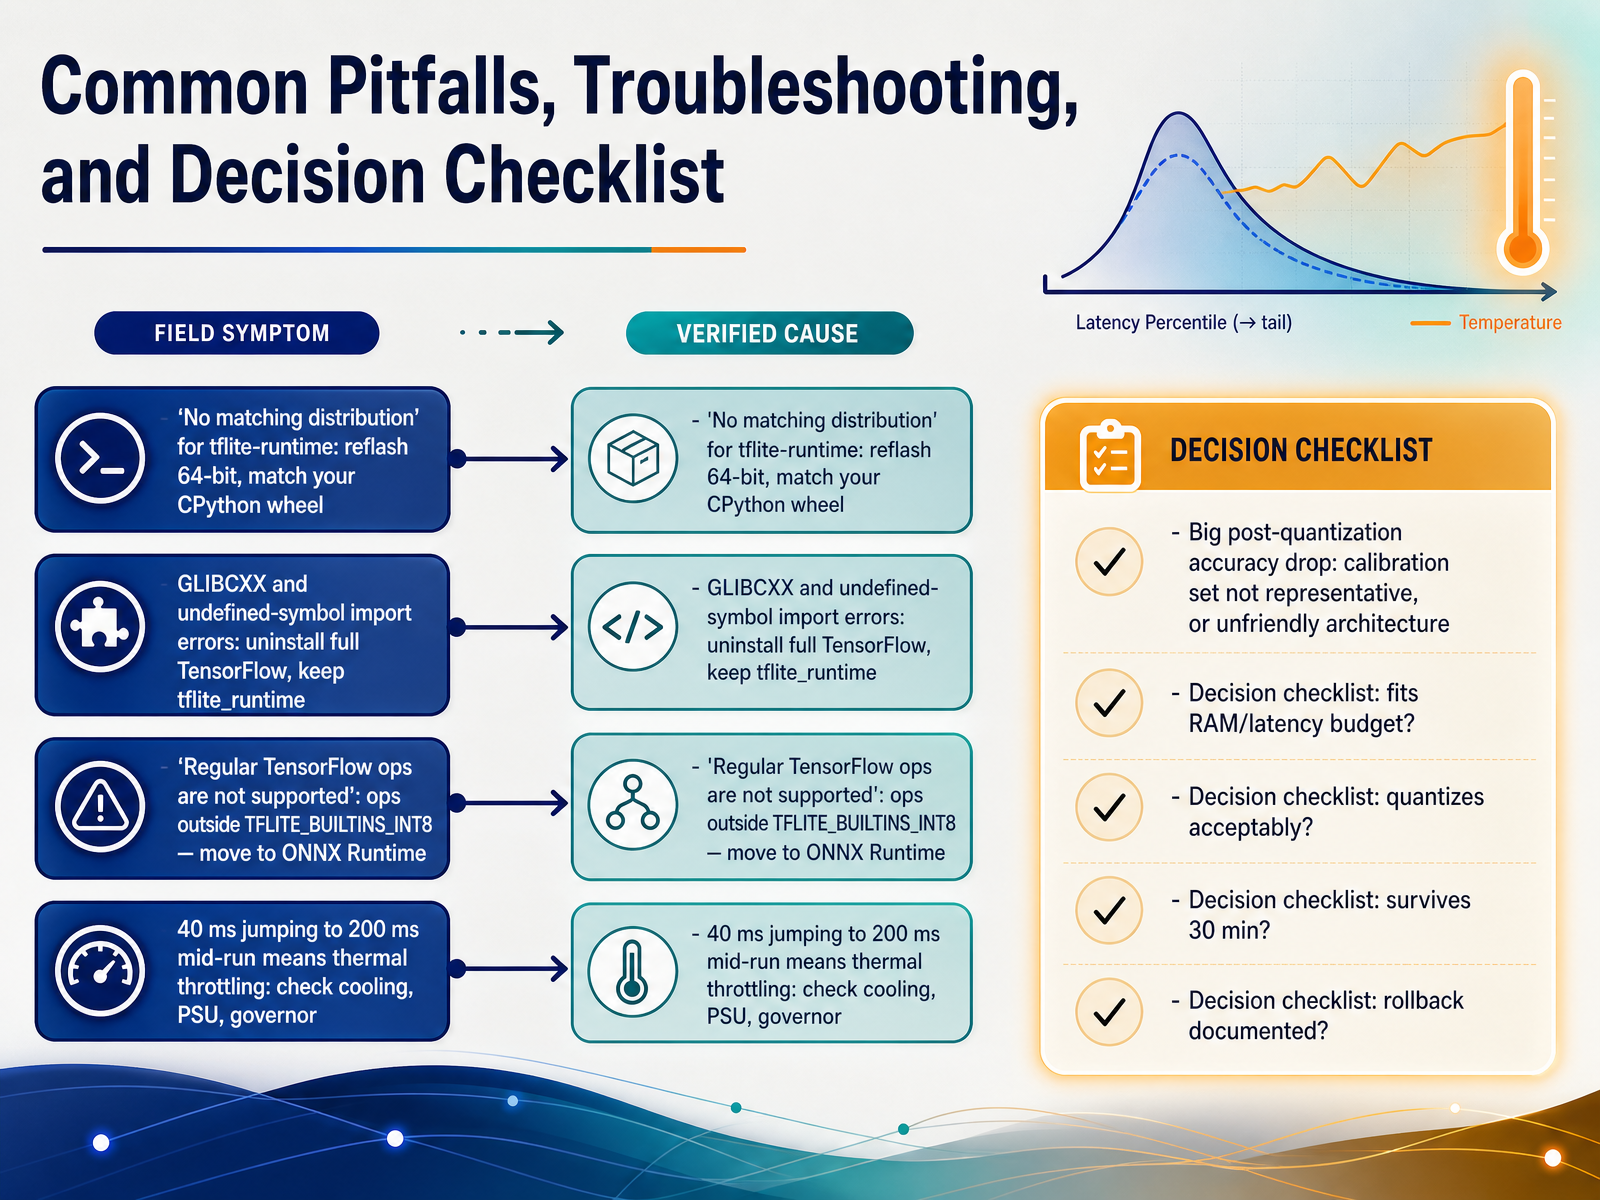
2 min - 13Common Pitfalls, Troubleshooting, and Decision ChecklistLet's talk about the failures you will actually hit. First, if pip says no matching distribution for tflite-runtime, you are probably on a 32-bit image or the wrong CPython wheel. Reflash 64-bit and match the wheel to your Python version. Next, if you see GLIBCXX errors or undefined symbols on import, uninstall full TensorFlow and keep only tflite_runtime. Both installed at once is a common conflict. If you get regular TensorFlow ops are not supported, your model uses ops outside TFLITE_BUILTINS_INT8. Move that model to ONNX Runtime instead of fighting the converter. Then watch your latency. If forty milliseconds jumps to two hundred mid-run, that is thermal throttling. Check cooling, power supply, and set the governor to performance. Finally, a big accuracy drop after quantization usually means your calibration set is not representative, or the architecture quantizes poorly. Before you move on, run the checklist. Does it fit your RAM and latency budget? Does it quantize acceptably? Does it survive thirty minutes? And is rollback documented? Next, we will look at where to go from here.
 techbloat.com2 min
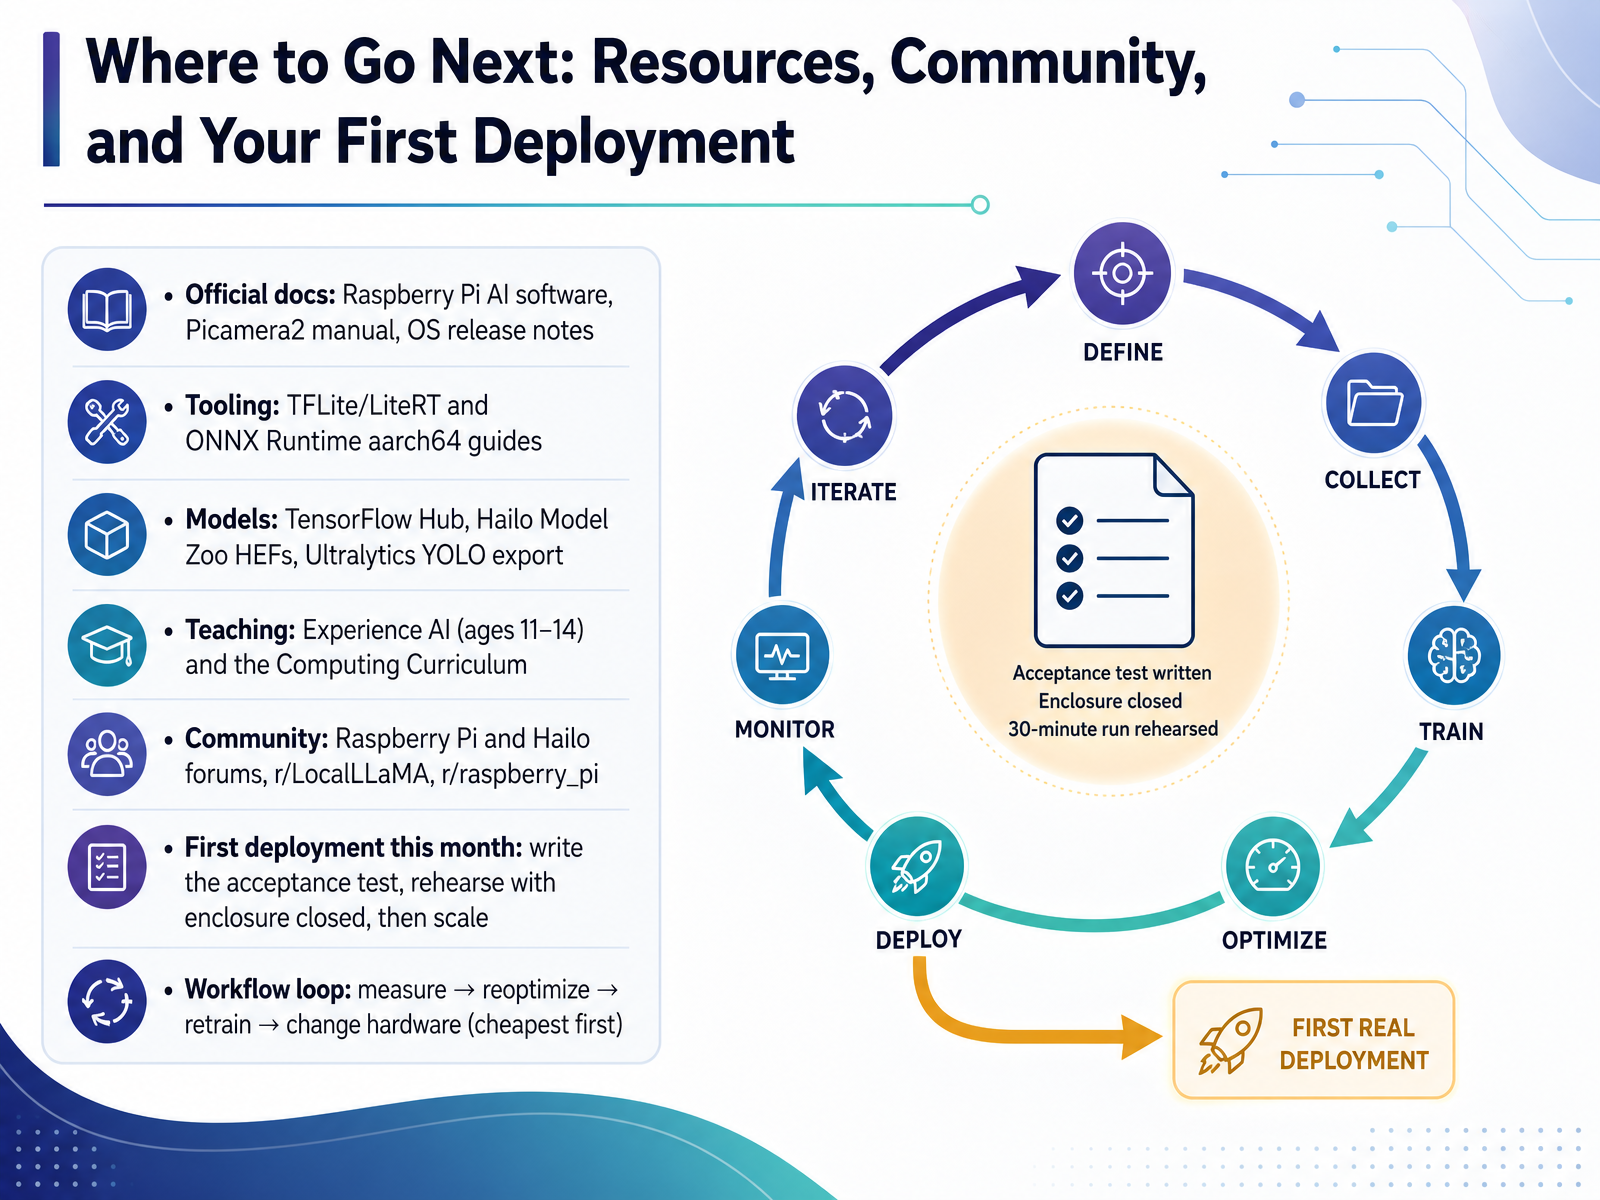
 - 14Where to Go Next: Resources, Community, and Your First DeploymentLet's close this out with where to go next, and how to ship your first deployment this month. Keep the official Raspberry Pi AI software docs, the Picamera2 manual, and the OS release notes bookmarked. Before you move on, note one key tradeoff: Hailo support now depends on DKMS kernel drivers, so a driver downgrade is possible without downgrading the kernel. Next, your tooling: TensorFlow Lite and ONNX Runtime both publish aarch64 guides. For models, start with TensorFlow Hub, the Hailo Model Zoo HEFs, or an Ultralytics YOLO export. Remember the hard limit: compiling your own HEF requires an x86 Linux machine, not the Pi. For teaching, Experience AI covers ages eleven to fourteen. The community lives on the Raspberry Pi and Hailo forums, plus r slash LocalLLaMA and r slash raspberry pi. Here is your first deployment this month. Write the acceptance test first. Rehearse with the enclosure closed, because heat changes your latency tails. Then scale up. Finally, keep the loop running: measure, reoptimize, retrain, and only then change hardware, cheapest option first. Thanks for building along with me. You now have a real workflow, so go measure something this week and just get it deployed.
 raspberrypi.comhackster.iolinuxgratis.com+22 min
Take the deck with you
Download this course as a file — free, no sign-up needed.
- PDF handoutEvery slide page, ready to print or share.15 pages · 4.4 MBDownload
- Narrated PowerPointThe deck that presents itself — every slide carries the digital human's narration video.15 pages · 17.5 MBDownload
- PowerPoint slidesThe full deck as a .pptx — open it in PowerPoint, Keynote, or Google Slides.15 pages · 4.2 MBDownload
Free to use in your own training — please keep the PersonWise credit page at the end.
Have your own deck? Turn it into a course
Sources consulted
Web sources consulted while building this course.
- Raspberry Pi AI Kit (Hailo-8L) Review (2026) | PAM Finds — pamfinds.com
- Raspberry Pi AI HAT+ 2 review - A 40 TOPS AI accelerator tested with Computer Vision, LLM, and VLM workloads - CNX Software — cnx-software.com
- Raspberry Pi AI HAT+ 2 Review: The brains and the brawn — tomshardware.com
- Raspberry Pi's new AI HAT adds 8GB of RAM for local LLMs — jeffgeerling.com
- Raspberry Pi AI HAT+ (26 TOPS): What It Actually | SpecPicks — specpicks.com
- https://www.raspberrypi.com/news/heating-and-cooling-raspberry-pi-5/ — raspberrypi.com
- Keeping the Pi 5 Chill: The Raspberry Pi Active Cooler Reviewed for Local AI Enthusiasts — singularitymoments.com
- Edge Inference on Raspberry Pi 5: Thermal Reality vs Marketing — futurion.blog
- Benchmarking TensorFlow and TensorFlow Lite on Raspberry Pi — techbloat.com
- Raspberry Pi 5 Thermal Showdown: Active Cooler vs Passive Cooling | by Mahinsha Nazeer | Medium — medium.com
- Software updates for Raspberry Pi AI products — raspberrypi.com
- Raspberry Pi OS "Trixie" Gets Hailo-Based AI Kit, AI HAT+ ... — hackster.io
- Raspberry Pi OS 2026-06-18 Ships with Linux Kernel 6.18 LTS | LinuxGratis — linuxgratis.com
- Release notes — downloads.raspberrypi.com
- AI software - Raspberry Pi Documentation — raspberrypi.com
- raspberrypi/picamera2 — github.com
- The Picamera2 Library — pip.raspberrypi.com
- raw2event/raw2event · Datasets at Hugging Face — huggingface.co
- [HOW-TO] Fastest way to capture continuous full resolution .dng files — github.com
- picamera2 v0.3.37 — pypi.org