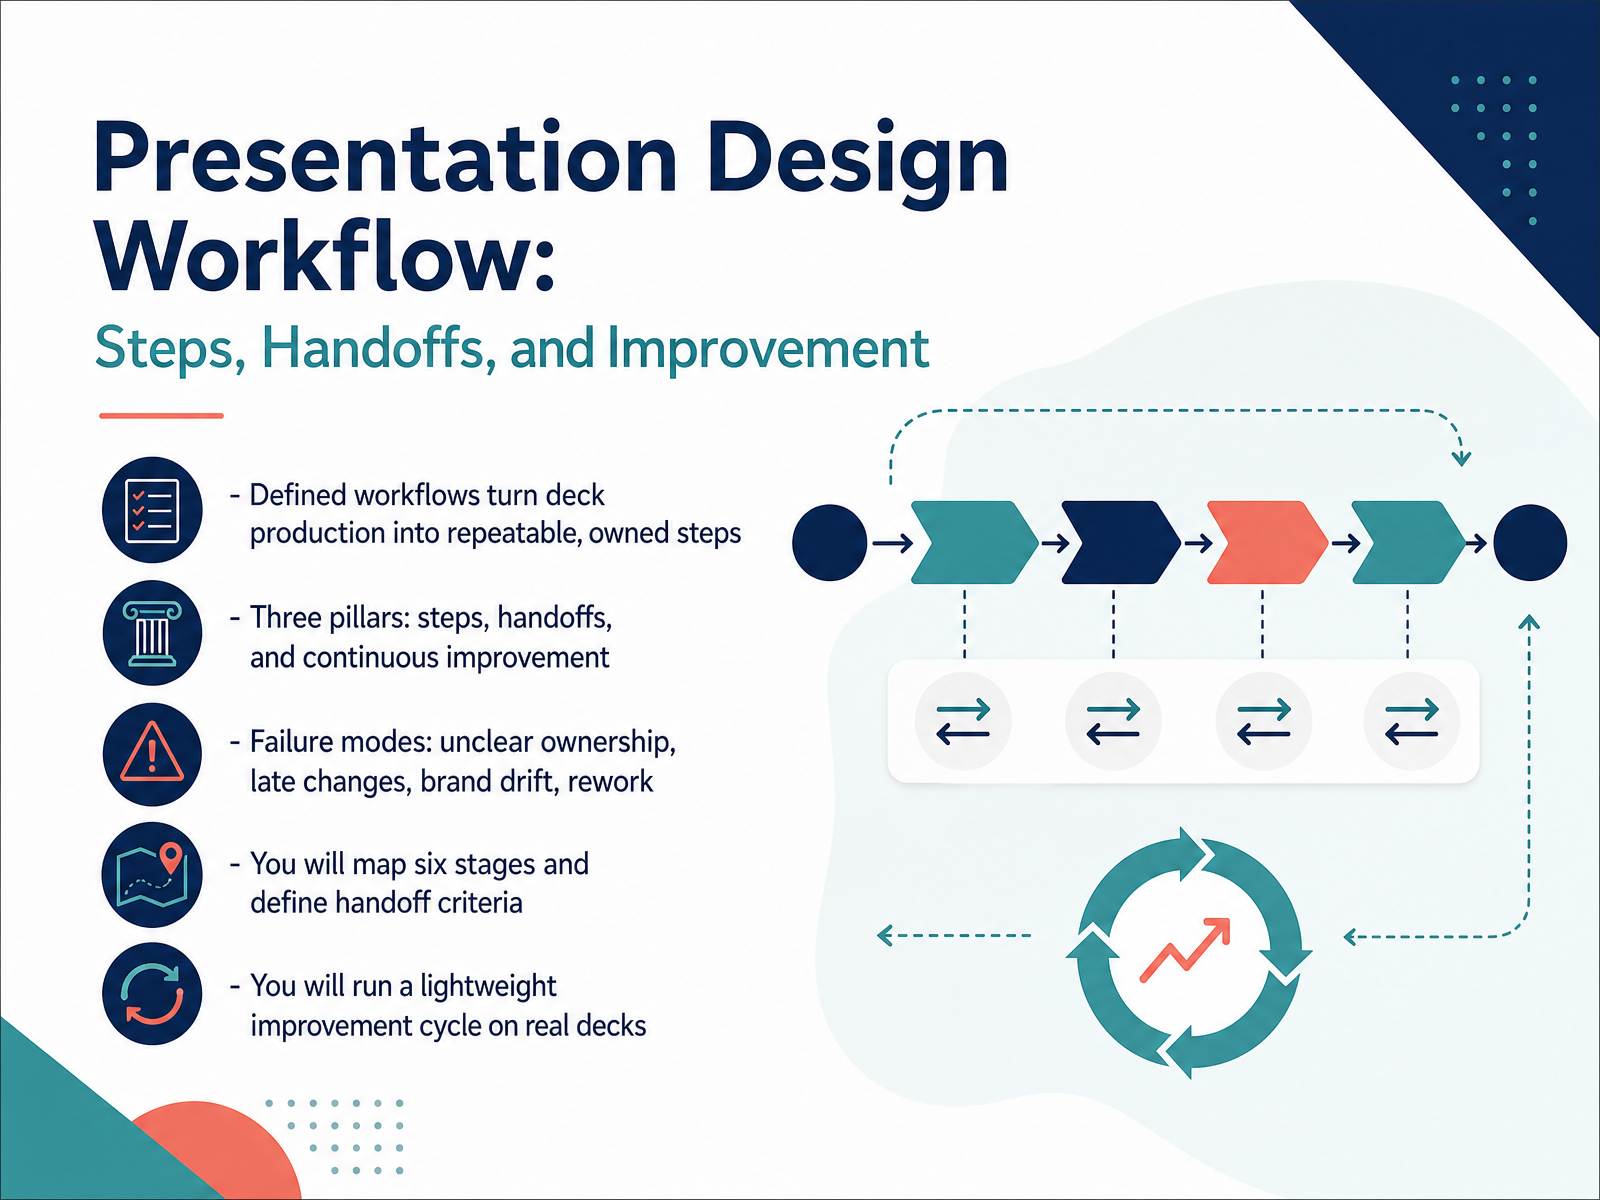
Presentation Design Workflow
Begin
14 pages · ~28 min
Presentation Design Workflow
This training guides instructional designers through the presentation design workflow, covering key steps, handoffs, and improvement practices.
What you’ll learn
- 01Presentation Design Workflow: Steps, Handoffs, and ImprovementWelcome. In this course, we will build a presentation design workflow you can actually repeat. The goal is simple. Turn deck production into clear steps, clear owners, and clear handoffs. We will focus on three pillars: the steps themselves, the handoffs between people, and continuous improvement over time. You have probably seen the failure modes before. Unclear ownership, late changes, brand drift, and endless rework. They slow teams down and burn people out. So here is what you will do. You will map six stages of deck production, from kickoff and brief through draft, feedback, and final. You will define handoff criteria so nothing gets lost between roles. And you will run a lightweight improvement cycle on real decks, so your process gets better with every project. Let's start by looking at why presentation workflows break down.1 min
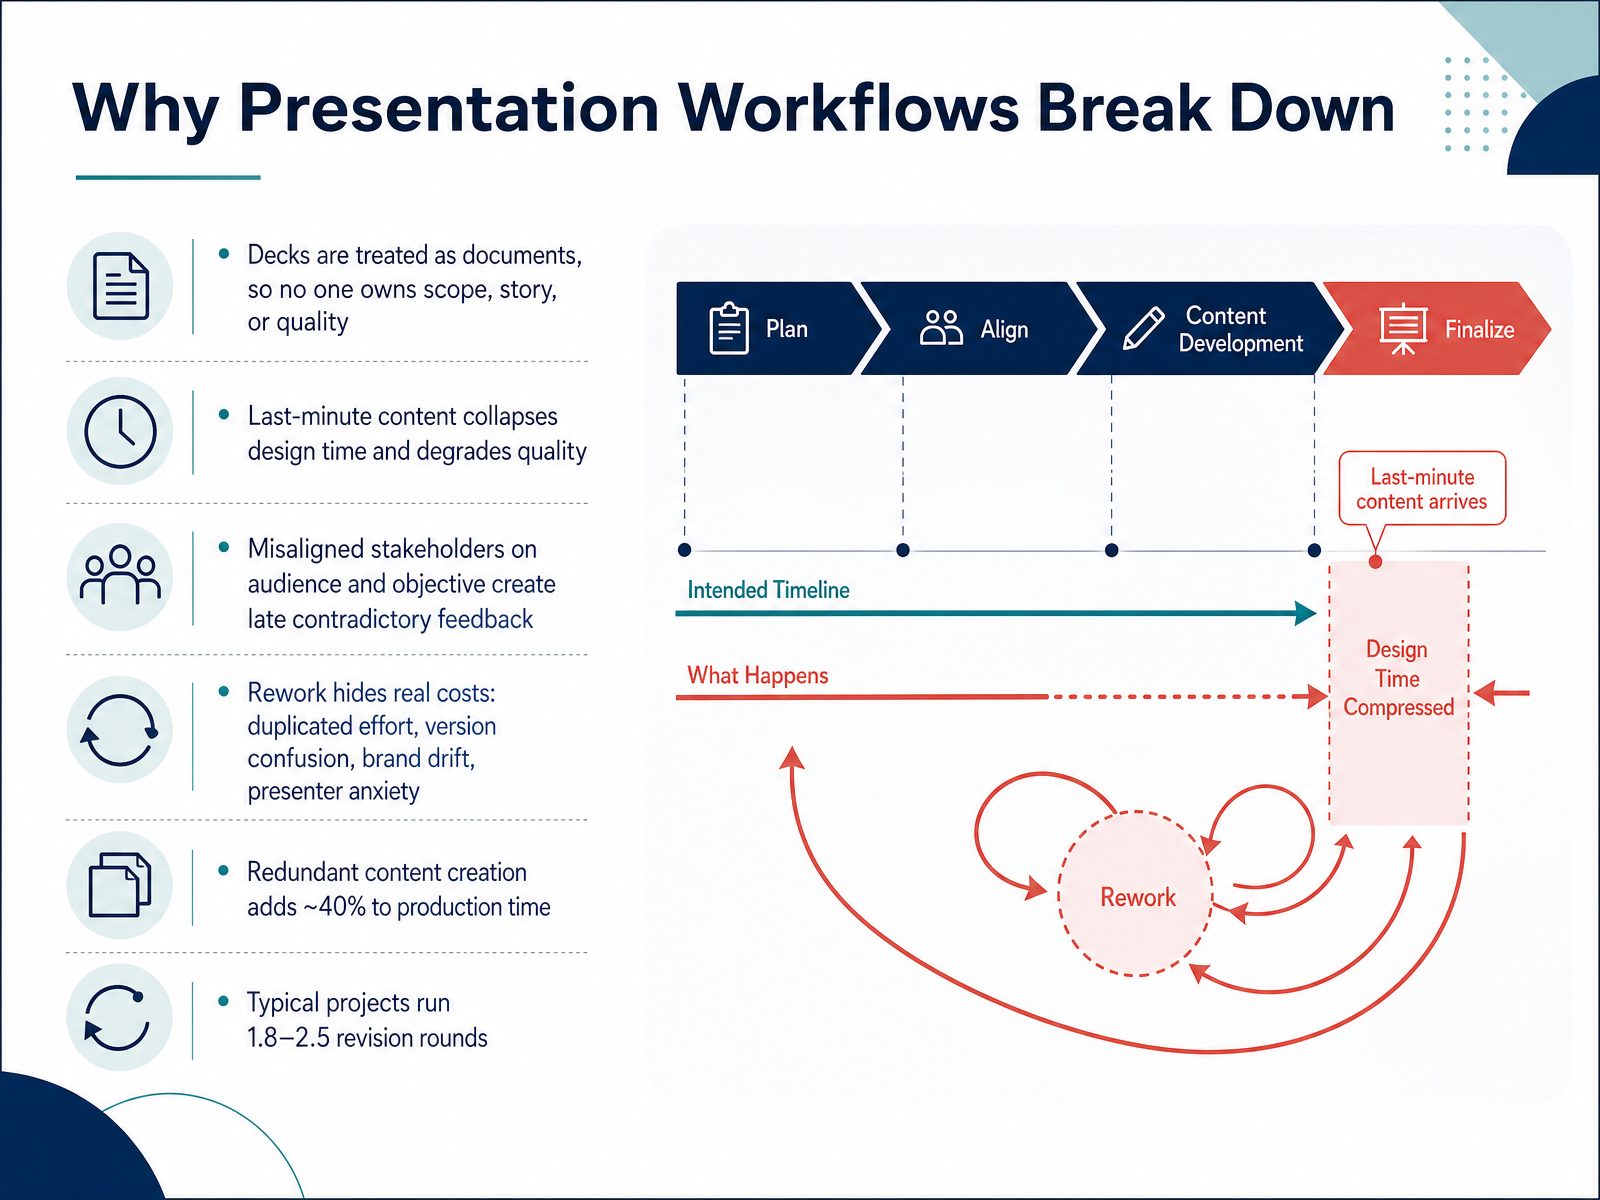
- 02Why Presentation Workflows Break DownSo let's talk about why presentation workflows break down. Most teams don't lack talent or effort. They lack a shared process. The first problem is ownership. Decks get treated like documents, so no one truly owns scope, story, or quality. Everyone edits, but nobody leads. The second problem is timing. When content lands at the last minute, design time collapses. Quality drops, and the team ends up firefighting instead of refining. Third, stakeholders often disagree on the audience and the objective. That disagreement doesn't show up early. It shows up late, as contradictory feedback. And then there's the hidden cost of rework. Duplicated effort, version confusion, brand drift, even presenter anxiety. Redundant content creation alone can add about forty percent to production time. And most projects run roughly two revision rounds, sometimes two and a half. Here's the takeaway. These breakdowns aren't random. They're structural. Fix the workflow, and you remove the friction. Next, let's look at a six-stage lifecycle and the roles behind it.
 2 min
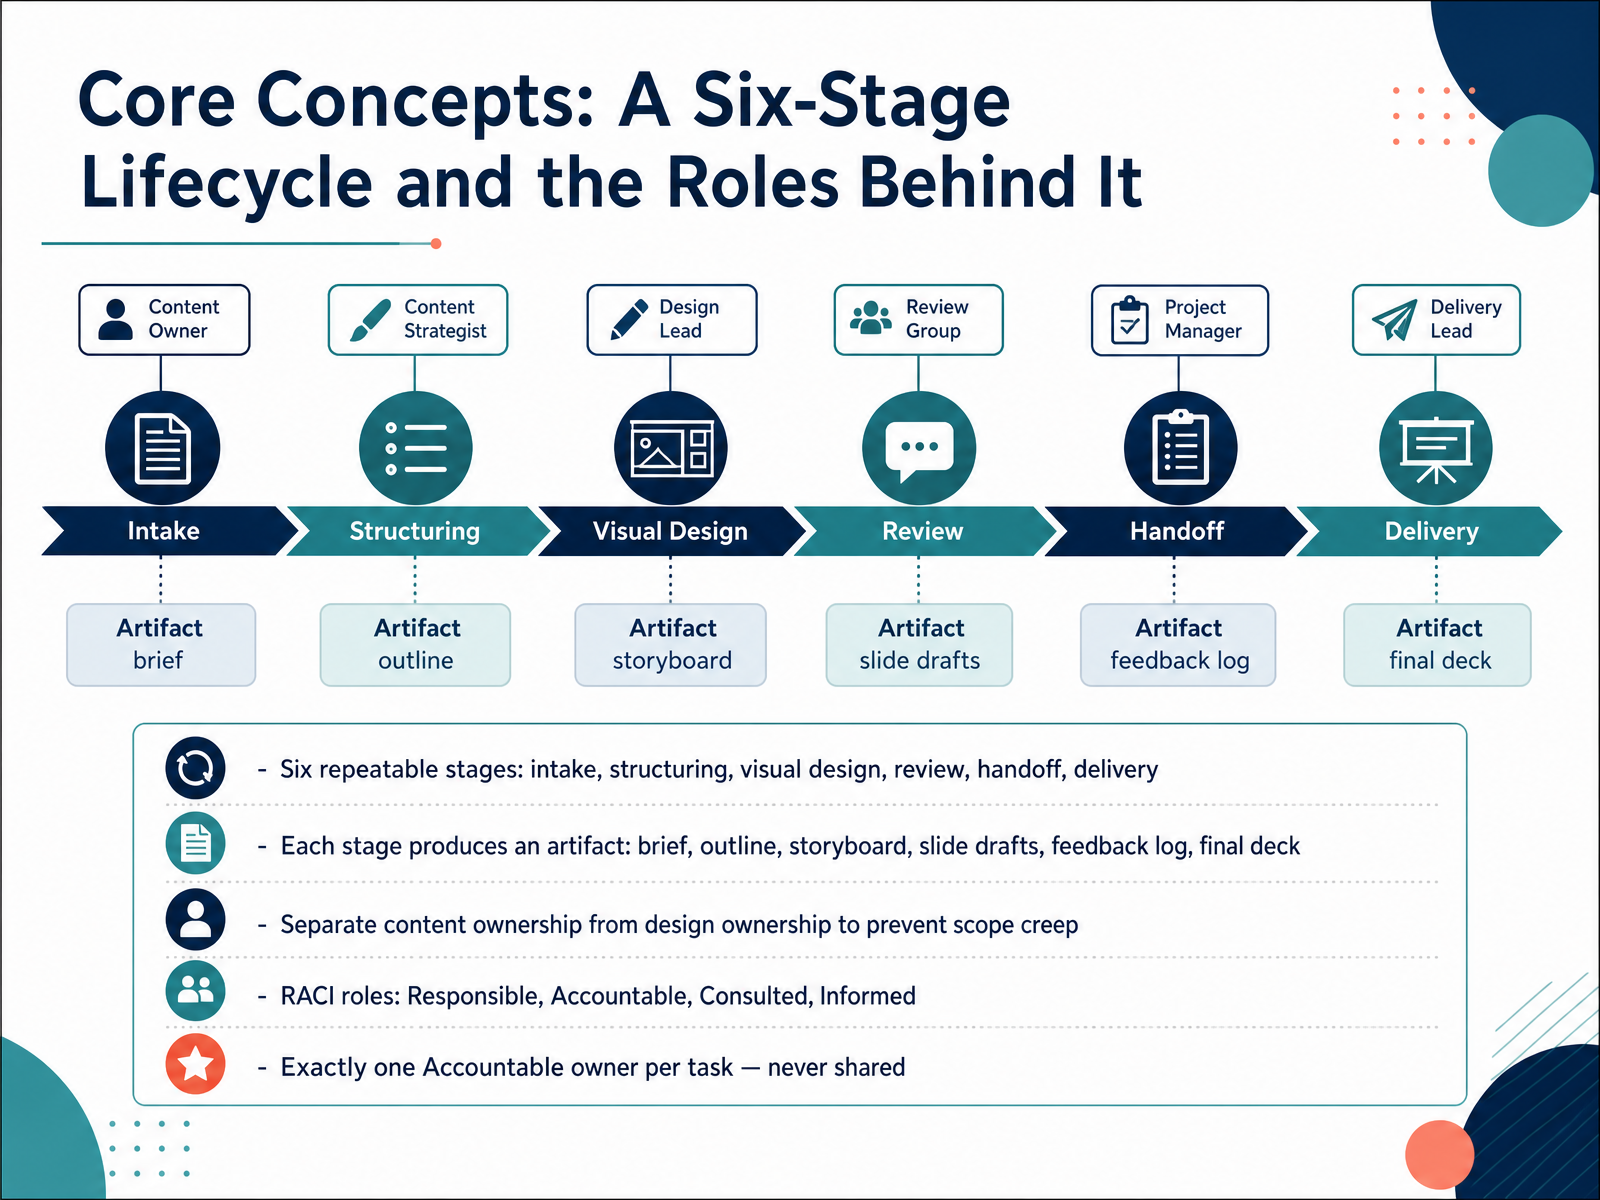
2 min - 03Core Concepts: A Six-Stage Lifecycle and the Roles Behind ItLet's look at the structure that holds a presentation project together. You can think of your workflow as a six-stage lifecycle. Intake, structuring, visual design, review, handoff, and delivery. The power of naming these stages is that each one produces a clear artifact. Intake gives you the brief. Structuring gives you the outline. Visual design gives you the storyboard and slide drafts. Review gives you a feedback log. And handoff and delivery give you the final deck. Now, here is where projects often go sideways. Content ownership and design ownership need to stay separate. When one person owns both, scope creep creeps in quietly. So assign roles up front using RACI. Responsible does the work. Accountable owns the result. Consulted gives input. Informed stays in the loop. And one rule you never bend. Exactly one Accountable owner per task. Never shared. That single name keeps decisions moving and stops the endless back and forth. Next, we will start at the beginning with step one, intake and scoping the presentation.
 2 min
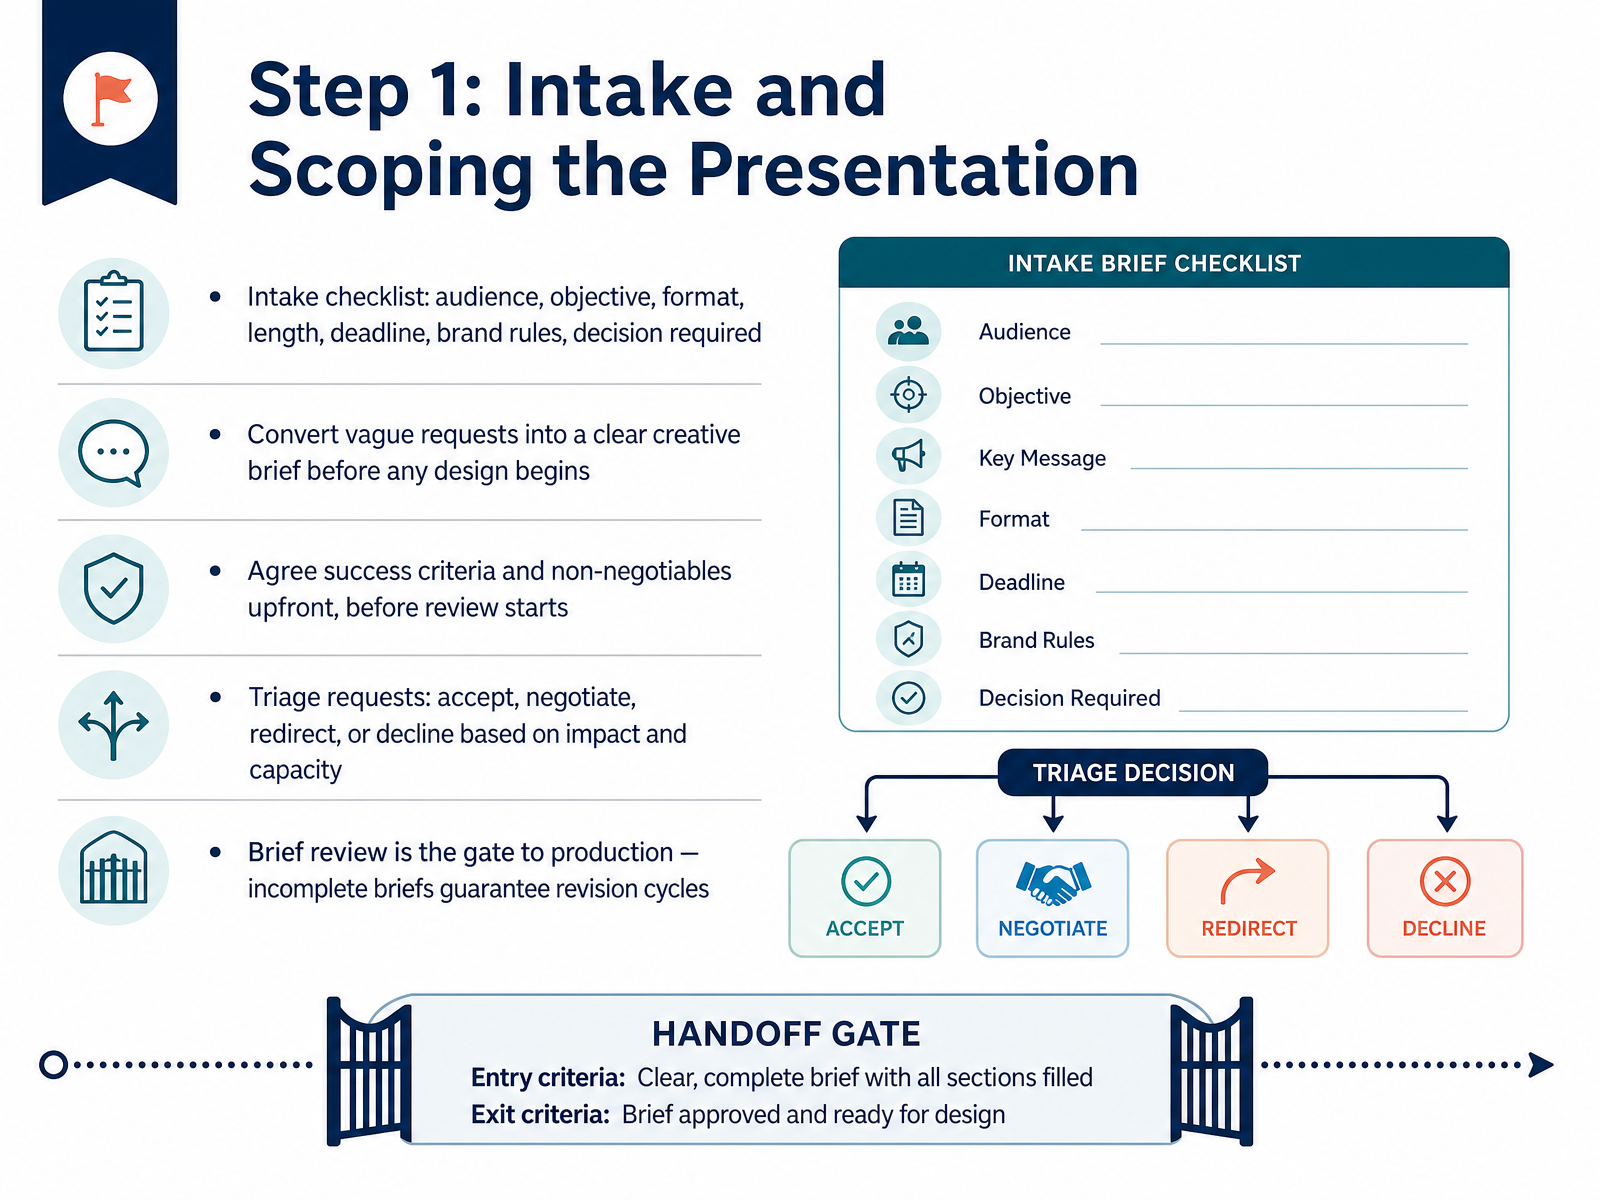
2 min - 04Step 1: Intake and Scoping the PresentationLet's start with step one: intake and scoping. This is where good presentations are quietly won or lost. Before any design begins, run a quick intake checklist. Who is the audience? What is the objective? What format and length? What is the deadline? What brand rules apply? And most importantly, what decision does this presentation need to drive? Then convert that vague request into a clear creative brief. For example, a request to make a deck for the sales meeting should become a specific audience, objective, and call to action. Next, agree on success criteria and non-negotiables upfront, before review starts. You also need to triage. Accept, negotiate, redirect, or decline based on impact and your team's capacity. The brief review is the gate to production. Incomplete briefs guarantee revision cycles later. Get scoping right, and everything downstream gets smoother. Now let's move on to step two: content structuring and storyboarding.
 2 min
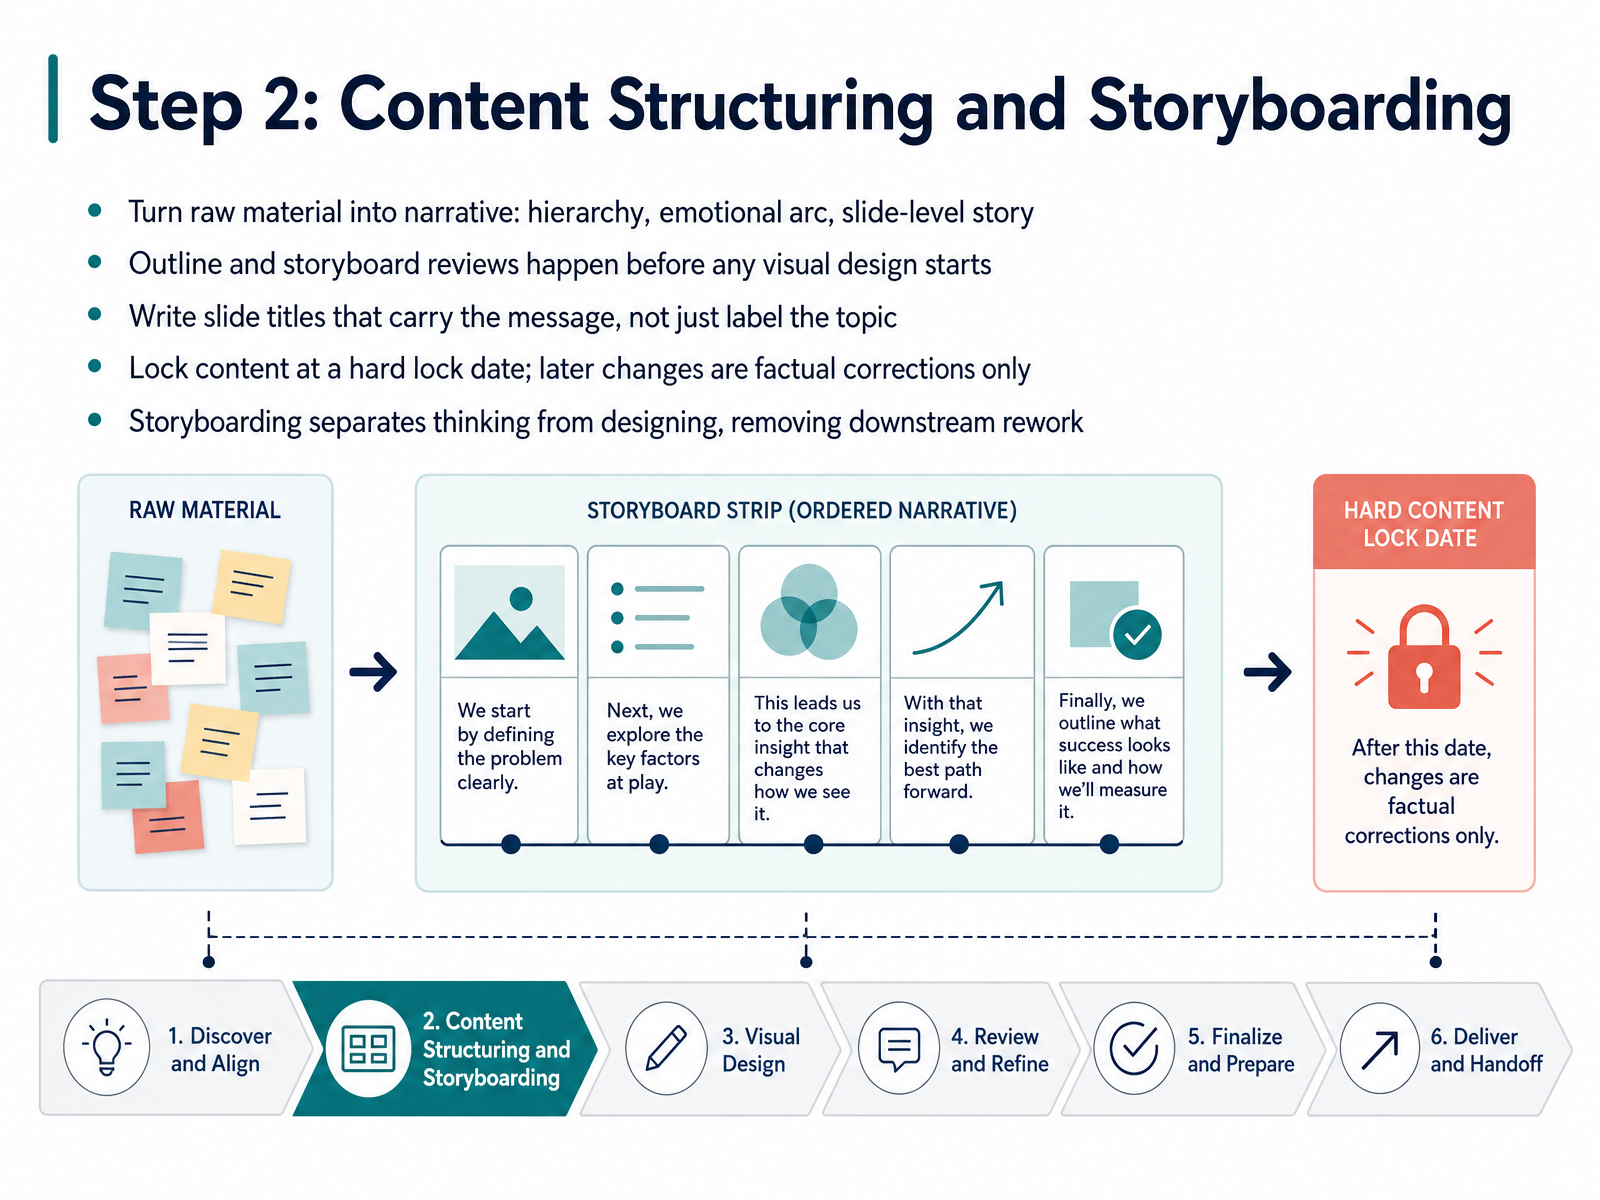
2 min - 05Step 2: Content Structuring and StoryboardingNow let's talk about Step Two, content structuring and storyboarding. This is where your raw material becomes a real narrative. You shape the hierarchy, build an emotional arc, and decide what story each slide tells. And here is the key discipline. Outline and storyboard reviews happen before any visual design starts. Write slide titles that carry the message, not just label the topic. For example, instead of saying "Q3 results," say "Q3 revenue grew twelve percent despite supply pressure." That single change does a lot of work. Then lock your content at a hard lock date. After that point, only factual corrections are allowed. This protects your team from constant scope creep. Storyboarding also separates thinking from designing. You resolve the logic first, which removes a lot of downstream rework. So structure the story, review the outline, lock the content, and then move forward. Next, we'll cover Step Three, visual design and build.
 2 min
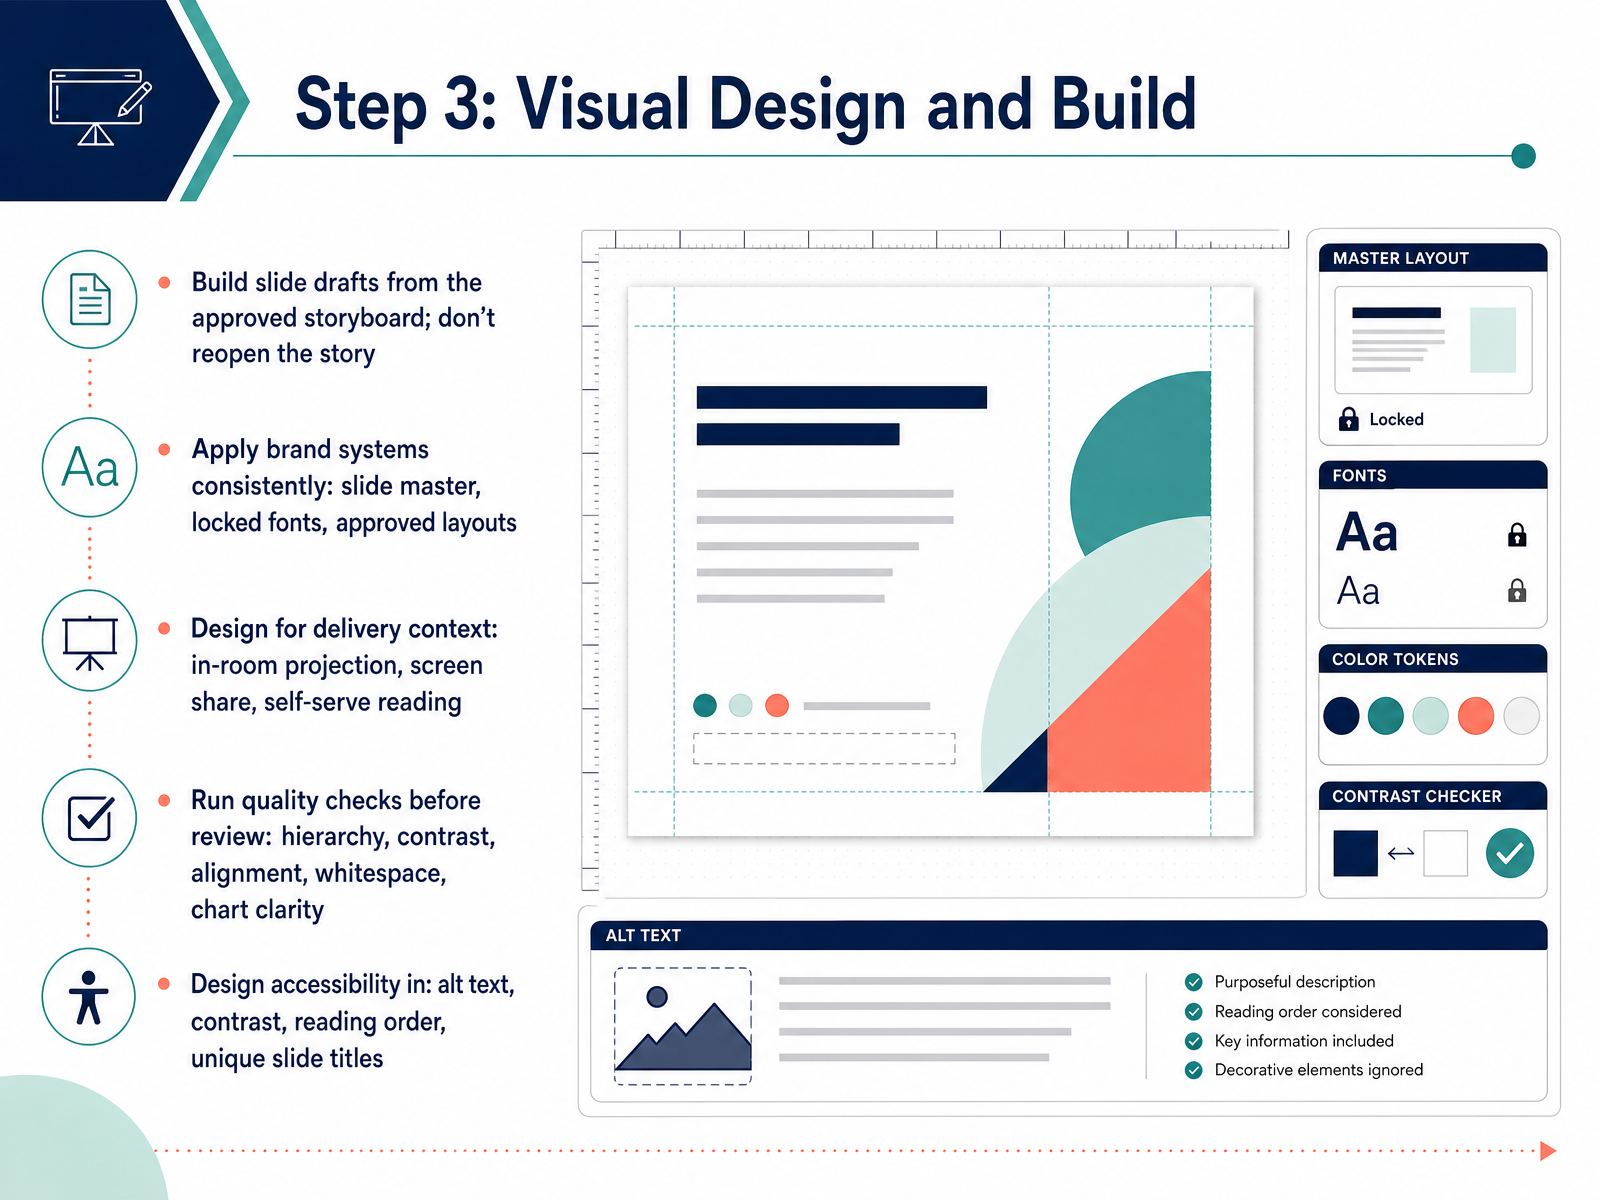
2 min - 06Step 3: Visual Design and BuildNow, let's move into step three: visual design and build. At this point, your storyboard is approved. So build your slide drafts directly from it. Resist the urge to reopen the story. If the narrative needs to change, take that back to the storyboard, not into a single slide. Next, apply your brand systems consistently. Use the slide master, locked fonts, and approved layouts. Consistency builds trust and saves you rework. Then design for the delivery context. A slide shown in a room reads differently than one on a screen share, or a self-serve deck someone reads alone. So check hierarchy, contrast, alignment, whitespace, and chart clarity before review, not during it. And design accessibility in from the start. Add alt text, protect contrast, set a logical reading order, and give every slide a unique title. That keeps your deck usable for everyone. Build with discipline, and review becomes faster. Next, let's look at handoffs, defining clear ownership transfers.
 2 min
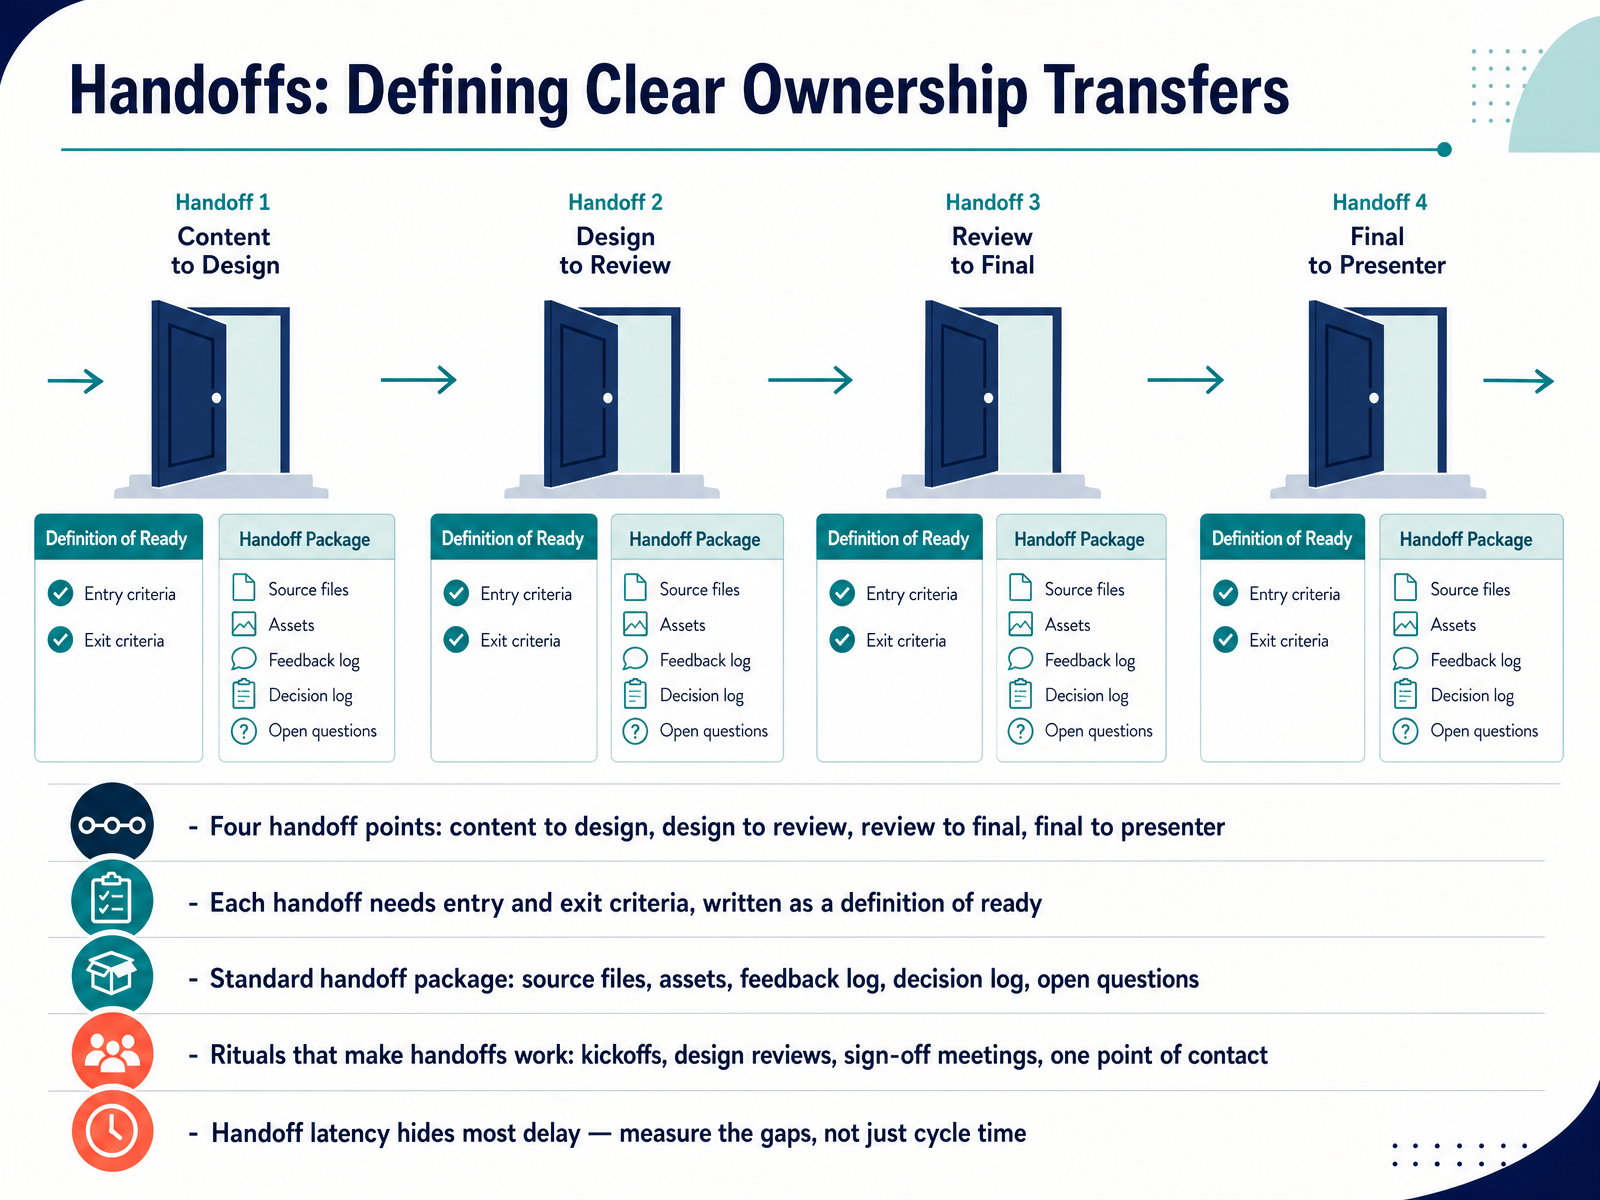
2 min - 07Handoffs: Defining Clear Ownership TransfersNow let's talk about handoffs, where ownership actually changes hands. There are four main points: content to design, design to review, review to final, and final to presenter. Each one needs clear entry and exit criteria, written as a definition of ready. That's your contract. Both sides agree on what done looks like before work moves. A standard handoff package keeps things clean. Include source files, assets, the feedback log, the decision log, and any open questions. For example, when design hands off to review, the reviewer should know exactly what changed and what still needs a call. Rituals make this stick: kickoffs, design reviews, sign-off meetings, and one point of contact. Here's the part people miss. Handoff latency hides most of your delay. So measure the gaps between steps, not just total cycle time. If a file sits in a queue for two days, that's your real bottleneck. Define your criteria, package your work, and track the gaps. Coming up next, review, feedback, and approval without rework.
 2 min
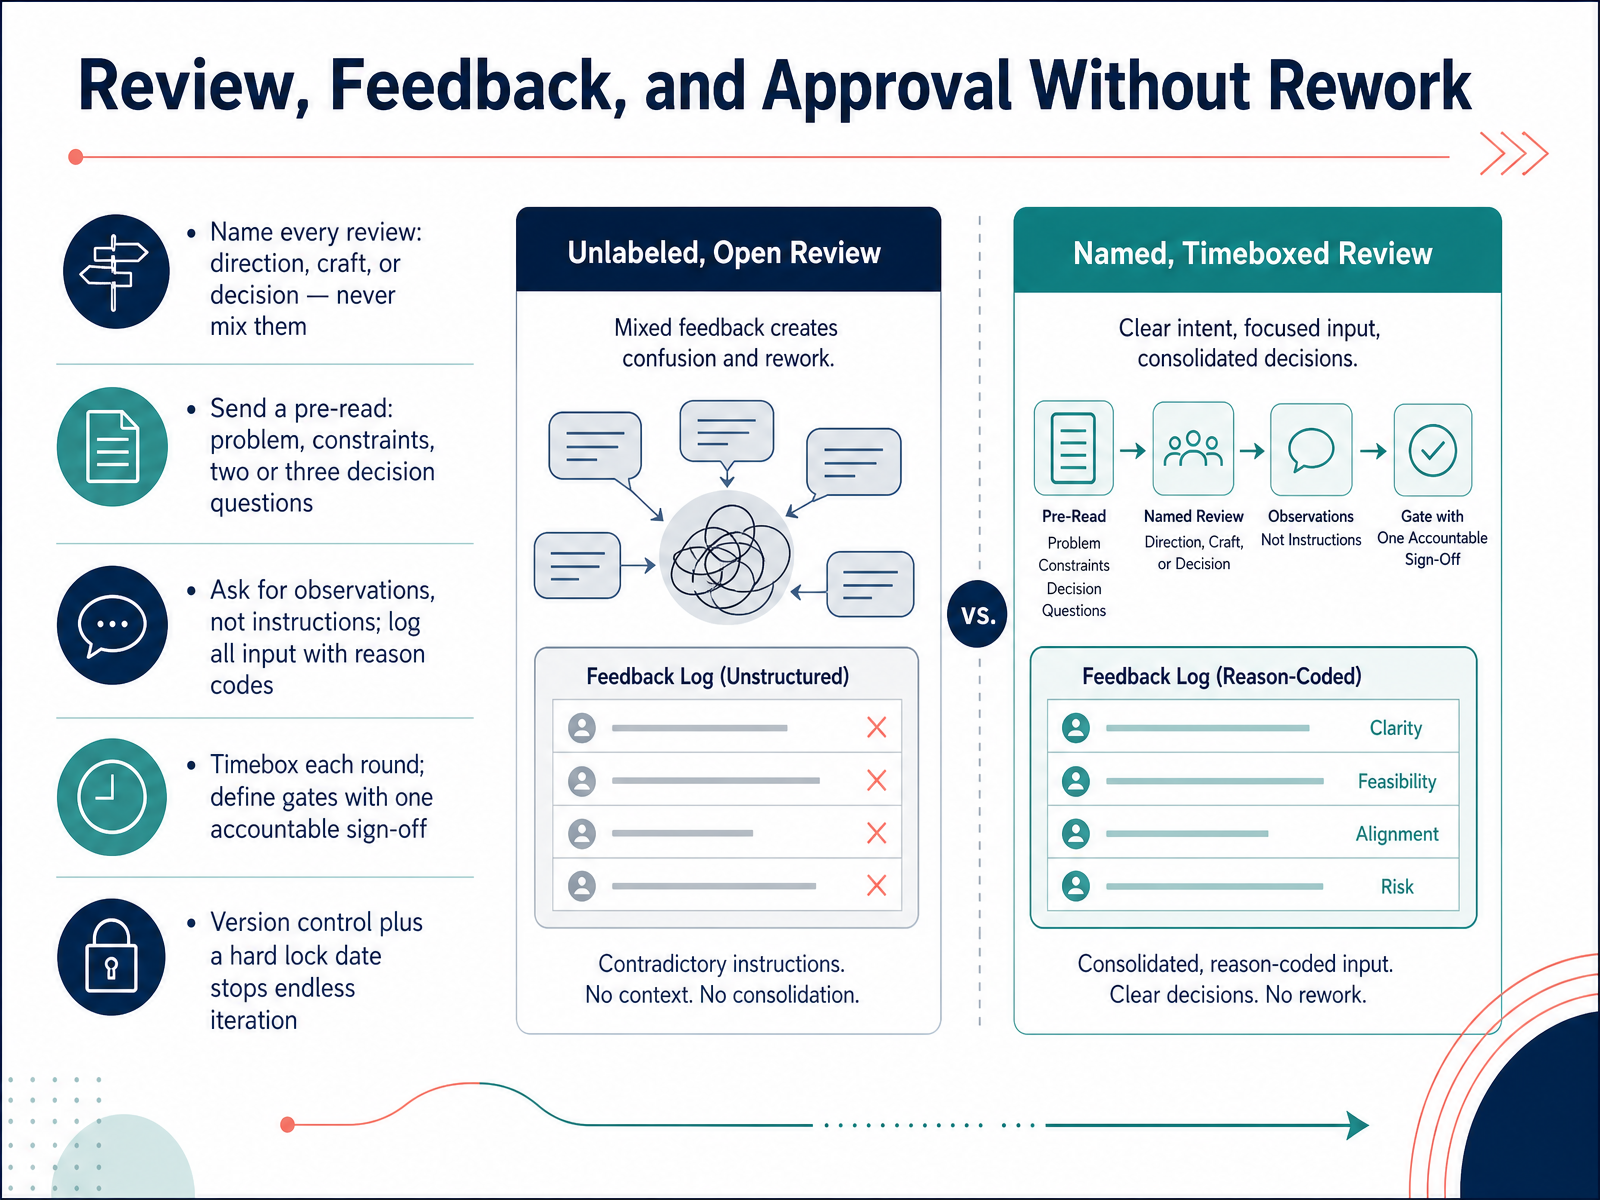
2 min - 08Review, Feedback, and Approval Without ReworkNow let's make review and approval run smoothly, without the endless rework. The fix starts with naming every review. Is this a direction review, a craft review, or a decision review? Never mix them in one meeting. Direction decides the story and message. Craft refines layout, language, and visuals. Decision closes open questions. Before the review, send a pre-read. Include the problem, the constraints, and two or three decision questions. Then ask for observations, not instructions. You want to hear what people notice, not have them redesign the slide. Log every piece of input with a reason code, so you can trace why a change was made. Timebox each round. Set a hard gate, and name one accountable sign-off. That person makes the final call. Pair version control with a lock date. When the lock date hits, iteration stops. This prevents the slow creep of endless tweaks. Next, we'll look at measuring the workflow, using metrics that reveal bottlenecks.
 2 min
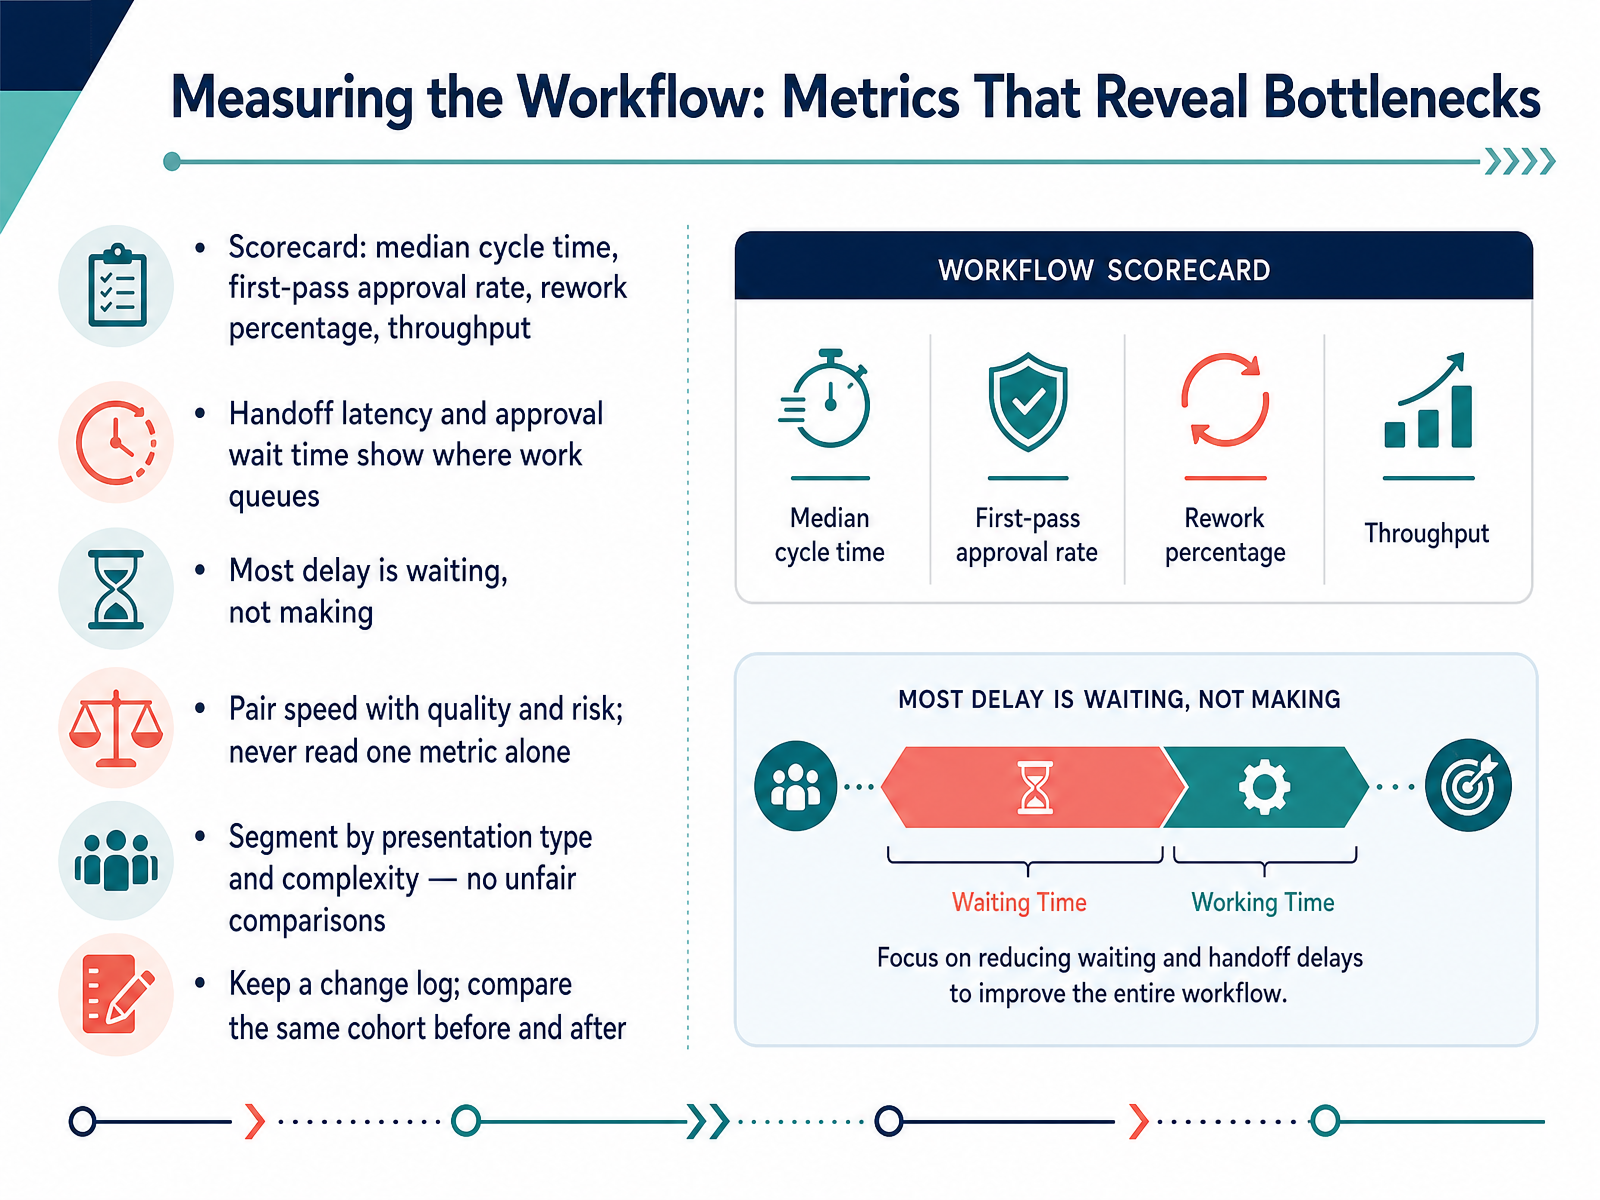
2 min - 09Measuring the Workflow: Metrics That Reveal BottlenecksNow let's look at how to measure your workflow, so bottlenecks stop hiding. Start with a simple scorecard. Track median cycle time, first-pass approval rate, rework percentage, and throughput. Then watch your handoff latency and approval wait time. Those two show where work actually queues. Here's the key insight. Most delay is waiting, not making. So if a draft sits for three days before review, that gap is your real problem, not the time spent designing. Always pair speed with quality and risk. Never read one metric alone. For example, fast cycle time with heavy rework is not progress. Segment your data by presentation type and complexity. A sales deck and a board deck are not fair comparisons. Finally, keep a change log. Compare the same cohort before and after a change, so you can prove what worked. Measure the wait, protect the quality, and your workflow gets faster for the right reasons.
 2 min
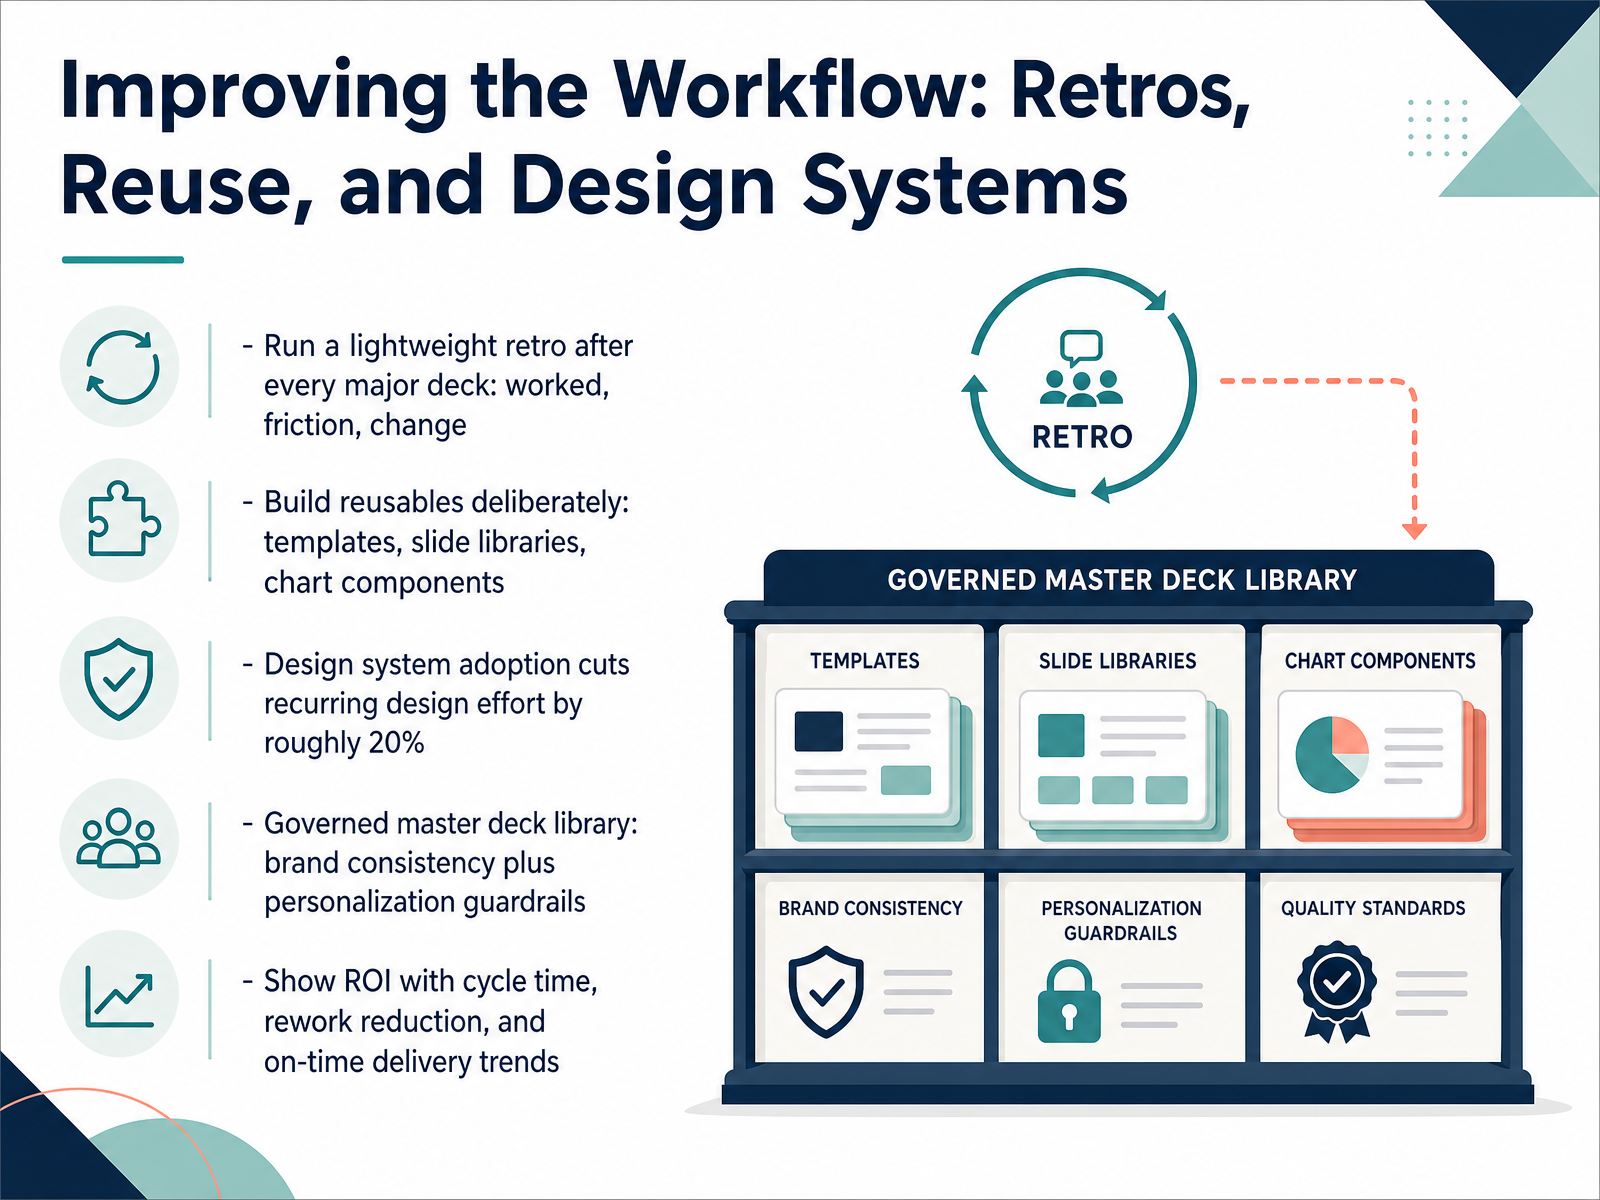
2 min - 10Improving the Workflow: Retros, Reuse, and Design SystemsNow let's talk about improving the workflow itself. After every major deck, run a lightweight retro. Ask three questions. What worked? Where did we hit friction? What will we change next time? Keep it short, maybe fifteen minutes, but do it consistently. Then build reusables deliberately. Templates, slide libraries, and chart components save you hours on the next deck. When you adopt a design system, you cut recurring design effort by roughly twenty percent. So invest in a governed master deck library. It protects brand consistency while still giving teams personalization guardrails. Finally, show the value. Track cycle time, rework reduction, and on-time delivery trends. That data helps you justify the system and keep improving. Small habits, big payoff. Next, we will look at AI in the workflow, and where it helps versus where judgment stays human.
 1 min
1 min - 11AI in the Workflow: Where It Helps and Where Judgment Stays HumanNow let's talk about AI in the workflow, and where it helps versus where your judgment stays human.
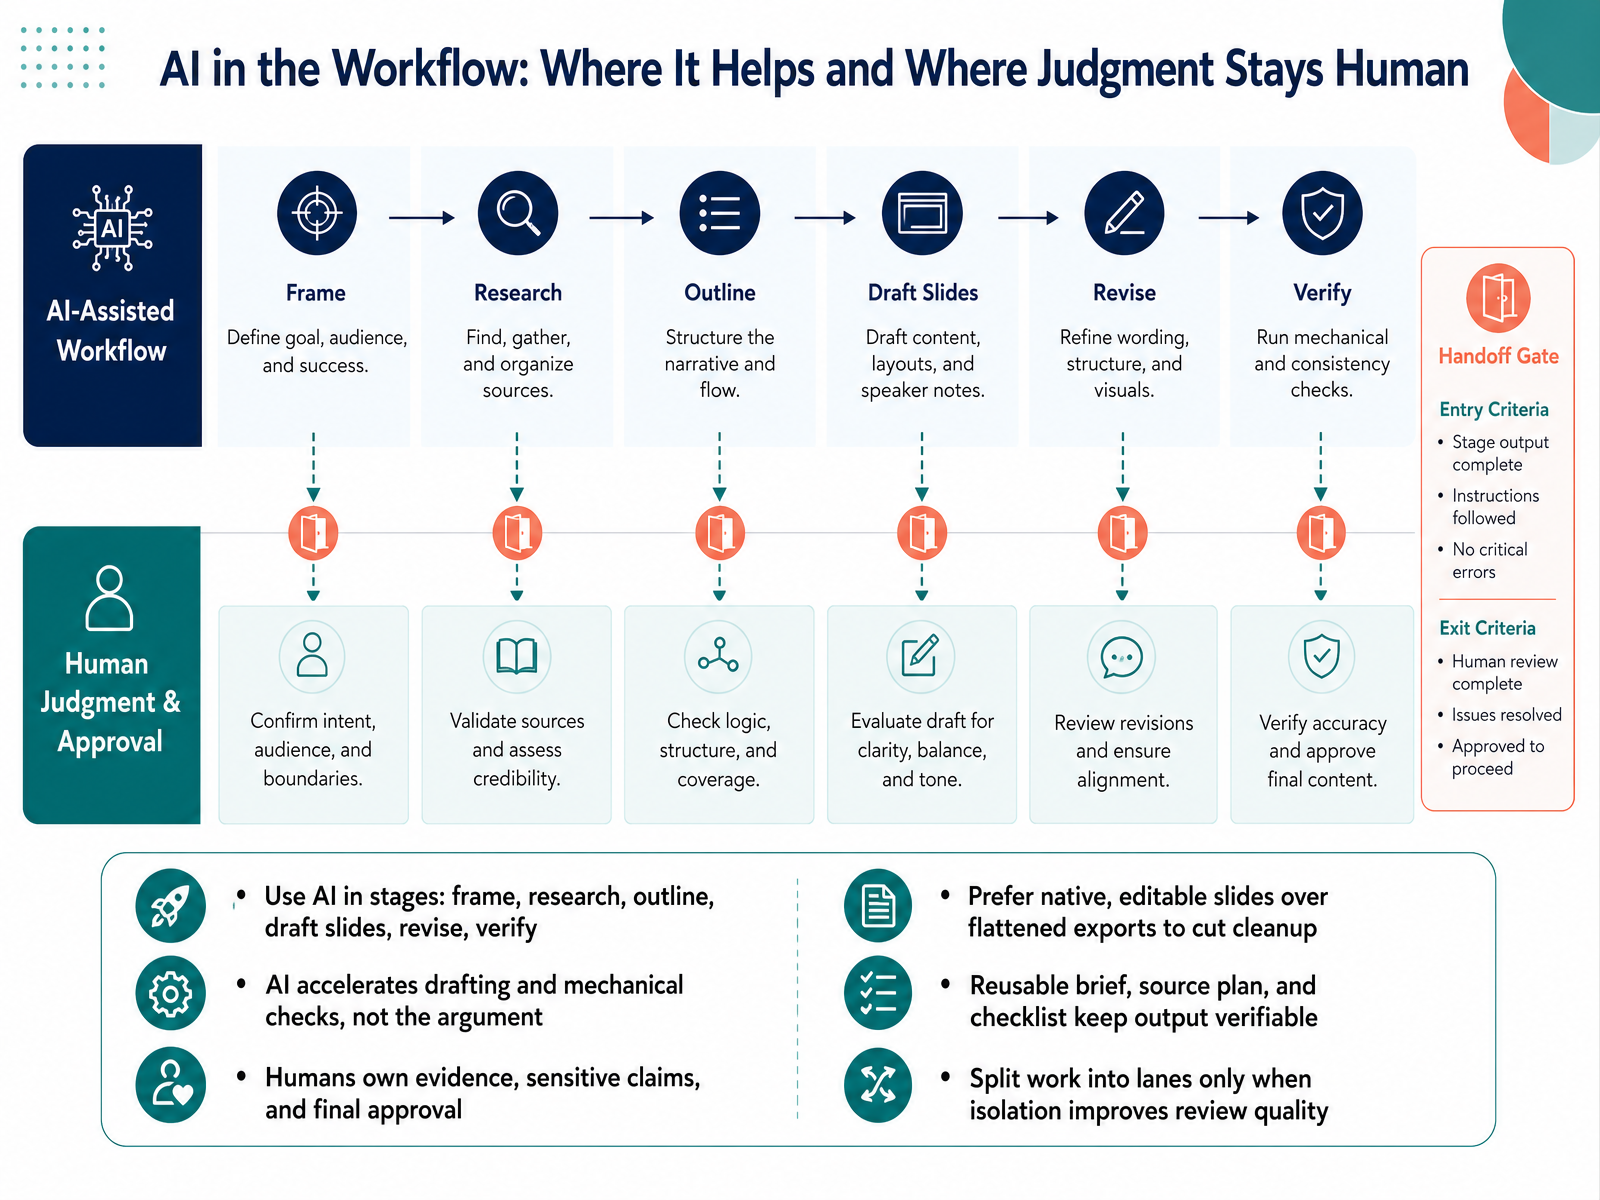
Use AI in stages. Let it help you frame, research, outline, draft slides, revise, and run mechanical checks. It moves fast on structure and repetition.
But here's the line. AI accelerates drafting and mechanical checks, not the argument. Your reasoning is still yours to build.
Humans own the evidence, the sensitive claims, and the final approval. Always verify your sources before anything goes out.
One practical tip. Prefer native, editable slides over flattened exports. That cuts cleanup time and keeps your edits flexible.
Keep a reusable brief, a source plan, and a checklist. These three artifacts keep your output verifiable across the team.
And split work into lanes only when isolation improves review quality. Otherwise, keep it collaborative.
Next, we'll look at a practical playbook covering templates, role assignment, and first steps.
 1 min
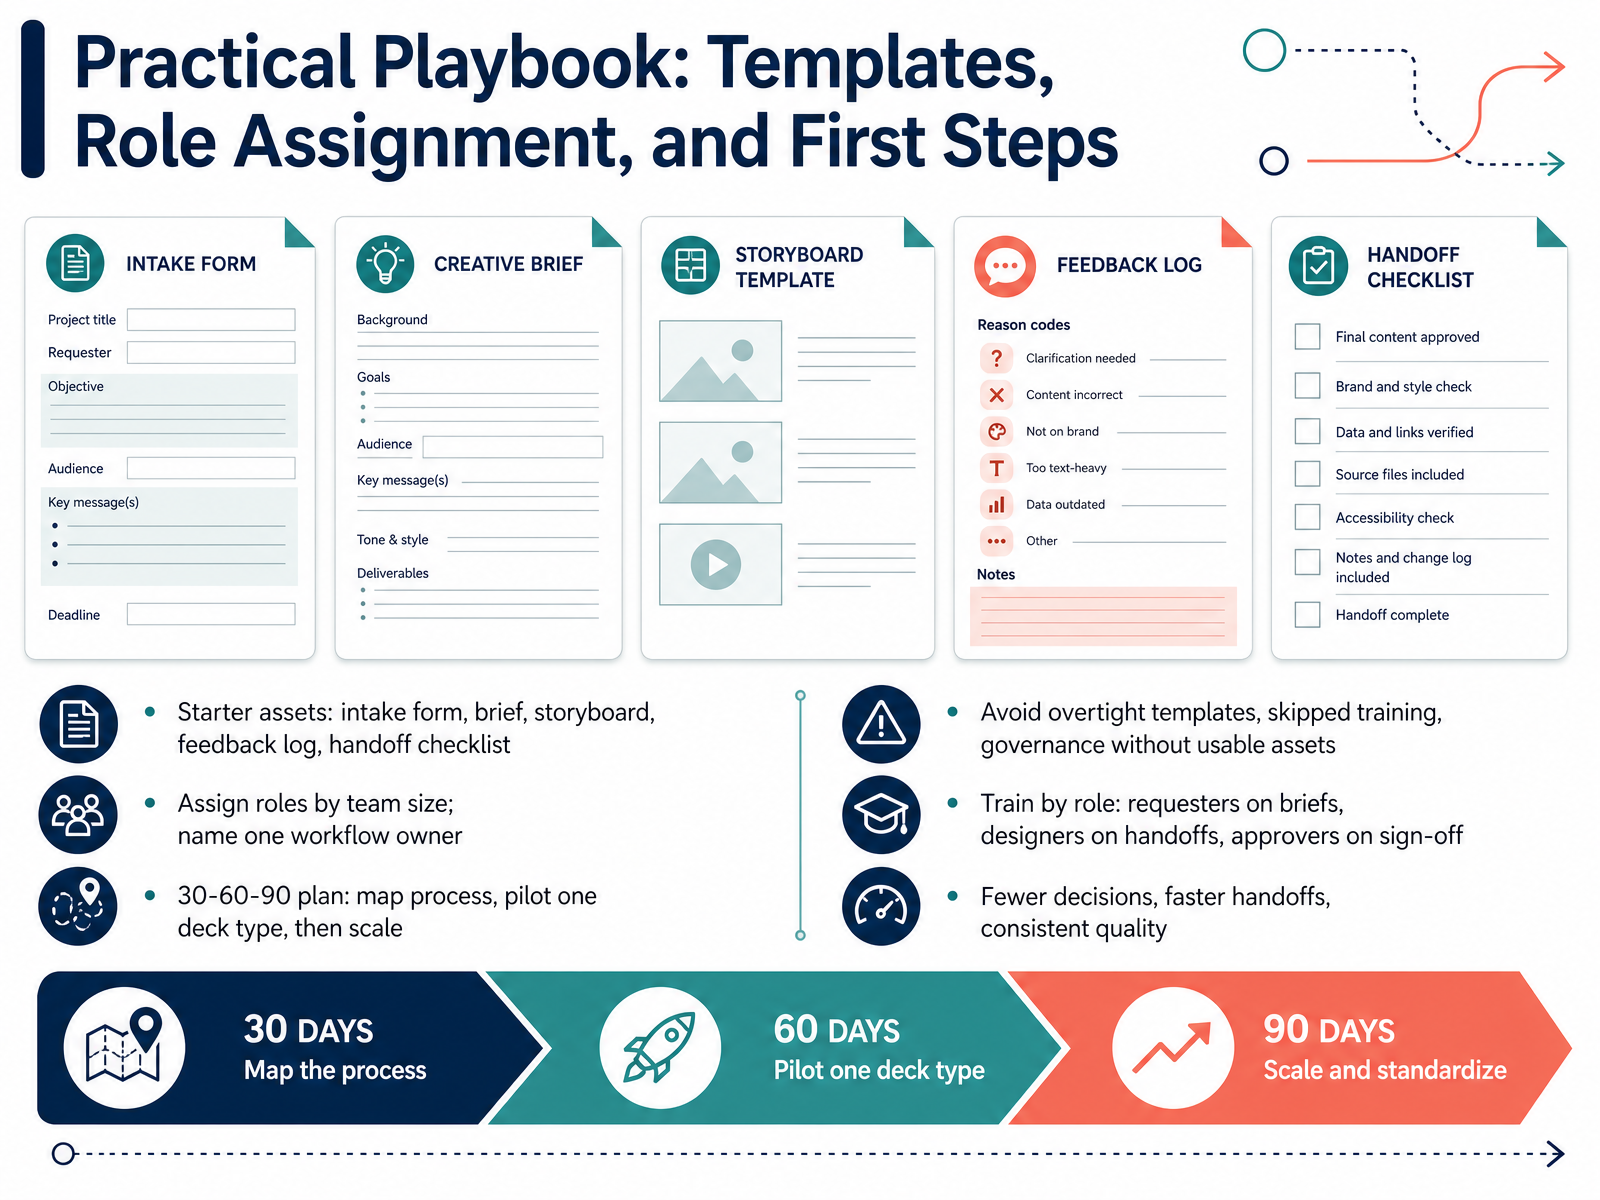
1 min - 12Practical Playbook: Templates, Role Assignment, and First StepsLet's put this into practice, because a good workflow needs assets your team can actually use. Start with a small kit. An intake form, a brief template, a storyboard, a feedback log, and a handoff checklist. Assign roles based on team size. Even on a small team, name one workflow owner. That person keeps things moving. Then follow a simple thirty, sixty, ninety day plan. In the first thirty days, map your current process. In the next sixty, pilot one deck type. By ninety days, scale what works. Watch for common traps. Overly tight templates, skipped training, and governance without usable assets. Instead, train by role. Requesters on briefs, designers on handoffs, approvers on sign-off. The payoff is fewer decisions, faster handoffs, and consistent quality. Next, we'll walk through running the full cycle on one deck.
 1 min
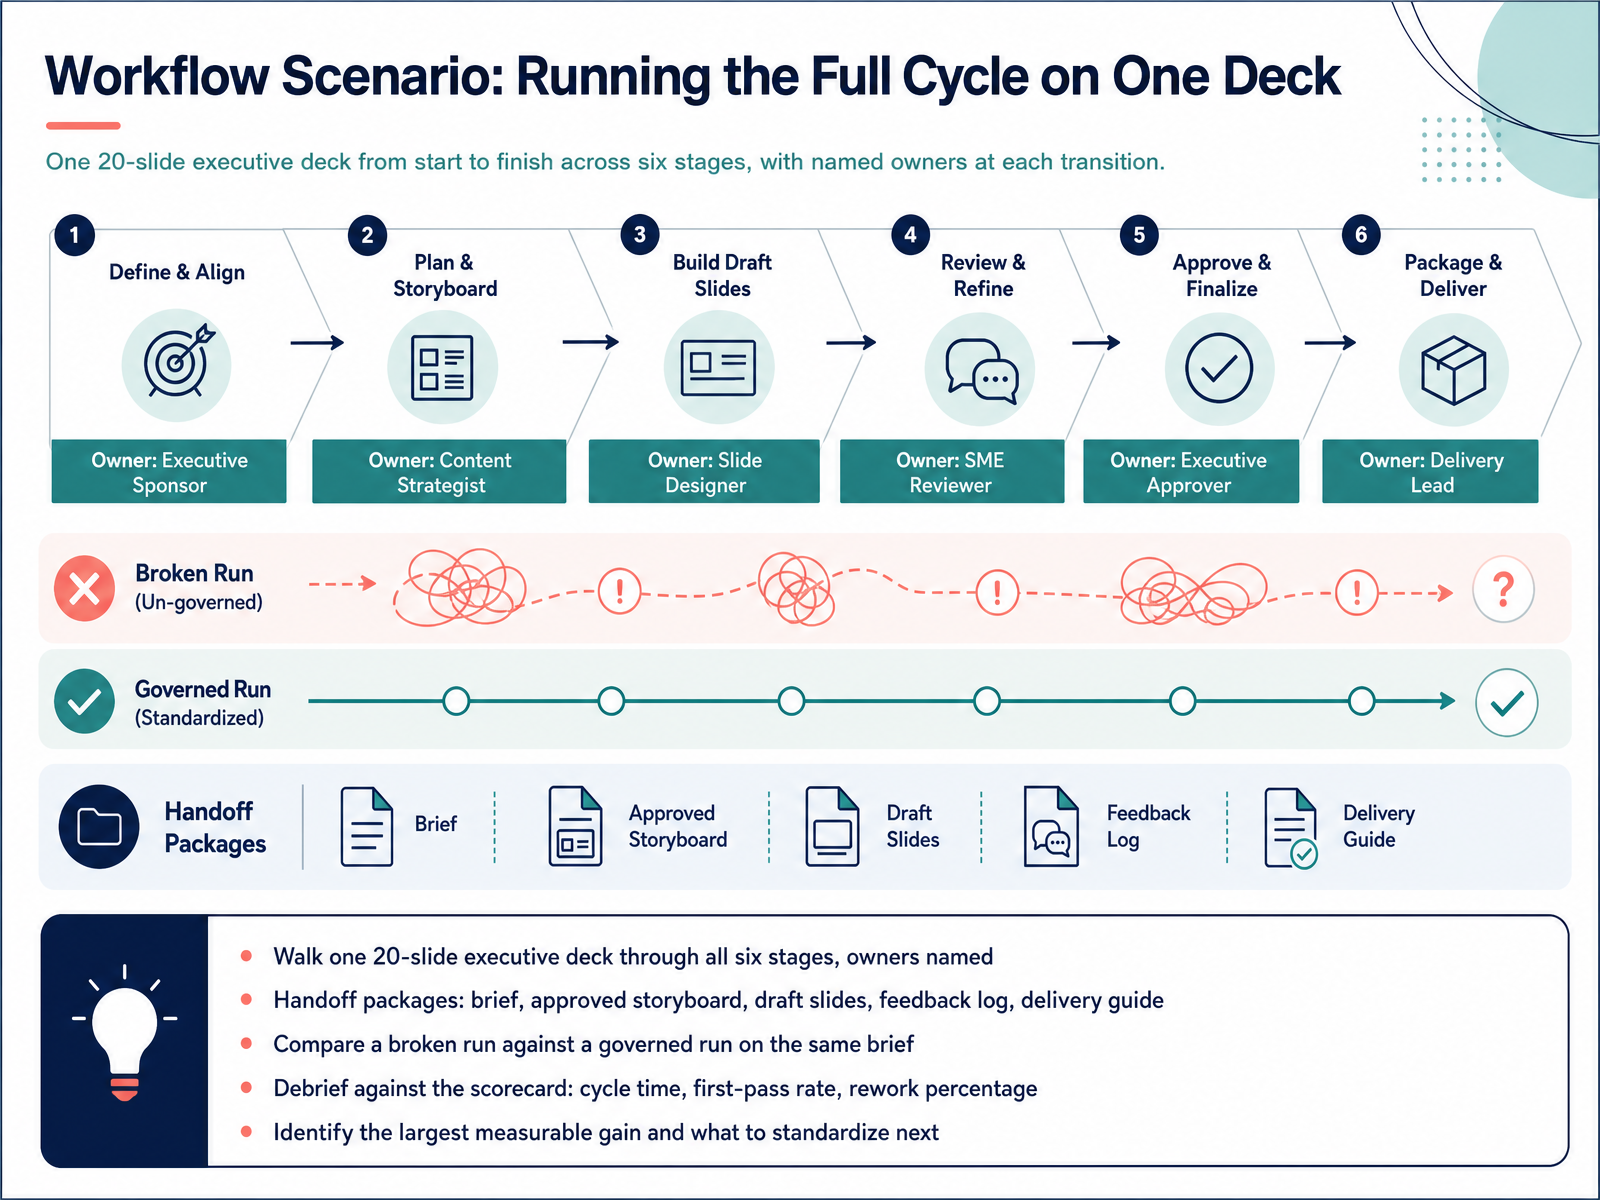
1 min - 13Workflow Scenario: Running the Full Cycle on One DeckNow let's put the whole workflow into practice. Picture one twenty-slide executive deck. You walk it through all six stages, and every owner is named. At each gate, you hand off a clean package. The brief, the approved storyboard, the draft slides, the feedback log, and the delivery guide. Next, run a fair comparison. Take the same brief and play out a broken run against a governed run. The broken run skips approvals and chases feedback in chat. The governed run holds every handoff. Then debrief against the scorecard. Cycle time, first-pass rate, and rework percentage. Look at the numbers side by side. You will usually see the same pattern. One stage causes most of the delay, and one handoff produces most of the rework. Identify the largest measurable gain, and decide what to standardize next. Maybe it is a tighter storyboard approval, or a shared feedback log. Pick one change and make it the default. That is how a single deck becomes a repeatable system. With that in mind, let's move to your next step.
 1 min
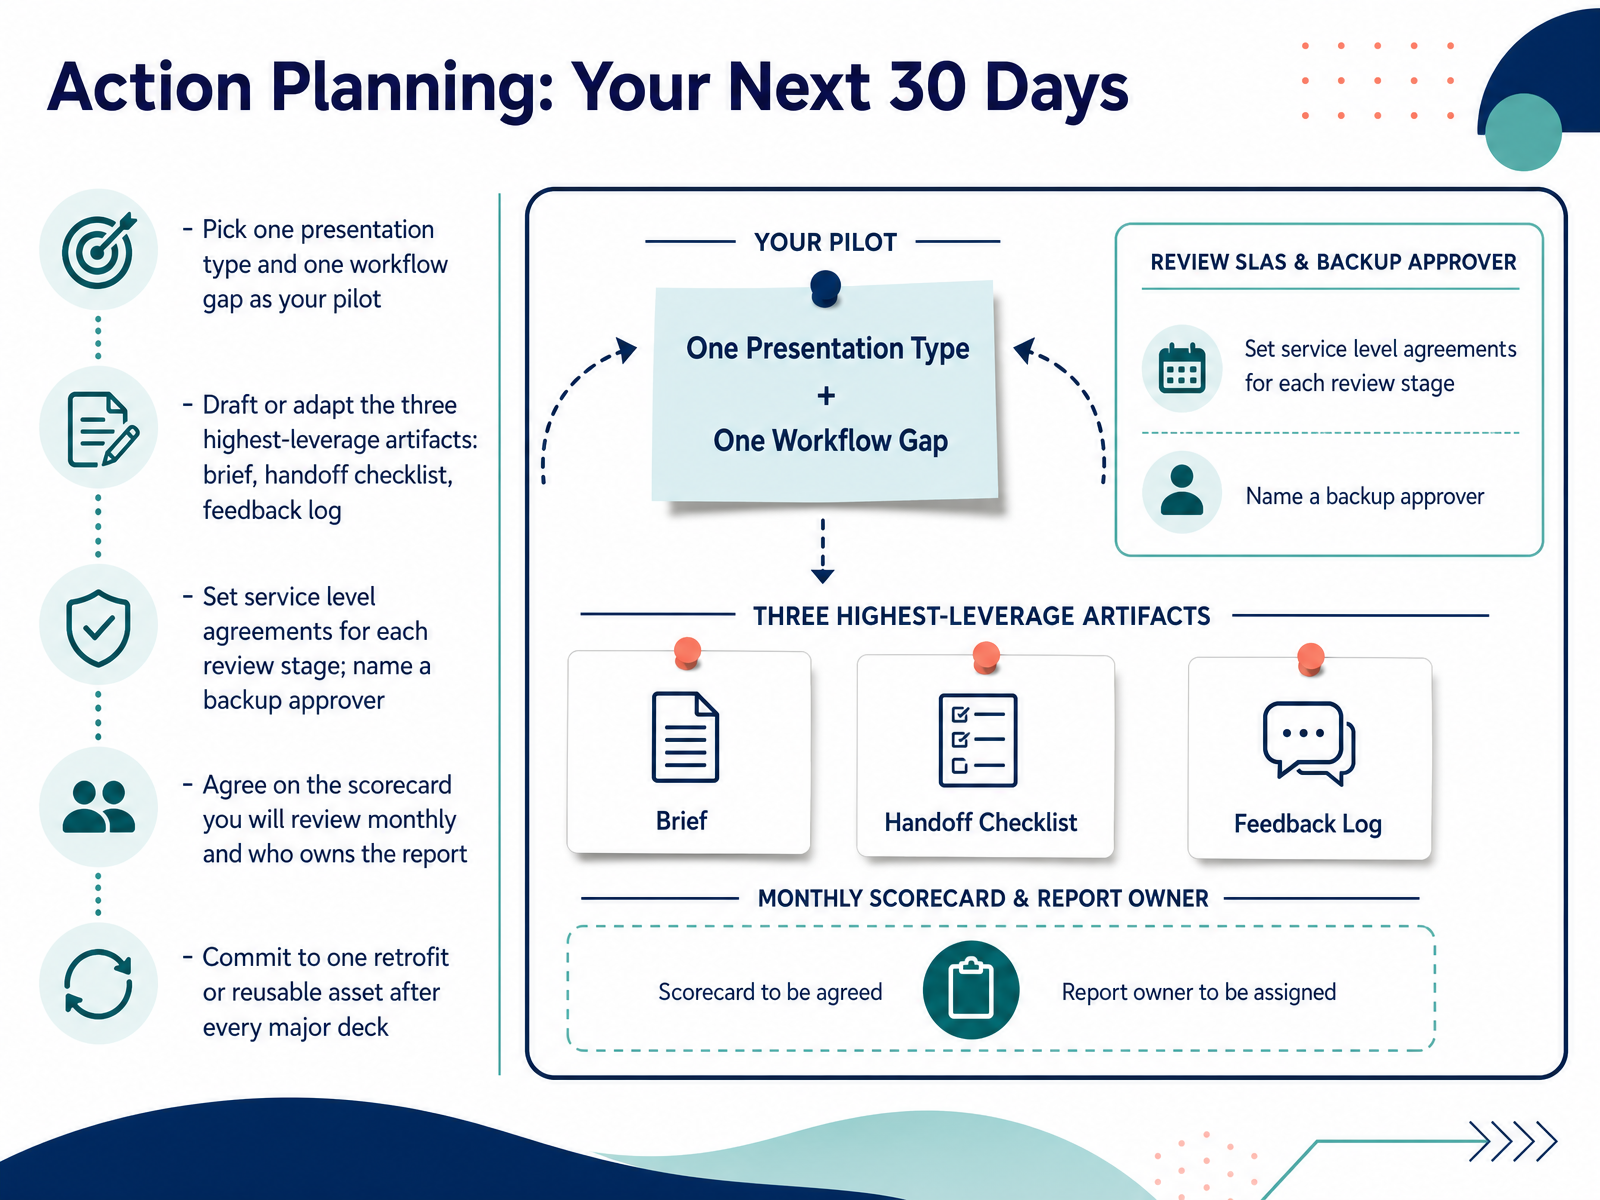
1 min - 14Action Planning: Your Next 30 DaysLet's close with a plan you can actually run. In the next thirty days, pick one presentation type and one workflow gap as your pilot. Keep it narrow. Maybe it's your sales deck and the messy feedback stage. Next, draft or adapt the three highest-leverage artifacts: the brief, the handoff checklist, and the feedback log. These three do most of the work. Then set service level agreements for each review stage. Decide how fast a reviewer responds, and name a backup approver so nothing stalls. Agree on the scorecard you will review monthly, and name who owns the report. Finally, commit to one retrofit or reusable asset after every major deck. That is how your system keeps improving. Thank you for your time and attention. You now have the structure. Start small, keep it visible, and make the next deck easier than the last. You've got this.
 2 min
2 min
Take the deck with you
Download this course as a file — free, no sign-up needed.
- PDF handoutEvery slide page, ready to print or share.15 pages · 3.7 MBDownload
- PowerPoint slidesThe full deck as a .pptx — open it in PowerPoint, Keynote, or Google Slides.15 pages · 3.5 MBDownload
Free to use in your own training — please keep the PersonWise credit page at the end.
Have your own deck? Turn it into a course