Web Development Practice Projects
Begin
14 pages · ~28 min
Web Development Practice Projects
Hands-on web development practice projects for aspiring developers to build real skills through applied coding exercises.
What you’ll learn
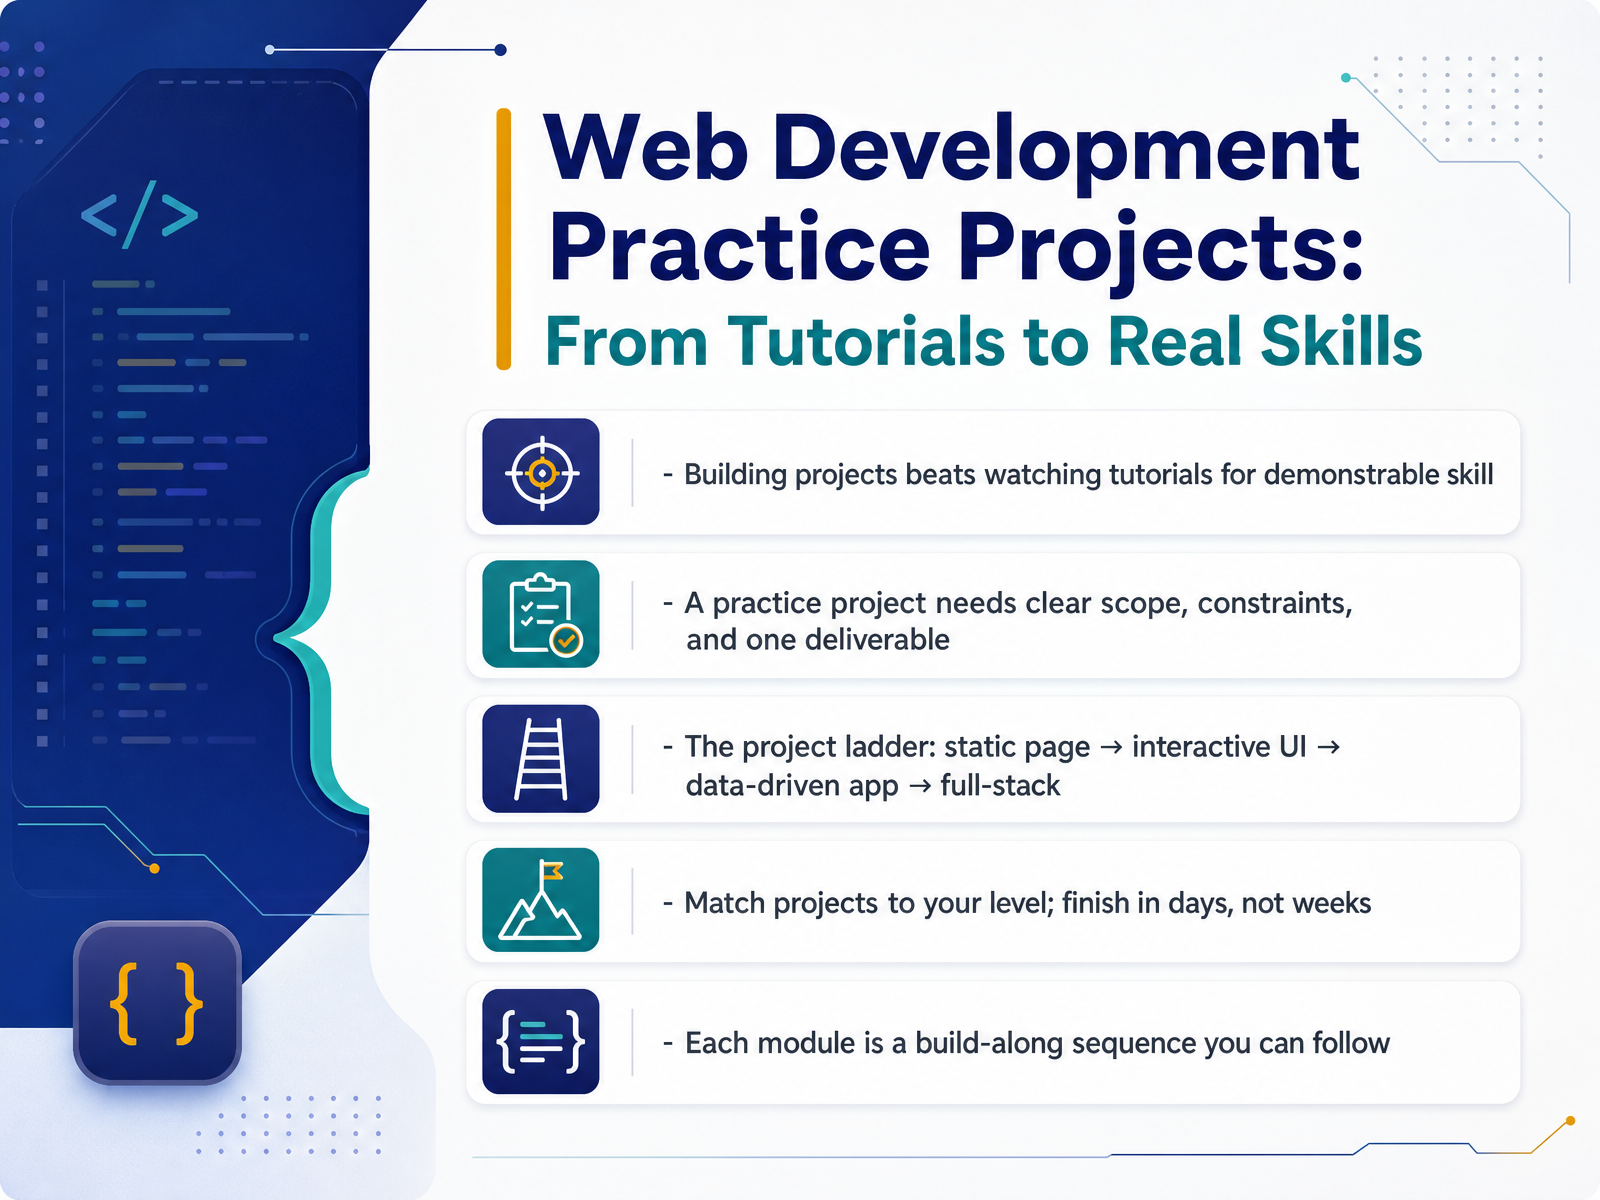
- 01Web Development Practice Projects: From Tutorials to Real SkillsWelcome. I'm glad you're here. This course is about web development practice projects, and our goal is simple: to move you from watching tutorials to building real skills. Here's the idea behind everything we'll do. Watching someone code teaches you recognition. Building something yourself teaches you skill, and skill is what you can show. So a good practice project needs three things: a clear scope, a few constraints, and exactly one deliverable you can point to. We'll also follow a project ladder. It starts with a static page, then adds an interactive user interface, then a data-driven app, and finally a full-stack application. You climb that ladder one rung at a time, matching each project to your current level. And here's a rule worth remembering: aim to finish each build in days, not weeks. Finishing matters more than scale. Every module ahead is a build-along sequence, so you will follow each step in your editor and check the result in your browser. Let's get started. Next, we'll look at choosing the right project for your level.scrimba.comthenewviews.comcodelearning.in+22 min
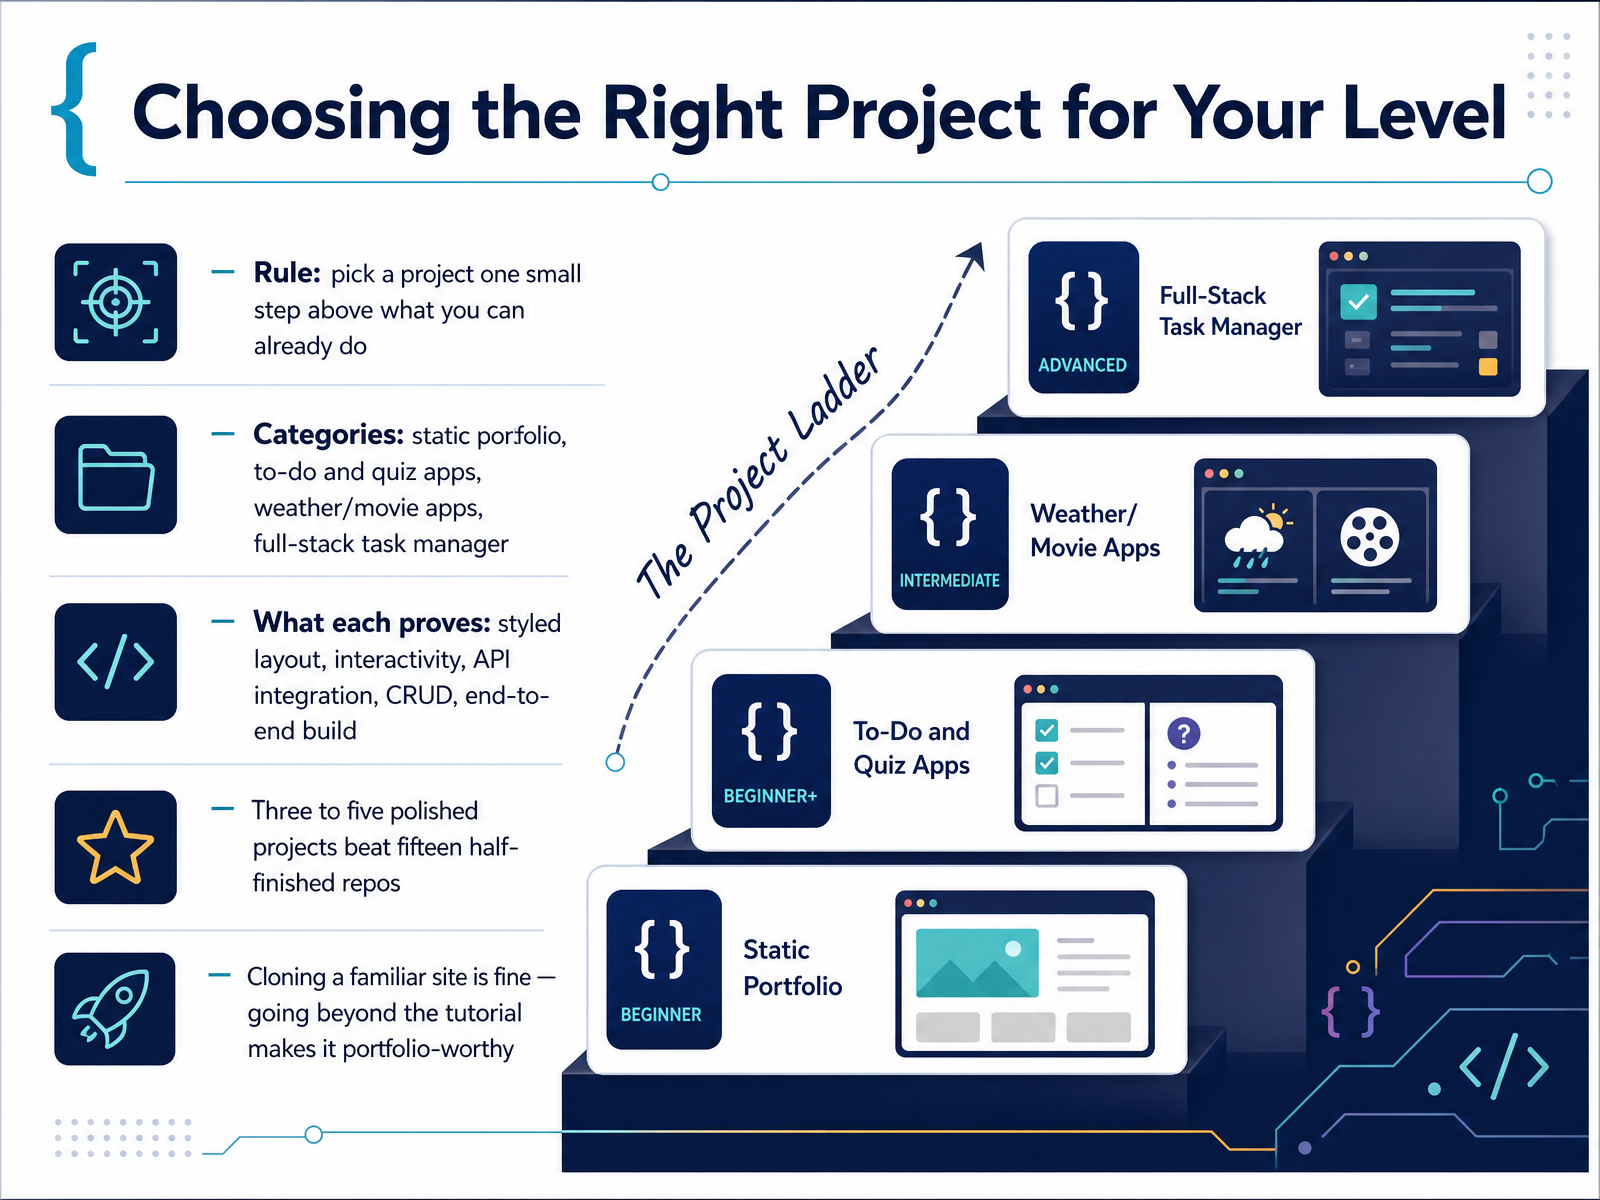
- 02Choosing the Right Project for Your LevelNow, let's choose the right project for your level. Here's the rule. Pick a project just one small step above what you can already do. Not a leap, just a step. Small steps are finishable, and finishing is where real learning happens.
Next, think in categories. A static portfolio proves you can build a styled layout. A to-do list or quiz app proves interactivity. A weather or movie app proves you can work with an API, which is simply a service that sends data to your page. A full-stack task manager proves CRUD, meaning create, read, update, and delete, plus an end-to-end build.
One more thing. Three to five polished projects beat fifteen half-finished repositories every time. And yes, cloning a familiar site is fine. It is a starting point. Add your own feature, better error handling, or a fresh design, and it becomes portfolio-worthy.
So pick one step up, finish it, and move on. Next, we look at setting up your beginner toolkit.
 scrimba.comthenewviews.comcodelearning.in+21 min
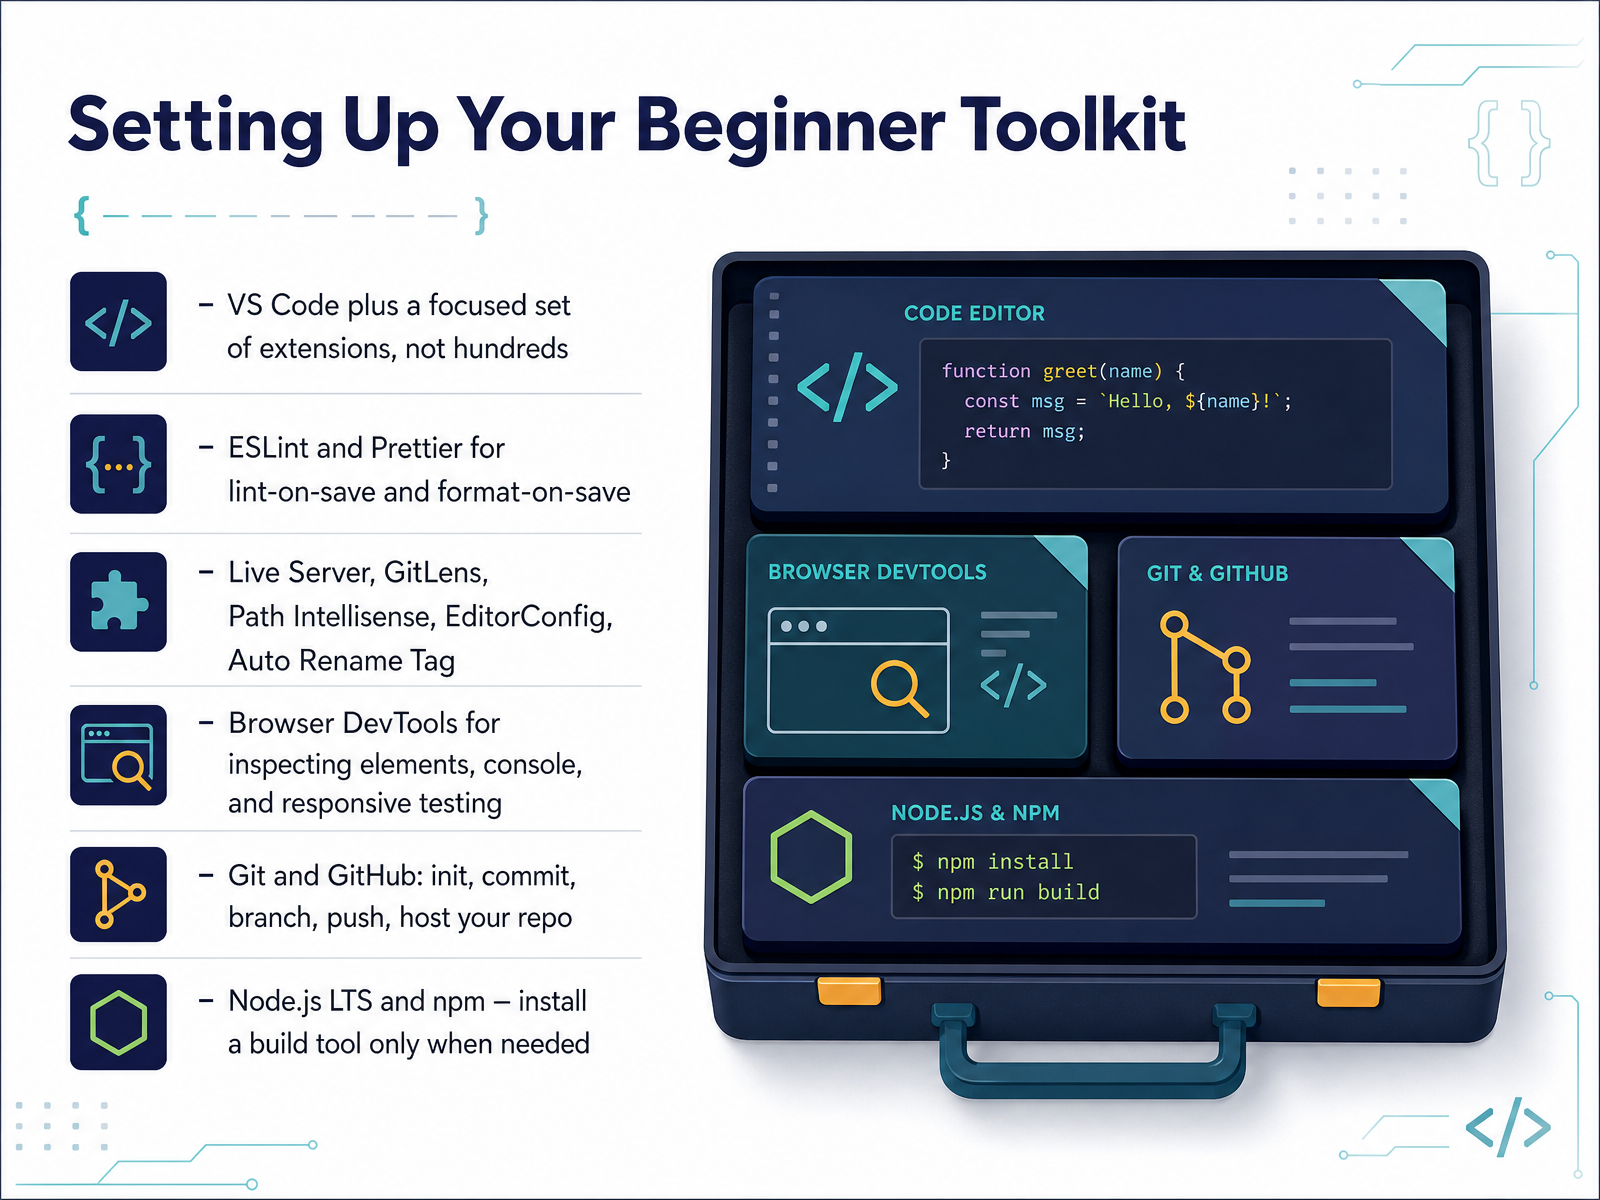
 - 03Setting Up Your Beginner ToolkitLet's set up your beginner toolkit. Keep it small and focused. Start with Visual Studio Code, a free code editor, and add only the extensions you truly need. Install ESLint to catch mistakes, and Prettier to format your code. Then turn on format on save and lint on save, so every save cleans your file. Next, add Live Server to preview pages in your browser with automatic reload, GitLens for Git history, Path Intellisense for file paths, EditorConfig for consistent spacing, and Auto Rename Tag for matching HTML tags. Learn your browser DevTools for inspecting elements, reading the console, and testing responsive layouts. Then use Git and GitHub to initialize a repository, commit, branch, and push your code online. Finally, install Node.js Long Term Support, or L T S, and npm. Add a build tool only when a project actually needs one. Your takeaway: a focused setup beats a crowded one. Next, we will look at Project Planning and Scope Control.
 codelucky.comjosenobile.coimran.xyz+22 min
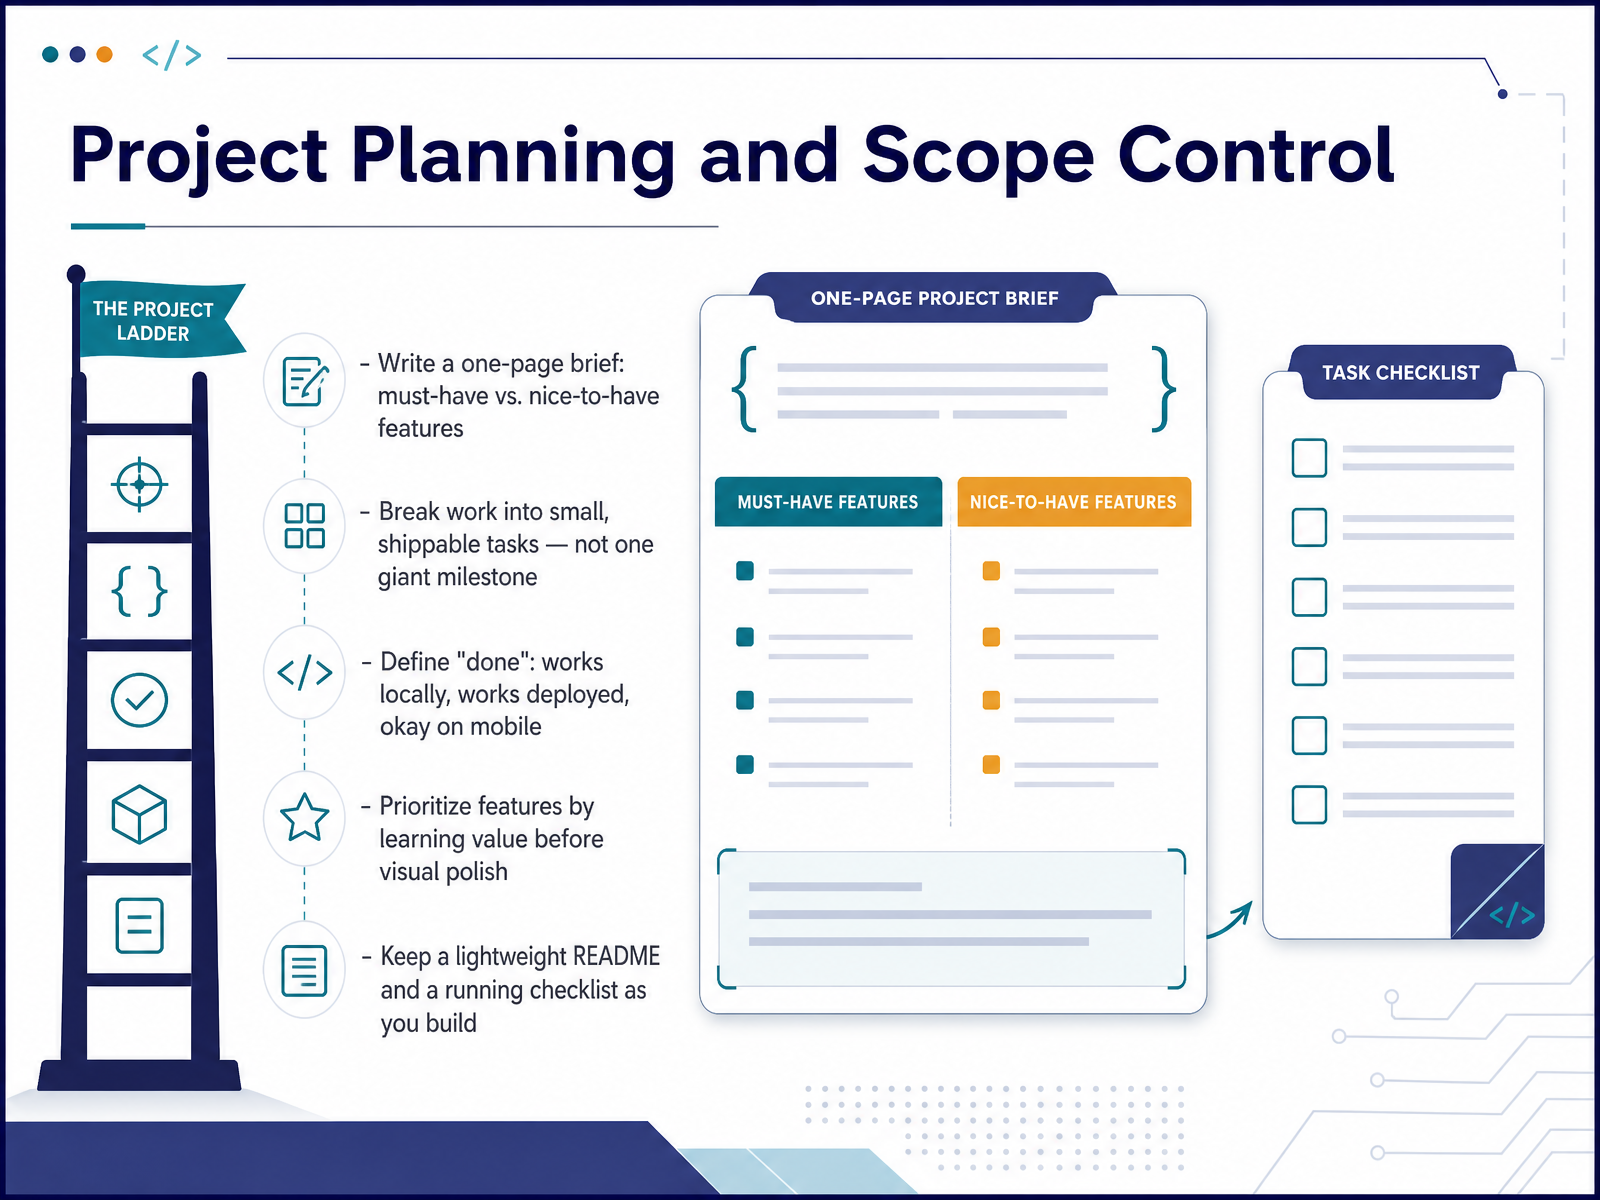
 - 04Project Planning and Scope ControlBefore you write any code, plan your project. Start with a one-page brief. Divide your features into must-have and nice-to-have. Must-haves are the features the project cannot work without. Nice-to-haves are extras you can add later. Then break the work into small, shippable tasks instead of one giant milestone. Each task should be something you can finish and check in the browser. For example, build the header first, then the main section, then the footer. Next, define what done means. A task is done when it works locally, works when deployed, and looks okay on mobile. Prioritize features by learning value, not visual polish. Learn how a form submits before you style the button. Finally, keep a lightweight README and a running checklist as you build. The README explains what the project does and how to run it. The checklist keeps you focused. Write the brief, cut the scope, define done, and start small. Next, we move to Project 1: A Static Portfolio Page.
 scrimba.comthenewviews.comcodelearning.in+22 min
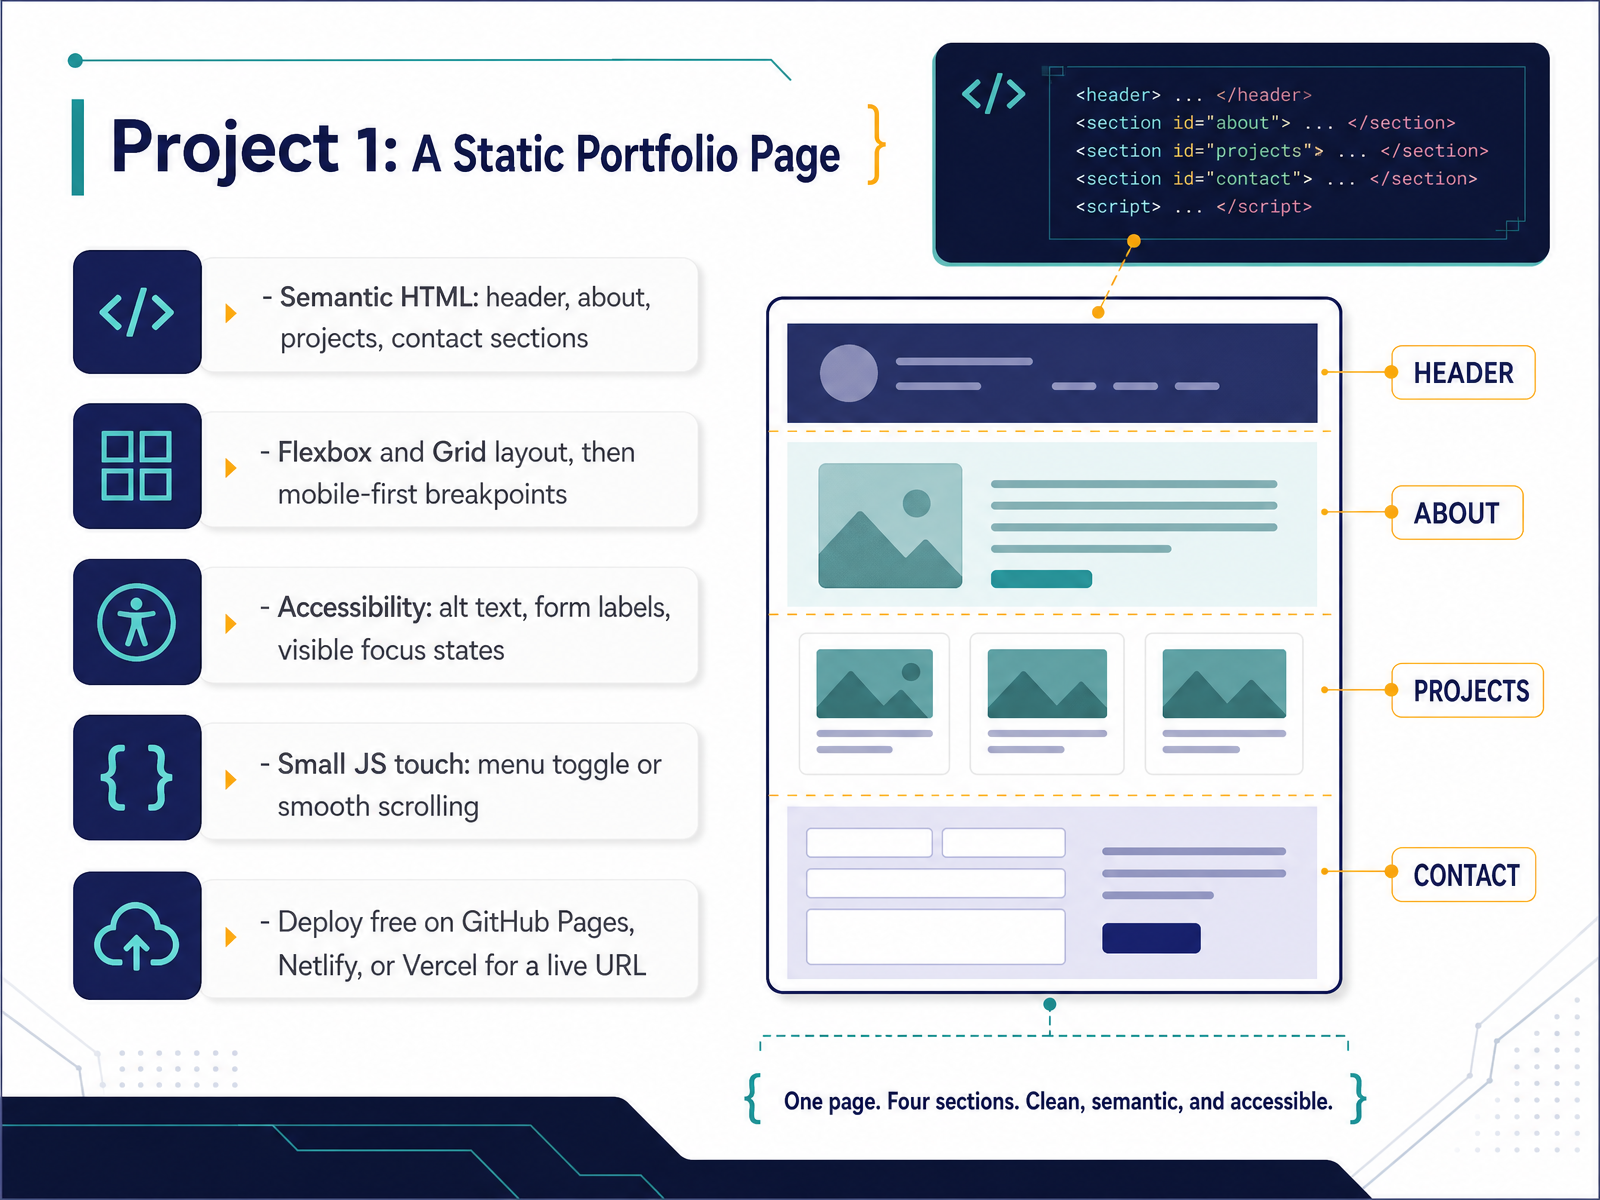
 - 05Project 1: A Static Portfolio PageNow let's build your first real project: a static portfolio page. It is one page that introduces you and shows your work, and it is a great first build because you can finish it in a day or two.
Start with semantic HTML. That means using tags that describe what each part is, like header, section for your about and projects, and footer for contact. Screen readers and search engines understand these tags, so your page is easier to navigate.
Then handle layout. Use Flexbox for one-dimensional rows and columns, like your navigation bar. Use Grid for two-dimensional layouts, like your project cards. Build mobile-first, meaning you style for the small screen first, then add breakpoints for tablet and desktop with media queries.
Accessibility matters here too. Write real alt text for images, connect every form label to its input, and keep keyboard focus visible with a clear outline on links and buttons.
Finally, add one small JavaScript touch. A menu toggle that opens and closes on click, or smooth scrolling between sections, gives you a first taste of interactivity.
Last step: deploy for free on GitHub Pages, Netlify, or Vercel. When it is live, you have a real URL you can share. Next, let's look at deploying your first static site.
 scrimba.comthenewviews.comcodelearning.in+22 min
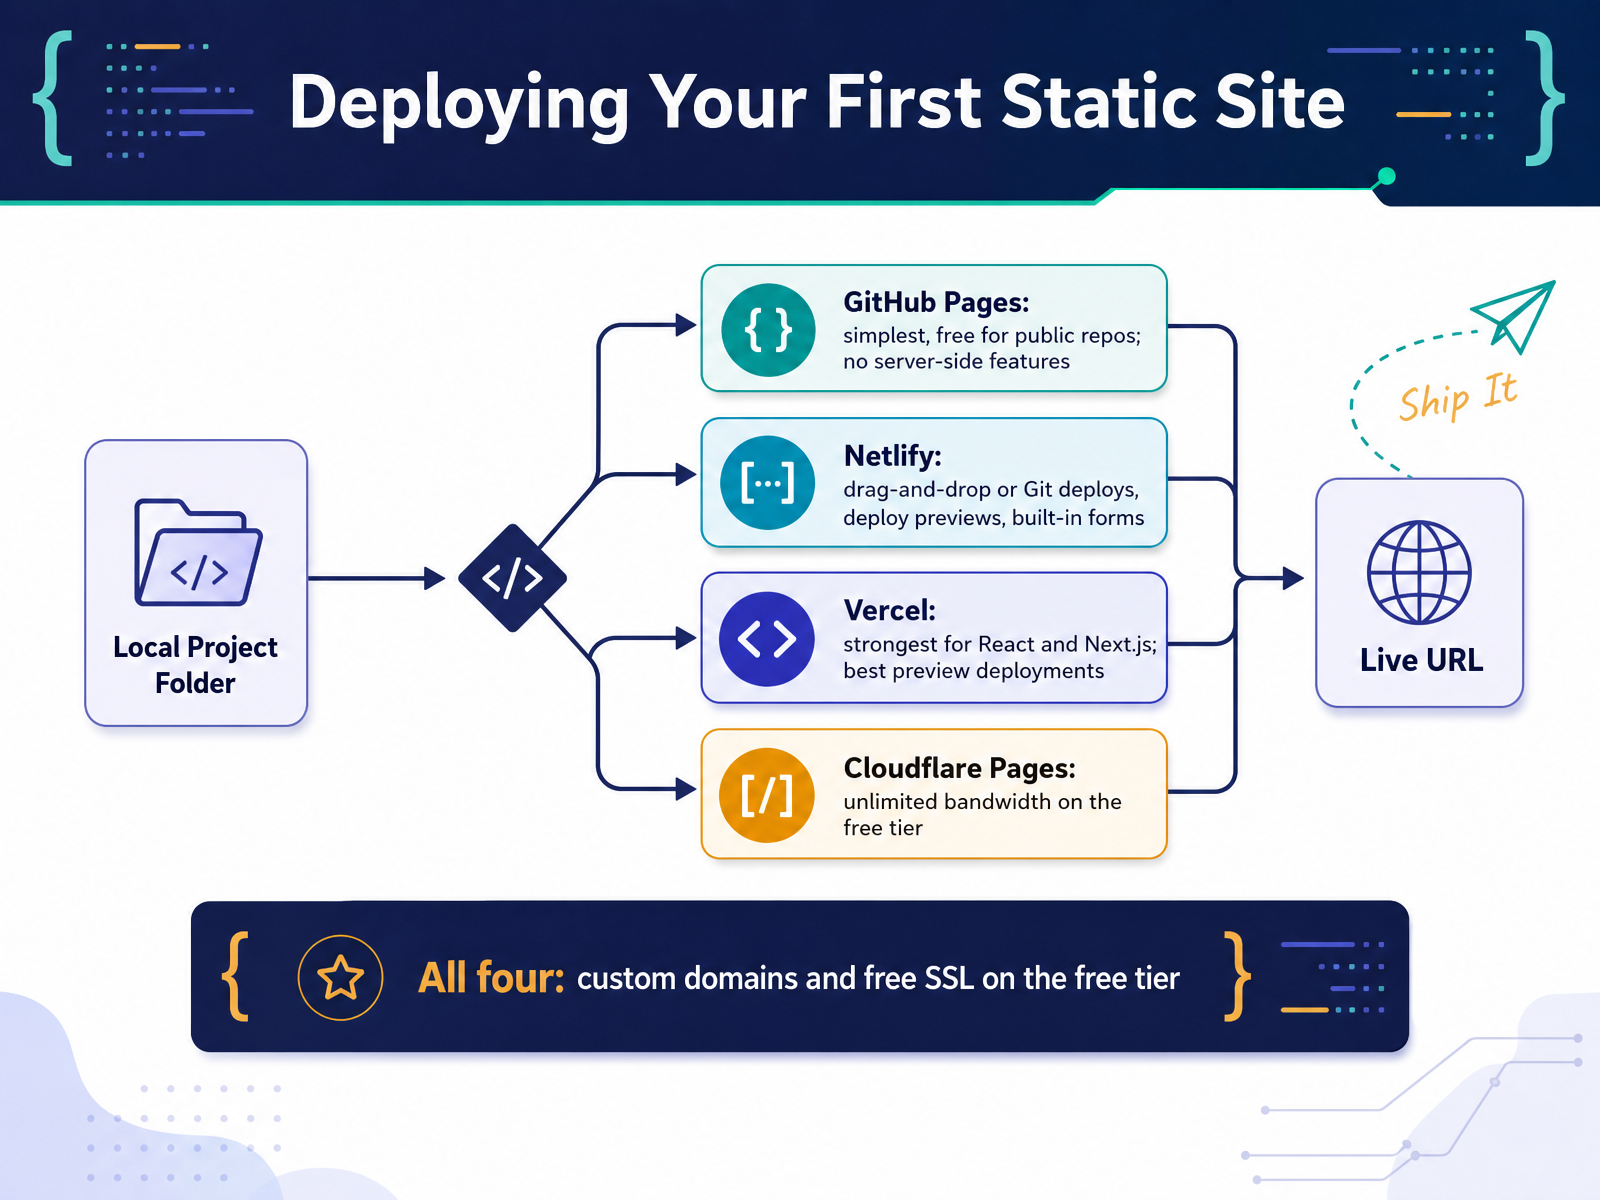
 - 06Deploying Your First Static SiteNow let's get your finished site online with free static hosting. A static site means your pages are plain HTML, CSS, and JavaScript files, served just as they are. All four options here include a custom domain and free SSL, which gives you the secure padlock in the browser. GitHub Pages is the simplest. It is free for public repositories, and your site publishes straight from your GitHub repo. It has no server-side features. Netlify lets you drag and drop a folder to deploy, or connect a Git repository. You also get deploy previews, which are temporary links for each change, plus built-in forms. Vercel is strongest for React and Next.js projects, and it has the best preview deployments. Cloudflare Pages gives you unlimited bandwidth on the free tier, so traffic spikes will not cut your site off. Pick one, follow its setup steps, and open the live link in your browser. When your page loads in a new tab, you are deployed. Next, we will build Project 2, an interactive app with vanilla JavaScript.
 startupik.comhostduel.comnamastedev.com+22 min
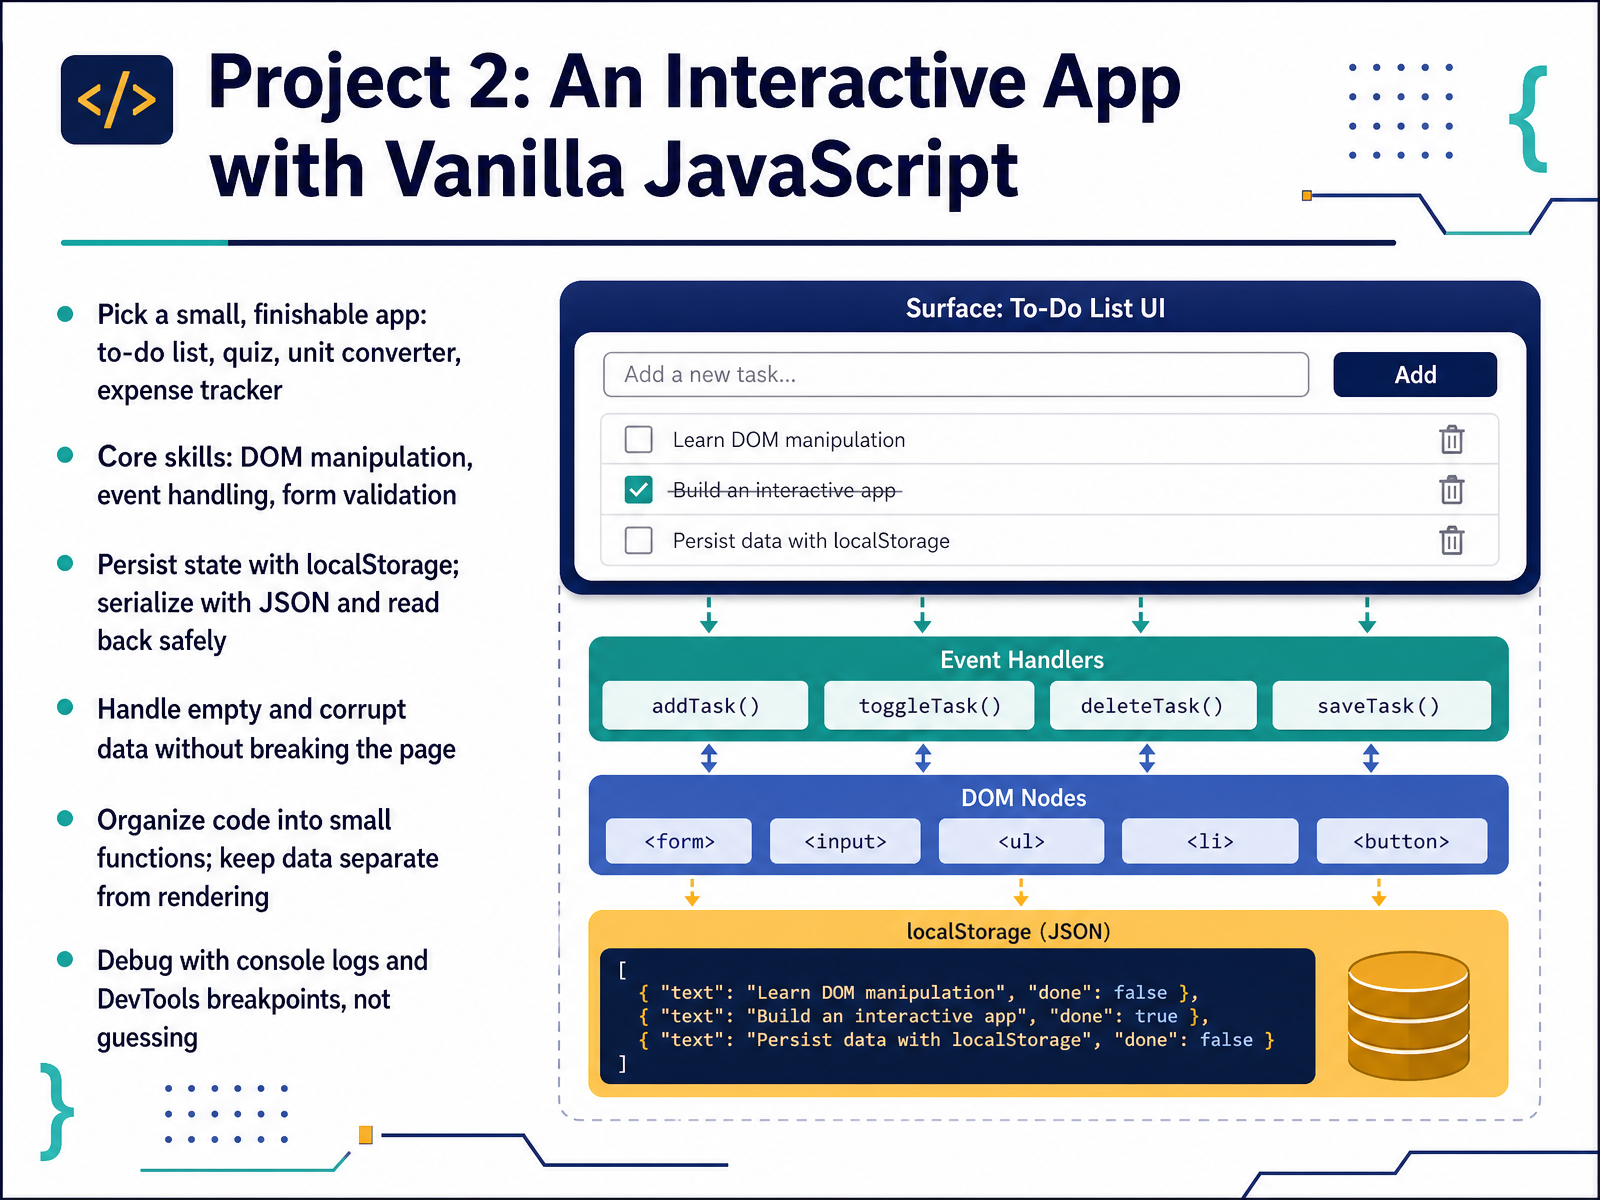
 - 07Project 2: An Interactive App with Vanilla JavaScriptNow let's build your second project: an interactive app using vanilla JavaScript. Start small and finishable. A to-do list, a quiz, a unit converter, or an expense tracker all work well. The core skills here are DOM manipulation, which means updating the page from code, event handling, like responding to a click, and form validation. To save data between visits, use localStorage. You store objects by converting them with JSON, and you read them back safely with a try and catch block. That way, empty or corrupt data will not break your page. Keep your code organized into small functions, and keep your data separate from your rendering. When something goes wrong, debug with console logs and DevTools breakpoints instead of guessing. Pick one small app and start building. Next, we move on to working with data and public APIs.
 scrimba.comthenewviews.comcodelearning.in+21 min
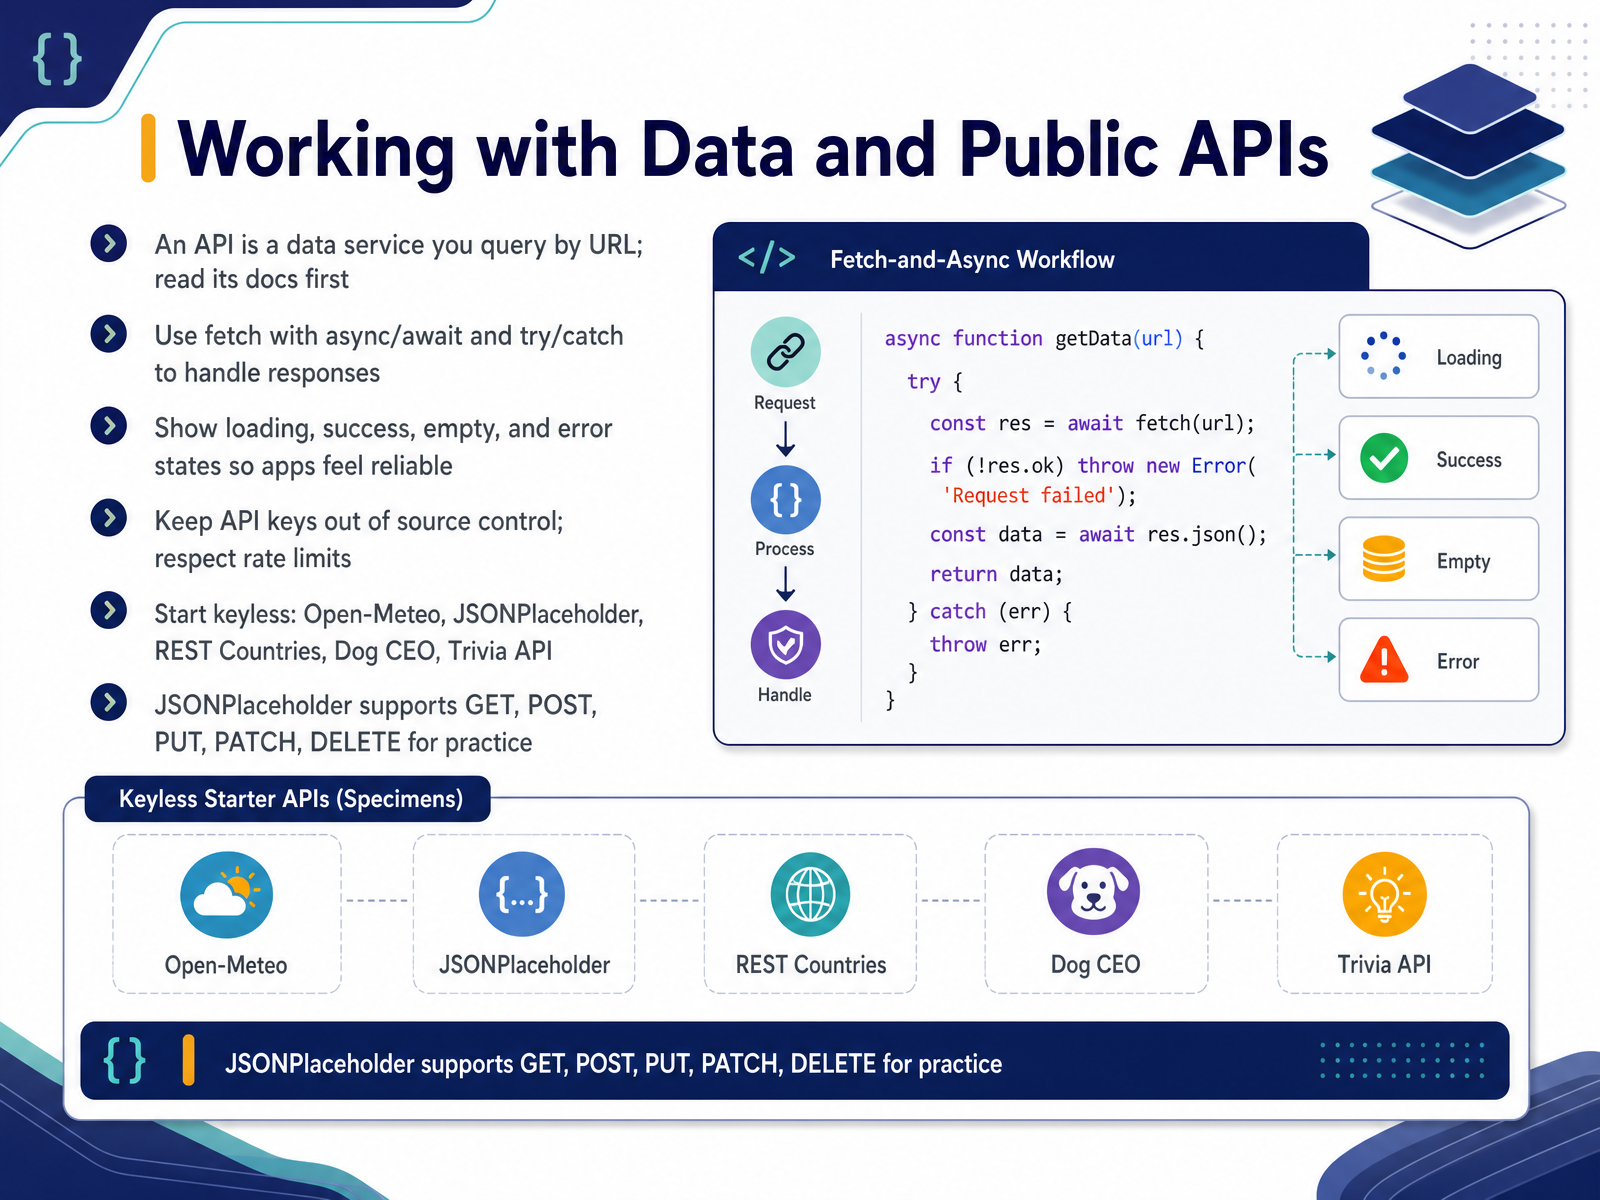
 - 08Working with Data and Public APIsNow let's talk about working with data and public APIs. An API is a data service you query by URL. You send a request, and it sends back data, usually in JSON format. Read the documentation first, because it tells you the exact URLs and the data you will get back.
In JavaScript, use fetch with async and await, and wrap it in a try and catch block so failed requests do not break your page. Then show four states: loading, success, empty, and error. That way, users always know what is happening.
Keep API keys out of your source code, and respect rate limits, which are the maximum number of requests allowed. Start with keyless APIs: Open-Meteo for weather, REST Countries for country data, Dog CEO for images, and the Trivia API for quiz questions. JSONPlaceholder is great for practice because it supports GET, POST, PUT, PATCH, and DELETE requests.
Pick one, make your first call, and log the response. Next, we will build Project 3: A Data-Driven App.
 github.comjsonplaceholder.typicode.comfreeapi.app+21 min
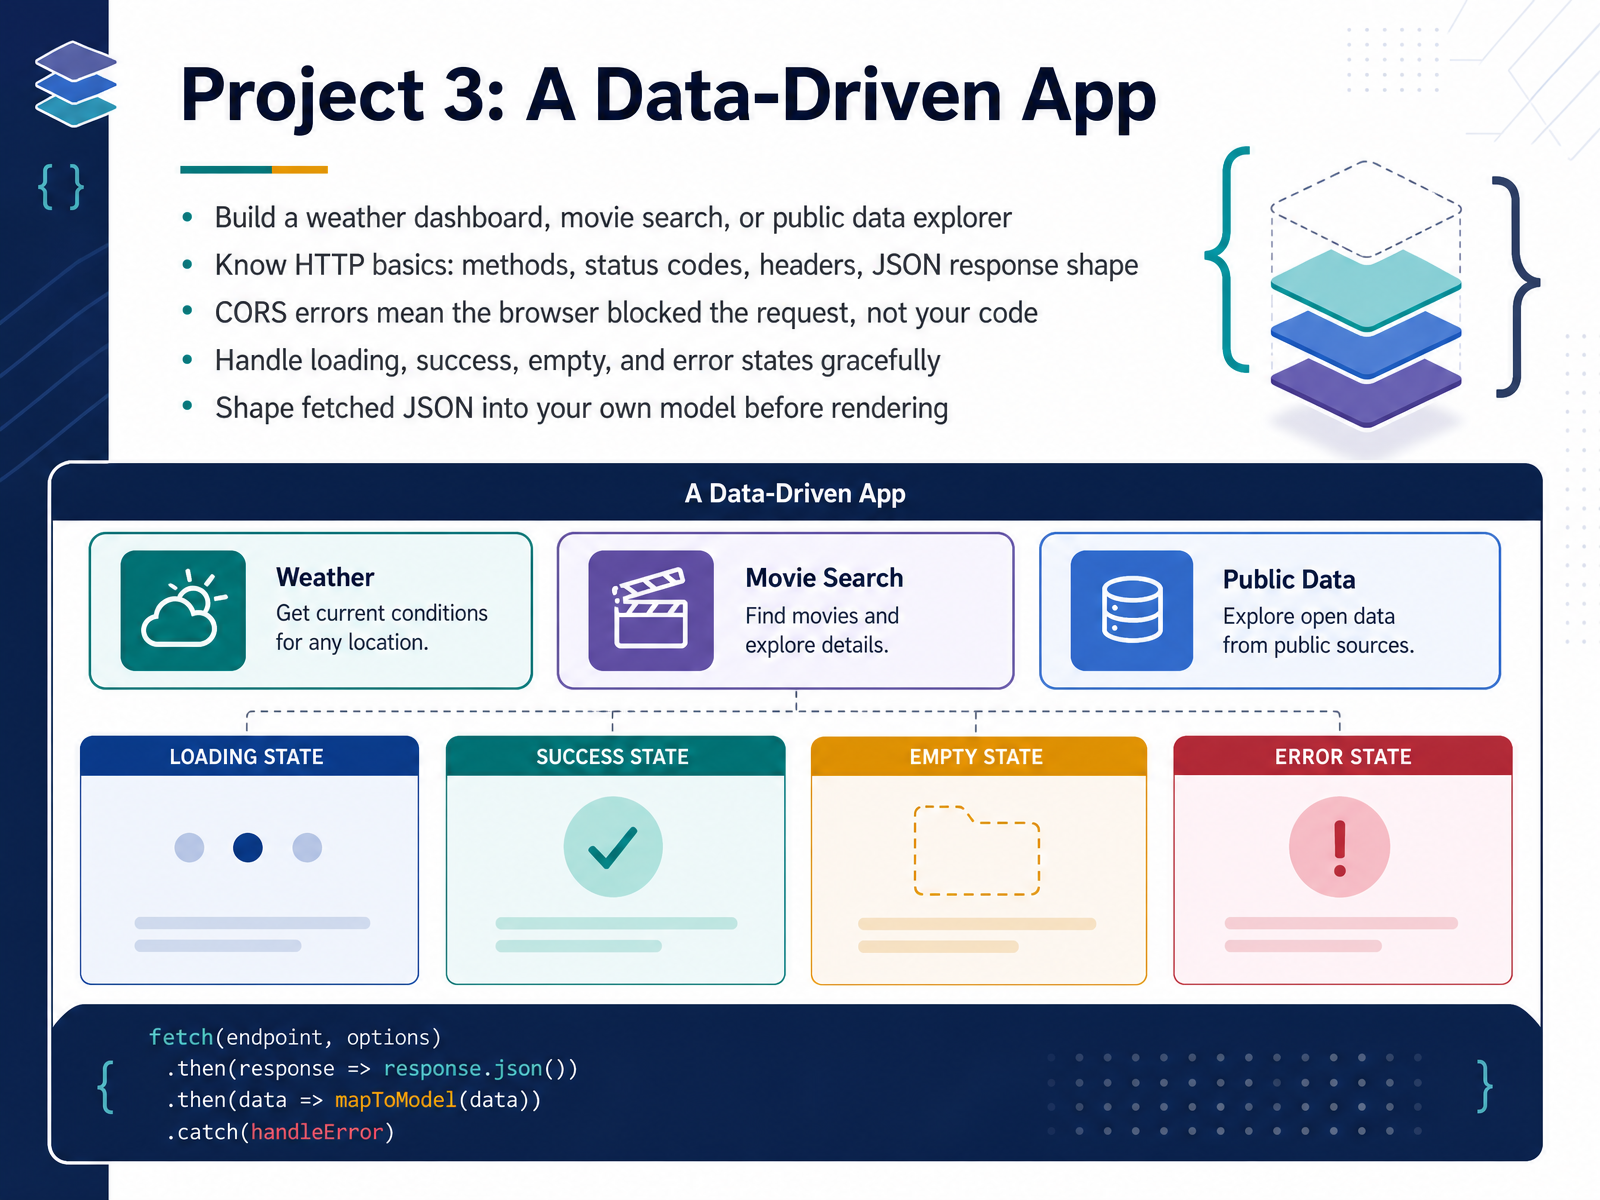
 - 09Project 3: A Data-Driven AppNow let's look at Project 3: a data-driven app. You could build a weather dashboard, a movie search, or a public data explorer. Good news: many free APIs need no key at all. For weather, Open-Meteo works with a simple web address. For countries, try REST Countries or Wikipedia. To fetch data, you call an API over HTTP. HTTP is just the set of rules browsers use to request and send data. Learn a few basics: methods like GET and POST, status codes like 200 for success and 404 for not found, headers, and the shape of a JSON response. JSON is a text format for structured data, using curly braces and key value pairs. If you see a CORS error, the browser blocked the request for security, not your code. CORS is a browser safety rule. Handle four states every time: loading, success, empty, and error. That means a spinner, your results, a friendly no results message, and a clear error message. Finally, shape the fetched JSON into your own model before rendering. Pick only the fields you need, rename them clearly, then display them. Try this with Open-Meteo or REST Countries today. Next, introducing a framework: a small React or Vue build.
 github.comjsonplaceholder.typicode.comfreeapi.app+22 min
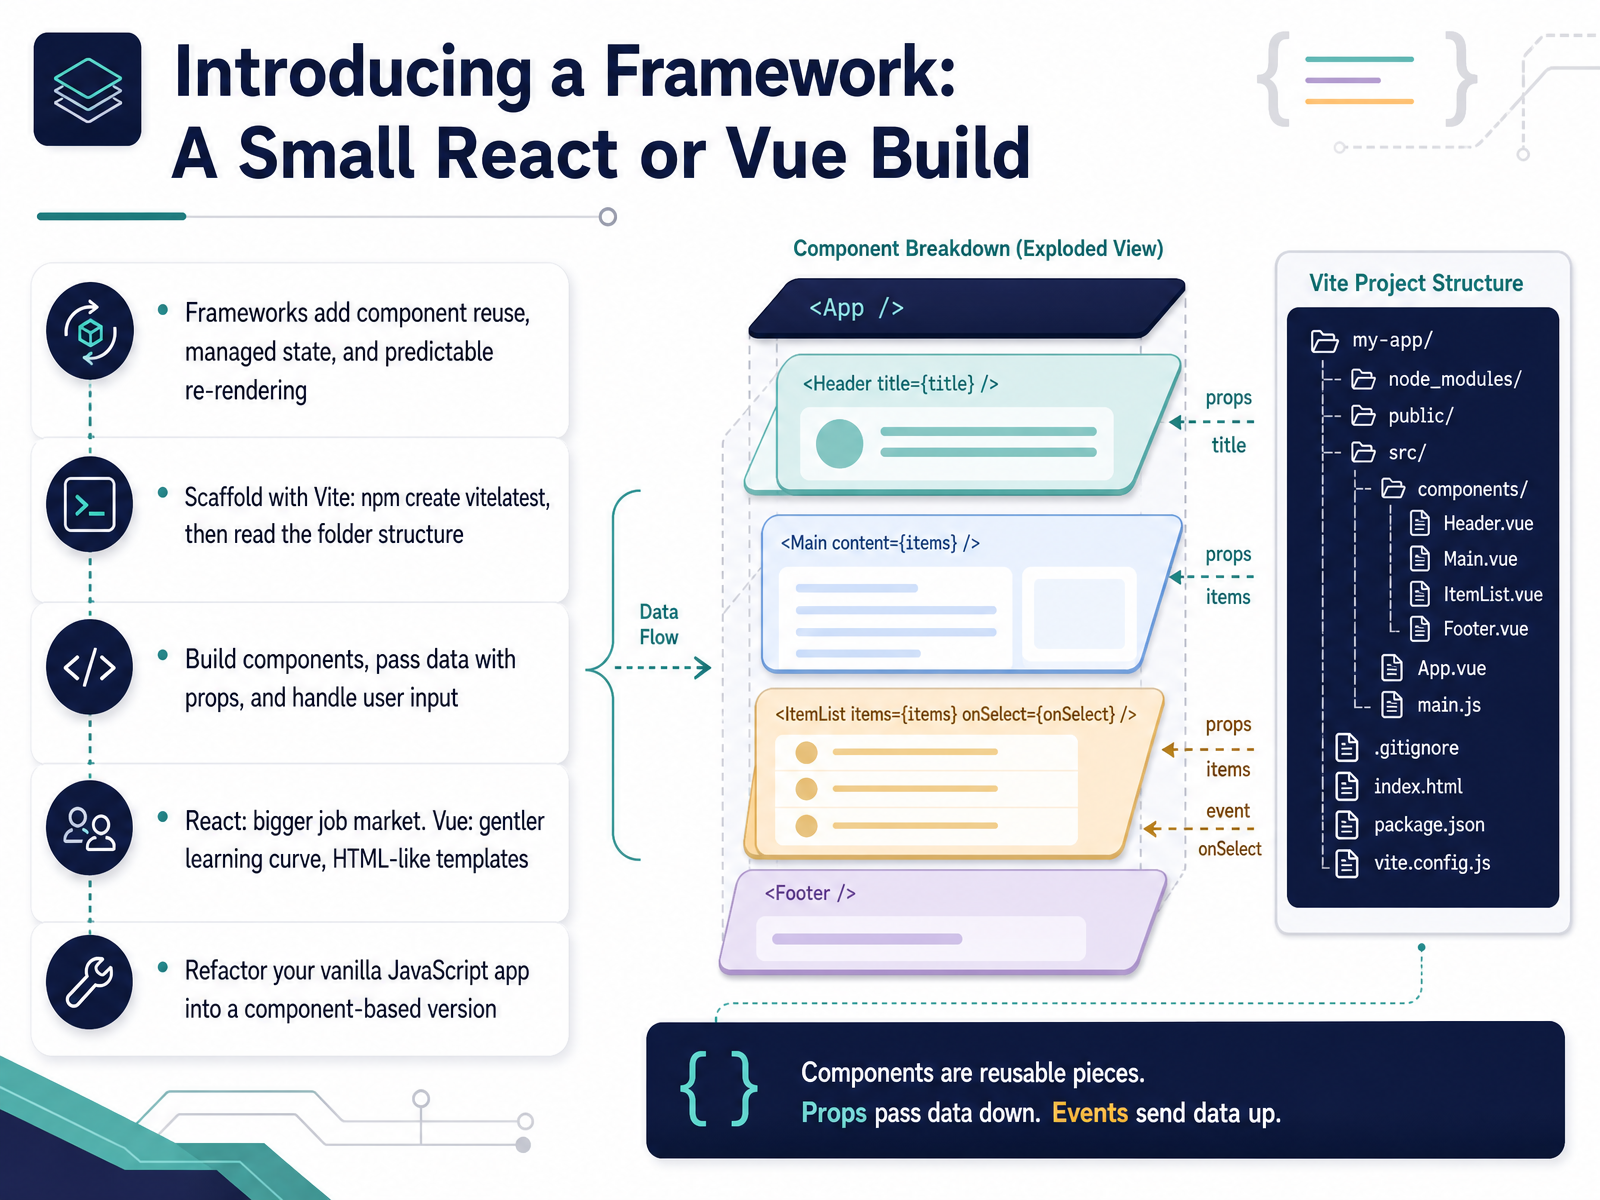
 - 10Introducing a Framework: A Small React or Vue BuildNow let's bring in a framework. A framework is a library that gives your app structure. It adds three things: component reuse, managed state, and predictable re-rendering. In plain terms, you build small pieces once and use them in many places.
We will use Vite as our build tool. Vite is a tool that starts a fast development server and prepares your files for the browser. Scaffold a project by running npm create vite at latest in your terminal. Then open the folder and read the structure. Notice the index dot html file, the source folder, and the main entry file. That is where your app begins.
In your project, build a few components. A component is a reusable piece of user interface, like a button or a list item. Pass data into a component with props. Props are read-only inputs. Then handle user input, such as typing in a text box, so the screen updates.
React and Vue are both good choices. React has a bigger job market. Vue has a gentler learning curve and templates that look like plain HTML.
Your task now is a refactor. Take the vanilla JavaScript app you already built and rewrite it as a component-based version. Check the browser after each change. You should see the same behavior, just organized into components.
Next, we look at when your project needs more than a browser. Project four, when you need a backend and database.
 2 min
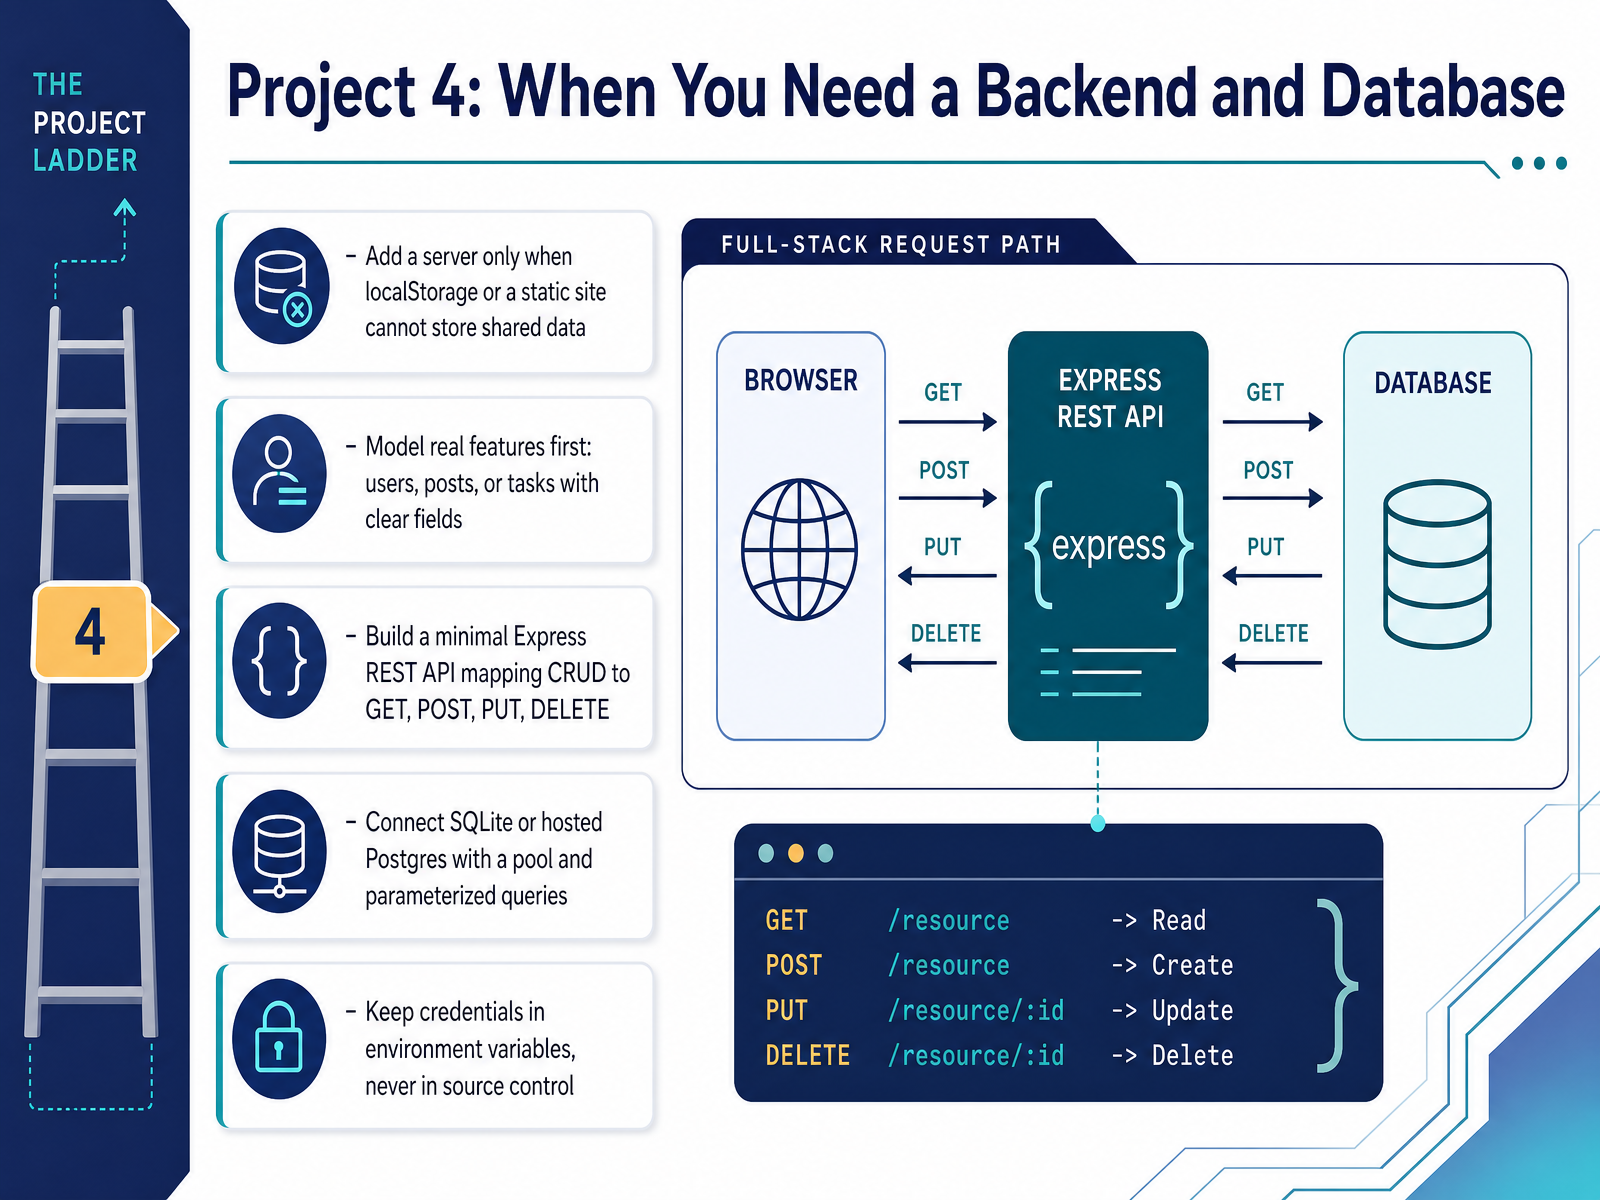
2 min - 11Project 4: When You Need a Backend and DatabaseNow let's look at Project 4: when you actually need a backend and a database. A frontend-only site is fine until your data must be shared between users, or saved somewhere that lasts. That is when a server and a database earn their place. So, when do you need a backend? When localStorage or a static site cannot store shared data. If two people must see the same records, you need a server. Start by modeling real features first. Write down users, posts, or tasks with clear fields. For a task, that might be a title, a completed flag, and a createdAt date. Next, build a minimal Express REST API. Express is a small Node.js framework for handling HTTP requests. A REST API maps your CRUD actions to GET, POST, PUT, and DELETE. For example, POST creates a task, GET reads it, PUT updates it, and DELETE removes it. Now connect a database. SQLite works for local practice, and hosted Postgres works well when you deploy. Use a connection pool so the server reuses database connections instead of opening a new one each time. Always use parameterized queries, which send values separately from the SQL text and protect against injection. Finally, keep credentials in environment variables, never in source control. Put your database password in a dot env file and add that file to gitignore. If you can create one task through your API and see it come back from the database, you have a real full stack project. Up next, we will look at testing, debugging, and code quality habits.
 2 min
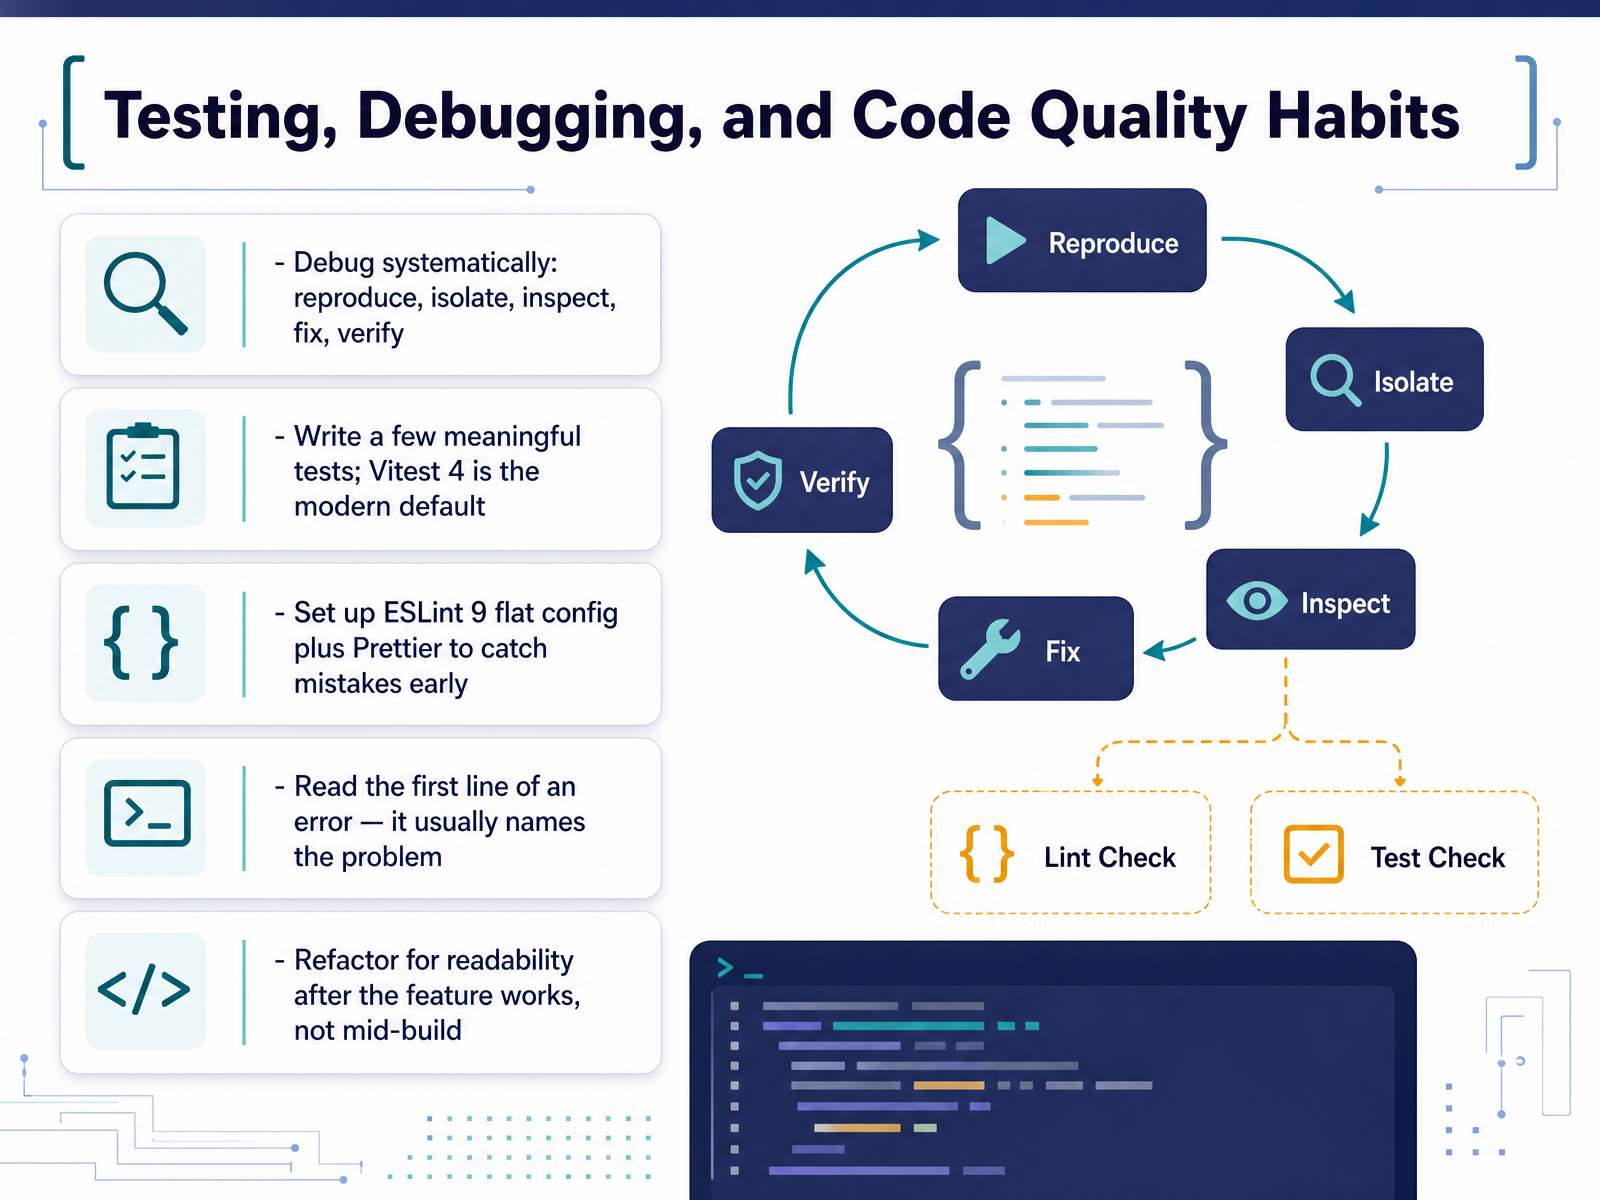
2 min - 12Testing, Debugging, and Code Quality HabitsNow let's look at habits that keep your code healthy. Start with debugging. Work through it the same way every time. Reproduce the bug, isolate it to one small piece of code, inspect what is happening, fix it, then verify the fix in your browser. When you hit an error, read the first line first. It usually names the problem and the file. Next, write a few meaningful tests rather than many shallow ones. Vitest 4 is the modern default, and running npm test shows a pass or fail in your terminal. For code quality, add ESLint 9 with a flat config plus Prettier. ESLint finds likely mistakes, and Prettier formats your code consistently. One caution. ESLint 9 uses eslint.config.js, so an old dot eslintrc file will be ignored. And refactor for readability only after the feature works, never mid build. That way your browser stays green while you clean things up. Coming up next, Documenting and Showcasing Your Projects.
 codelucky.comjosenobile.coimran.xyz+22 min
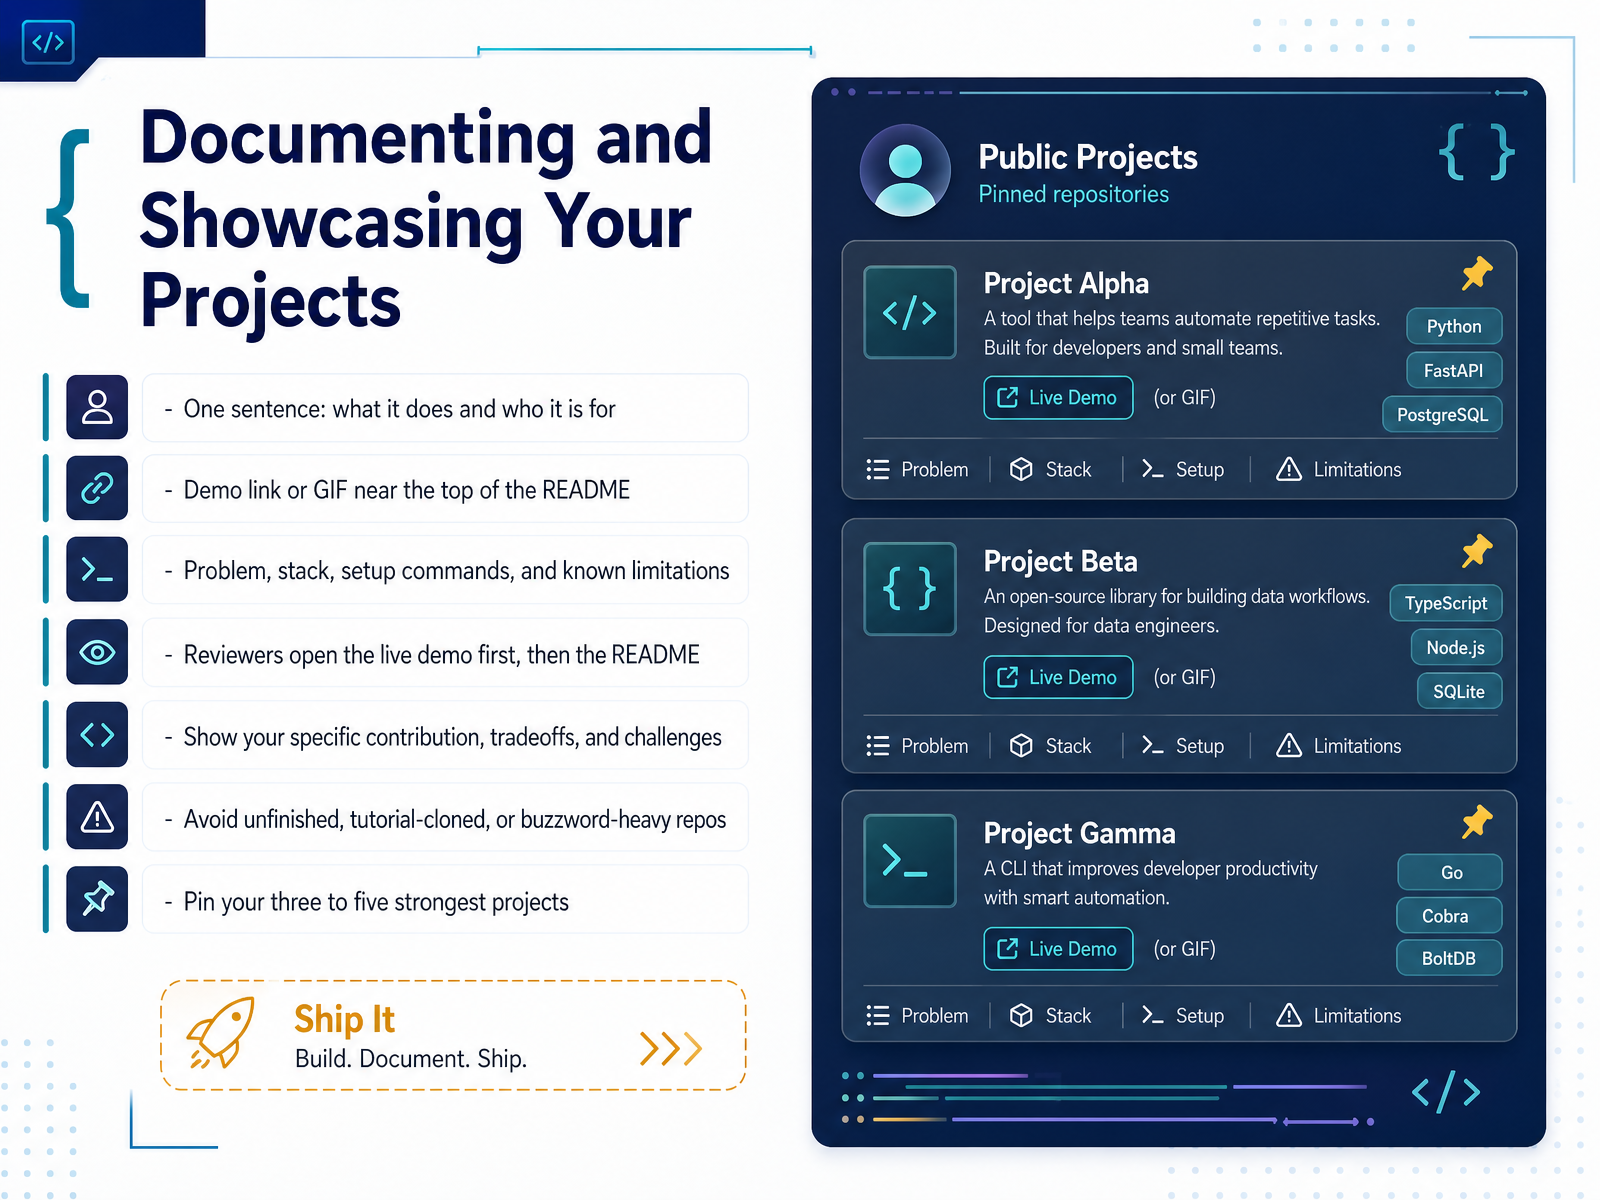
 - 13Documenting and Showcasing Your ProjectsLet's talk about how to document and showcase your projects. This is where good work becomes visible work.
Start your README with one sentence that says what the project does and who it is for. For example, a meal menu app that lets students check today's meals in one tap.
Right near the top, add a live demo link or a short GIF. A GIF is a brief looping animation that shows your app in action. Reviewers open the live demo first, then the README. So make that first impression count.
Then cover four things: the problem you solved, your tech stack, exact setup commands, and known limitations. Listing limitations is not a weakness. It shows judgment.
Be clear about your specific contribution, the tradeoffs you made, and the challenges you hit. Avoid unfinished repos, tutorial clones, and buzzword-heavy descriptions.
Finally, pin your three to five strongest projects on your profile. Unpin the rest. That way, visitors see your best work first.
Quick takeaway: treat your README as the landing page for your project. One clear sentence, a working demo, and honest notes about what you built.
Next, let's look at a 30-Day Plan for Keeping Momentum.
 2 min
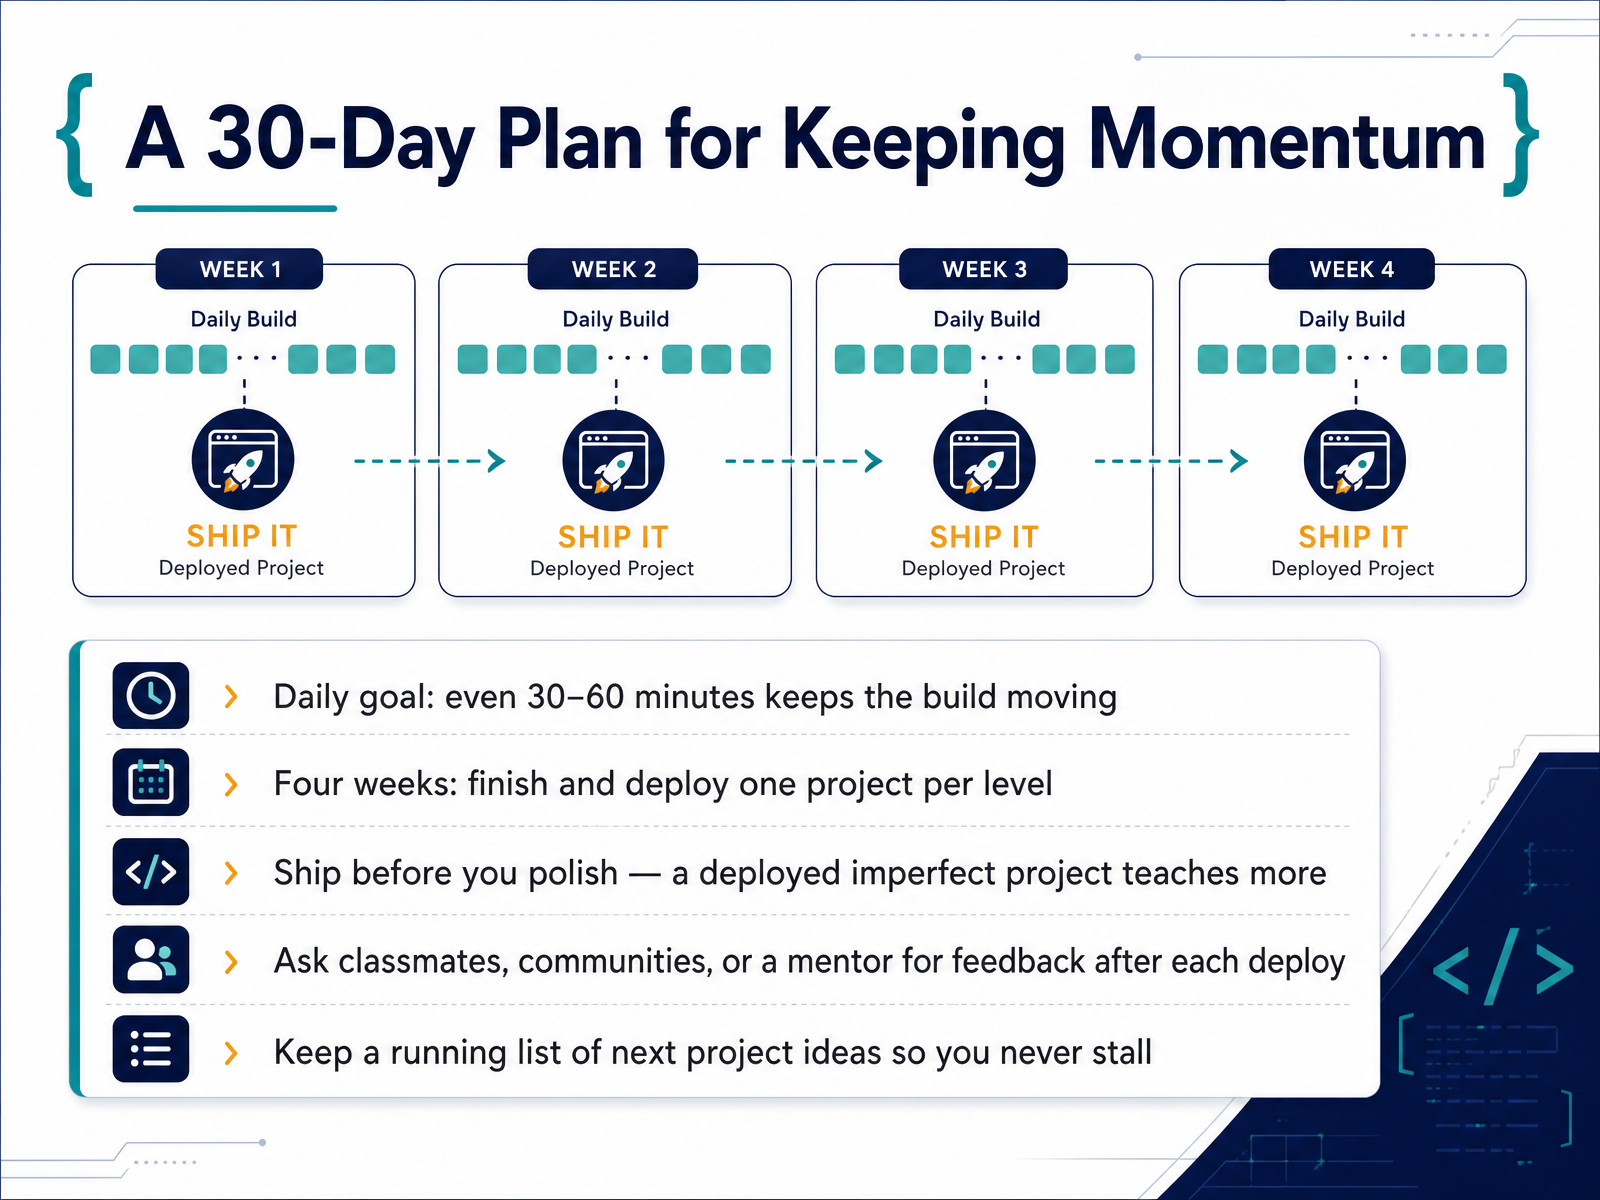
2 min - 14A 30-Day Plan for Keeping MomentumLet's finish with a simple plan you can actually follow. Your daily goal is small: even thirty to sixty minutes keeps the build moving. That habit matters more than long, occasional sessions. Over four weeks, finish and deploy one project per level. Start with a static page, then add interactivity, then work with data, then build a small app. Here is the key rule. Ship before you polish. A deployed project that is imperfect teaches you more than a perfect project hiding on your laptop. So deploy early, on GitHub Pages or Netlify, and share the link. After each deploy, ask classmates, a community, or a mentor for feedback. Real users spot what you miss. Finally, keep a running list of next project ideas. When one project ends, you start the next without stalling. You now have the path, the tools, and the plan. Keep building, keep shipping, and thank you for learning with me. You are ready. Now go build something.
 scrimba.comthenewviews.comcodelearning.in+22 min
Take the deck with you
Download this course as a file — free, no sign-up needed.
- PDF handoutEvery slide page, ready to print or share.15 pages · 3.5 MBDownload
- Narrated PowerPointThe deck that presents itself — every slide carries the digital human's narration video.15 pages · 16.8 MBDownload
- PowerPoint slidesThe full deck as a .pptx — open it in PowerPoint, Keynote, or Google Slides.15 pages · 3.3 MBDownload
Free to use in your own training — please keep the PersonWise credit page at the end.
Have your own deck? Turn it into a course
Sources consulted
Web sources consulted while building this course.
- Best Coding Project Ideas for Beginners [2026] — scrimba.com
- 50+ Web Development Projects With Source Code (2026) — thenewviews.com
- HTML CSS Projects 2026: 8 Best Beginner Projects to Build Your Portfolio — codelearning.in
- Web Development Projects — geeksforgeeks.org
- 50 Web Development Project Ideas 2026-27 - Best Project Ideas — bestprojectideas.com
- How to Set Up VS Code for Web Development - CodeLucky — codelucky.com
- VS Code in 2026: The Complete Setup, Extensions & AI Coding Guide | Jose Nobile — josenobile.co
- 10 Must-Have VS Code Extensions for Web Developers (2026 Edition) — imran.xyz
- How to use VS Code for web development - The Tech Edvocate — thetechedvocate.org
- 20 Best VS Code Extensions for Web Development in 2026 — syncfusion.com
- GitHub Pages vs Netlify vs Vercel: Which Platform Wins? - Startupik | Startup magazine — startupik.com
- Static Site Hosting: Netlify vs Vercel vs GitHub Pages vs Cloudflare Pages | HostDuel — hostduel.com
- Hosting a Static Website: Comparing GitHub Pages, Netlify, and Vercel - NamasteDev Blogs — namastedev.com
- Static site hosting compared in 2026: Cloudflare Pages, Vercel, Netlify, GitHub Pages and the new contenders | HostDir — hostdir.net
- Static Site Hosting Comparison 2026: Free Platforms Reviewed — Which One Actually Delivers? - HTMLPUT — blog.htmlput.com
- spinov001-art/free-apis-list — github.com
- JSONPlaceholder - Free Fake REST API — jsonplaceholder.typicode.com
- FreeAPI - Open Source API Hub | Chaicode — freeapi.app
- FreeAPI.me | Free Public APIs for Developers — freeapi.me
- spinov001-art/awesome-free-apis-2026 — github.com