Begin
14 pages · ~28 min
Reading Topographic Maps: Contours and Landforms
This training teaches participants to read topographic maps, interpret contour lines, and identify landforms—ideal for hikers, outdoor enthusiasts, and GIS learners building foundational map skills.
A digital instructor presents all 14 pages. Hold “Ask” at any point and ask out loud — the answer comes from this course. No sign-up needed.
What you’ll learn
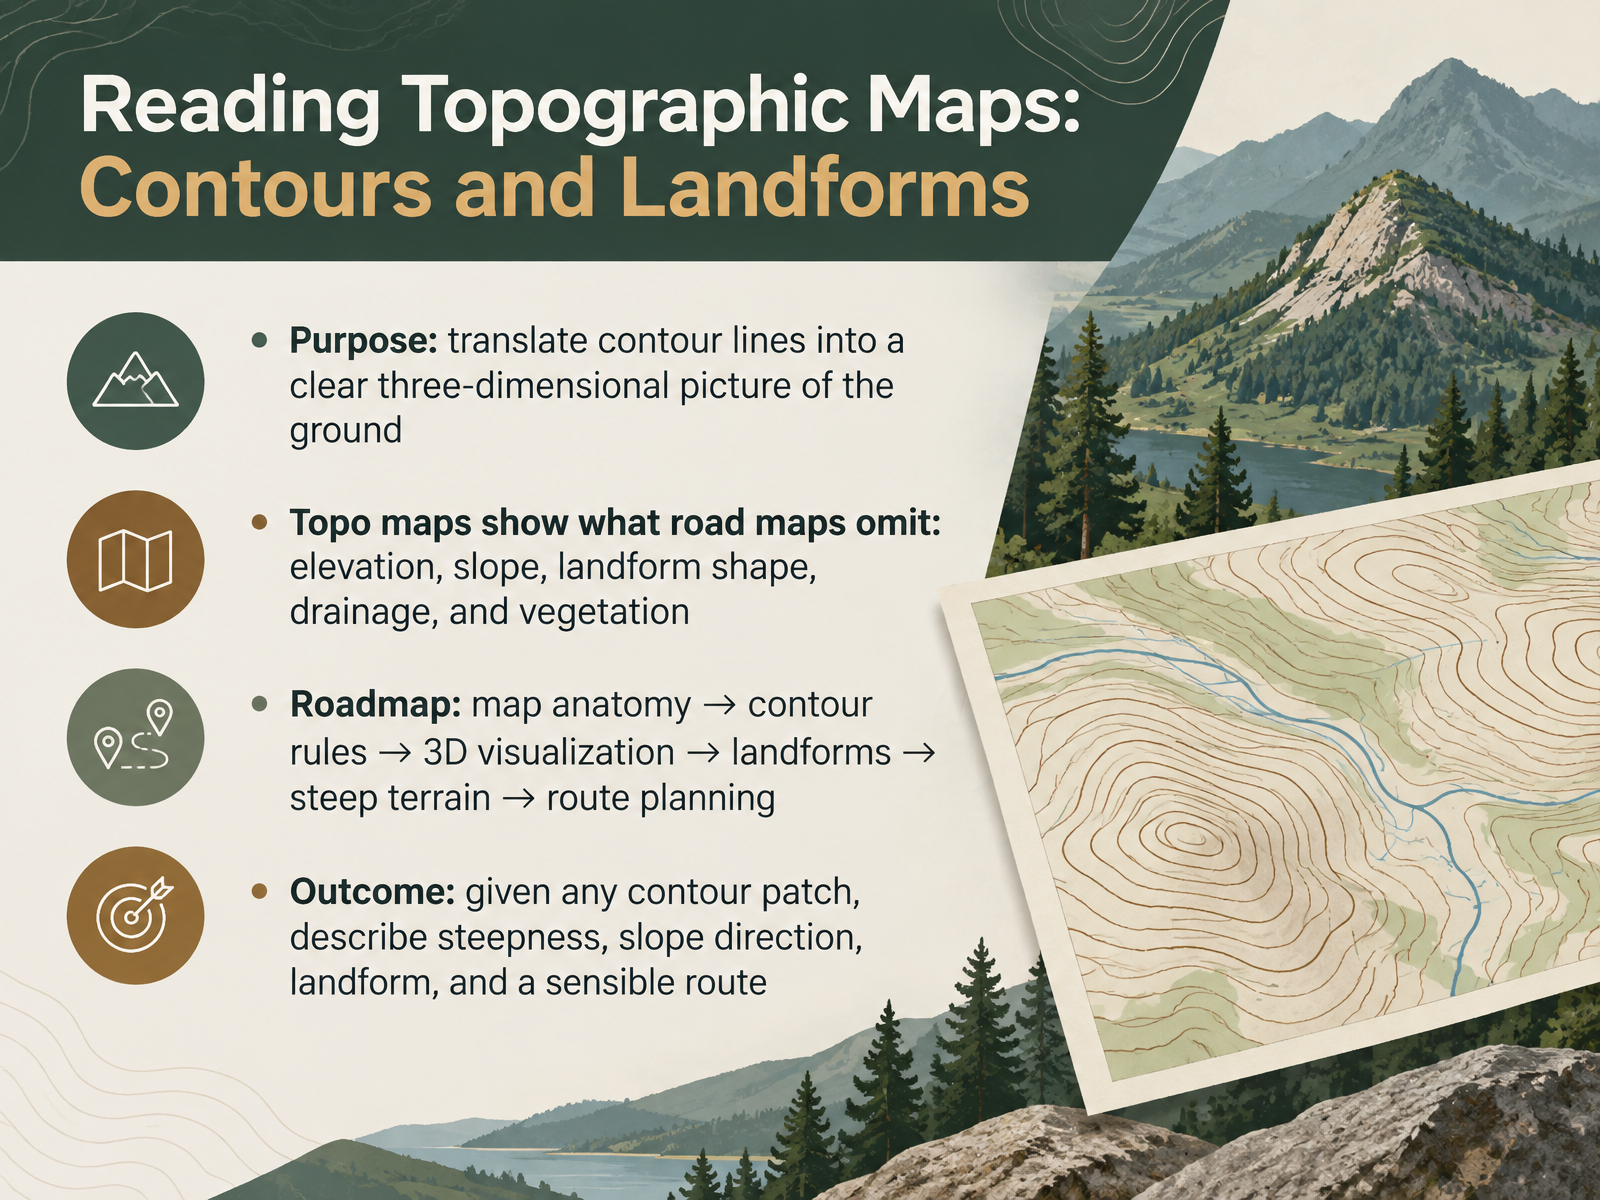
- 01Reading Topographic Maps: Contours and LandformsWelcome. This course is about reading topographic maps, and turning contour lines into a clear three-dimensional picture of the ground. Road maps show you where to drive. Topographic maps show what road maps leave out: elevation, slope, landform shape, drainage, and vegetation. Here is our path. We start with map anatomy, then move to contour rules and three-dimensional visualization. Next come landforms, steep terrain, and route planning. By the end, you will take any patch of contours and describe its steepness, the direction it slopes, the landform, and a sensible route. That is a practical skill for students, hikers, and anyone who spends time outdoors. Take your time with each term as it appears. The goal is not memorizing symbols. The goal is seeing the ground in your mind. Let us begin with the building blocks of the map itself.usgs.govusgs.govusgs.gov+21 min
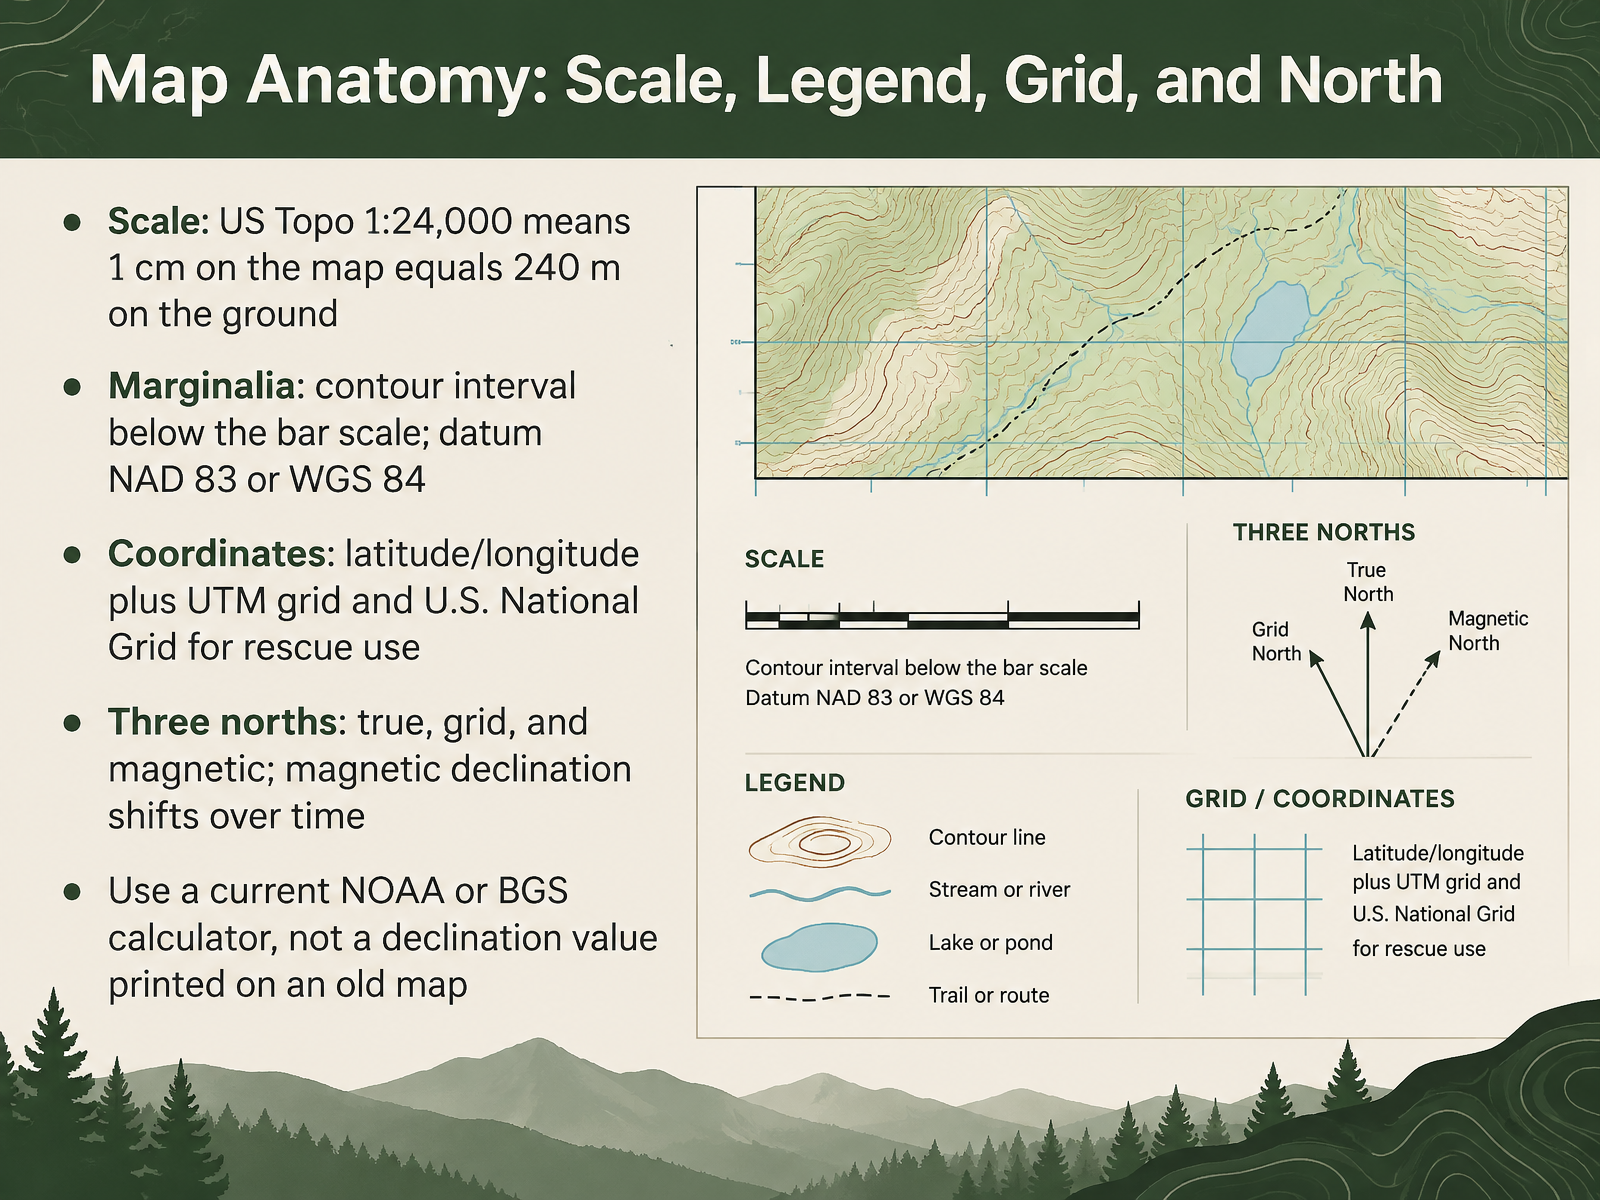
- 02Map Anatomy: Scale, Legend, Grid, and NorthNext, let us read the map's framing information before we trust any measurement. Start with scale. On a US Topo map at one to twenty-four thousand, one centimeter on the map equals two hundred forty meters on the ground. Look at the marginalia, the notes printed around the map border. The contour interval appears just below the bar scale. The datum is listed there too, usually North American Datum of 1983 or World Geodetic System of 1984, and it tells you which coordinate system the map uses. You will find latitude and longitude, plus a UTM grid and U.S. National Grid lines for rescue use. Notice three norths: true, grid, and magnetic. The angle between true and magnetic north is magnetic declination, and it shifts over time. So do not rely on a declination value printed on an old map. Use a current calculator from NOAA or the British Geological Survey instead. Now let us move on to contour lines and the rules that never change.
 usgs.govusgs.govusgs.gov+22 min
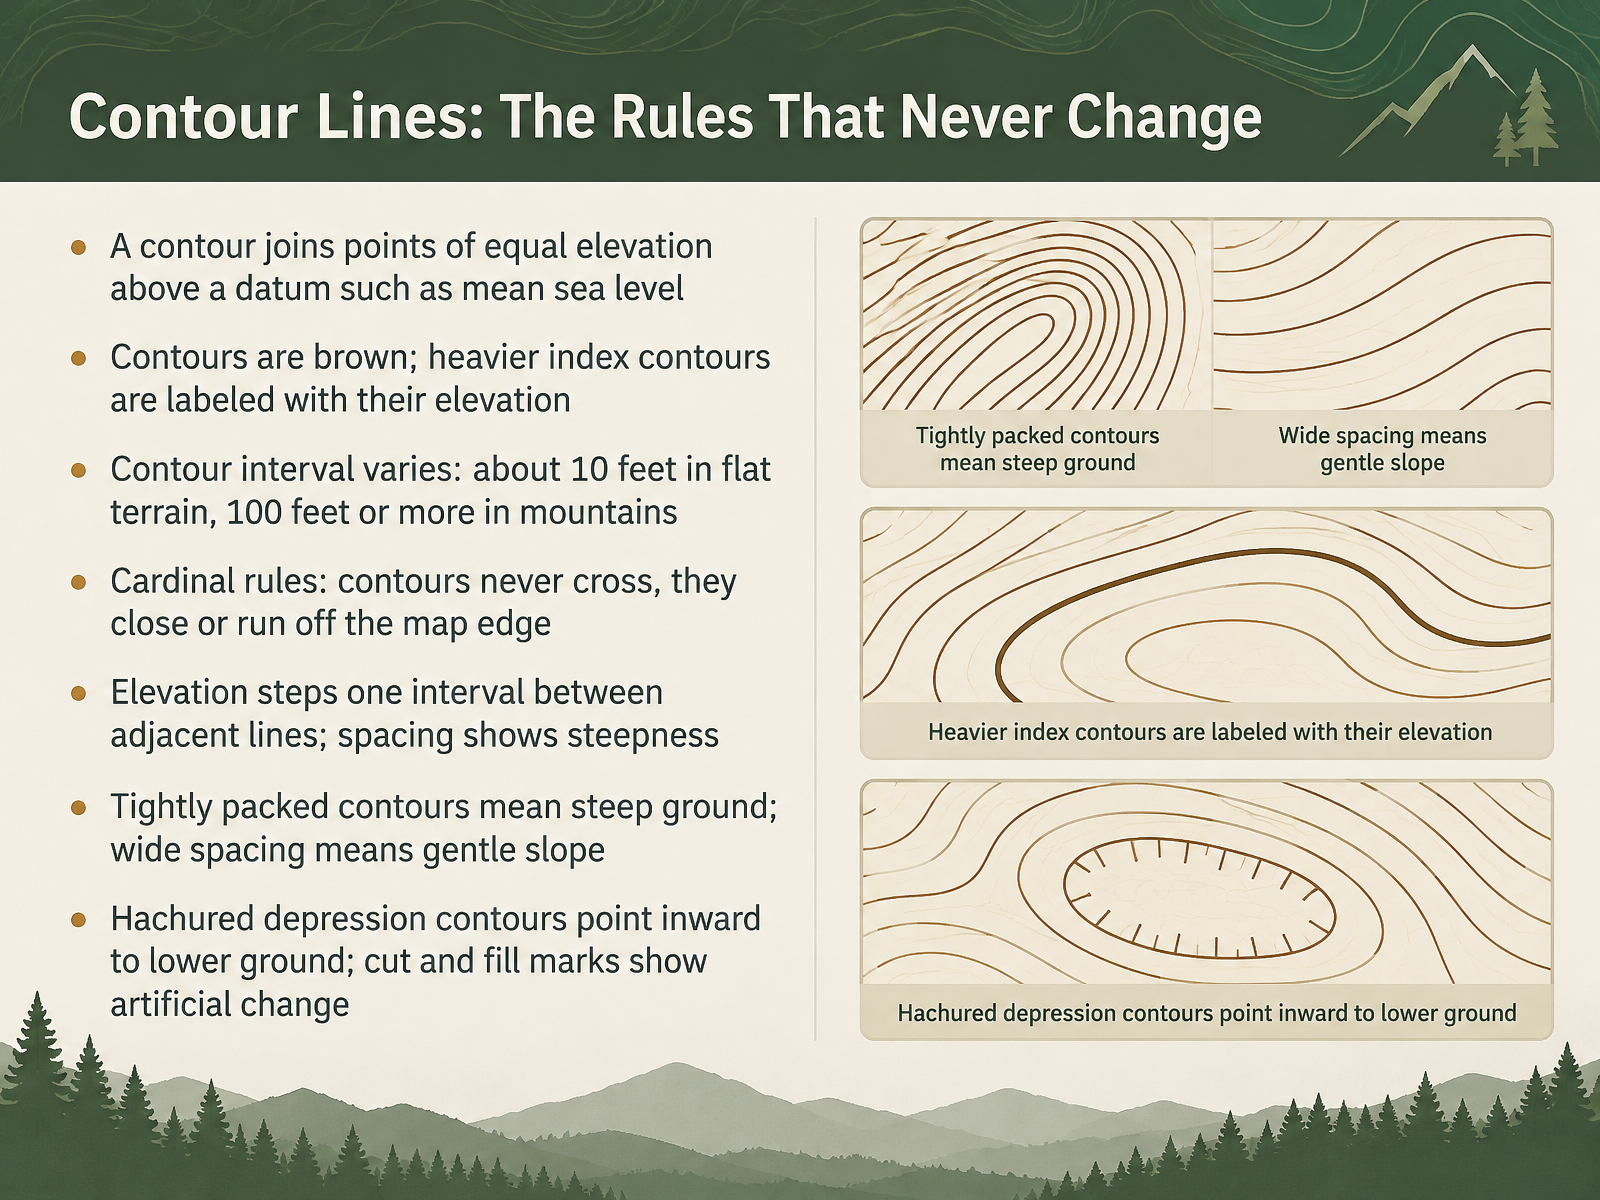
- 03Contour Lines: The Rules That Never ChangeNow let's look at the rules that contour lines always follow. A contour joins points of equal elevation. That elevation is measured above a datum, such as mean sea level. Contours are printed in brown. Heavier index contours are labeled with their elevation. The contour interval, the elevation change between adjacent lines, varies by terrain. It may be about ten feet in flat areas, and one hundred feet or more in mountains. Here are the cardinal rules. Contours never cross. They either close on themselves or run off the map edge. Elevation steps up or down by one interval between adjacent lines. Notice how the spacing changes. Tightly packed contours mean steep ground. Wide spacing means a gentle slope. Hachured depression contours point inward toward lower ground. Cut and fill marks show artificial changes in the land. In the next section, From 2D Lines to 3D Ground: Mental Visualization, we will turn these rules into a picture of the terrain.
 usgs.govusgs.govusgs.gov+22 min
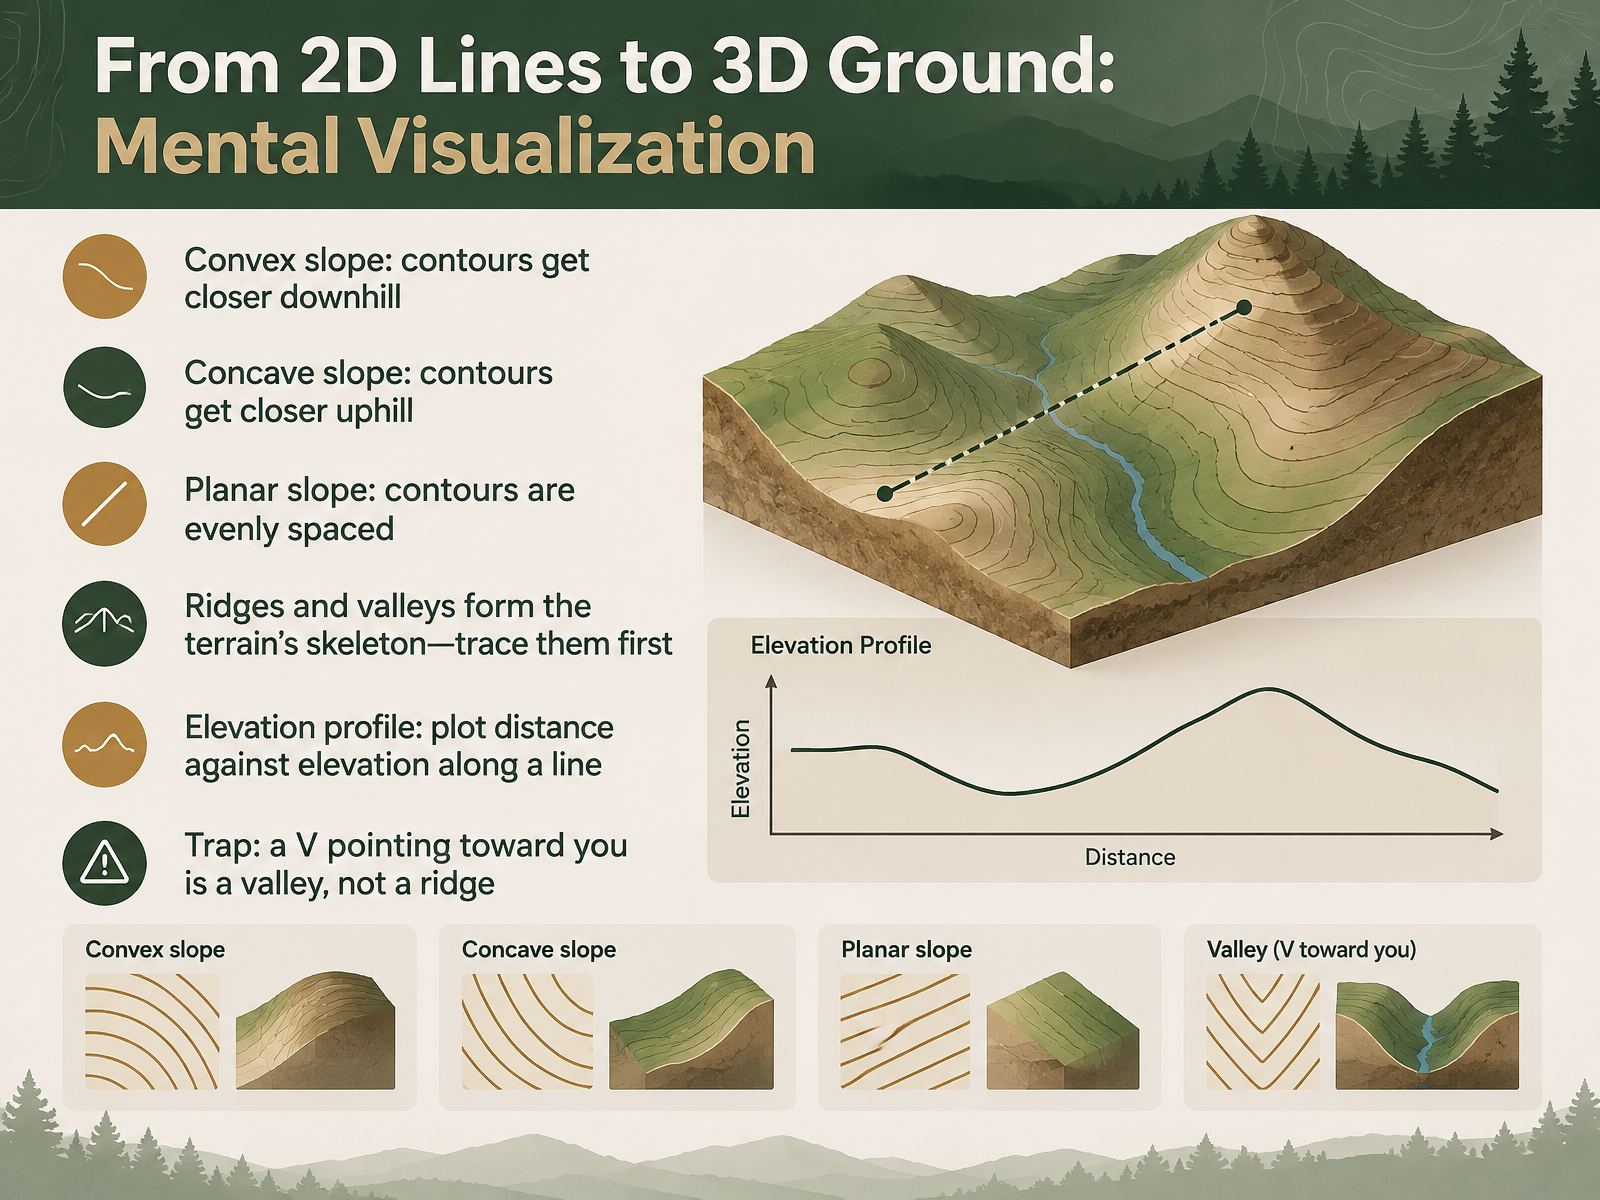
- 04From 2D Lines to 3D Ground: Mental VisualizationNow let's turn those two-dimensional lines into a mental picture of the ground. Start with slope shape. On a convex slope, contours get closer together downhill. On a concave slope, they get closer uphill. On a planar slope, contours stay evenly spaced. Look at the overall pattern next. Ridges and valleys form the terrain's skeleton, so trace them first before you judge individual slopes. An elevation profile helps too. Pick a line across the map, then plot distance against elevation along that line. Here is a common trap. A V shape pointing toward you is a valley, not a ridge. Valleys point uphill toward higher ground. Keep that in mind as we move on to landform signatures: summits, basins, and saddles.
 usgs.govusgs.govusgs.gov+21 min
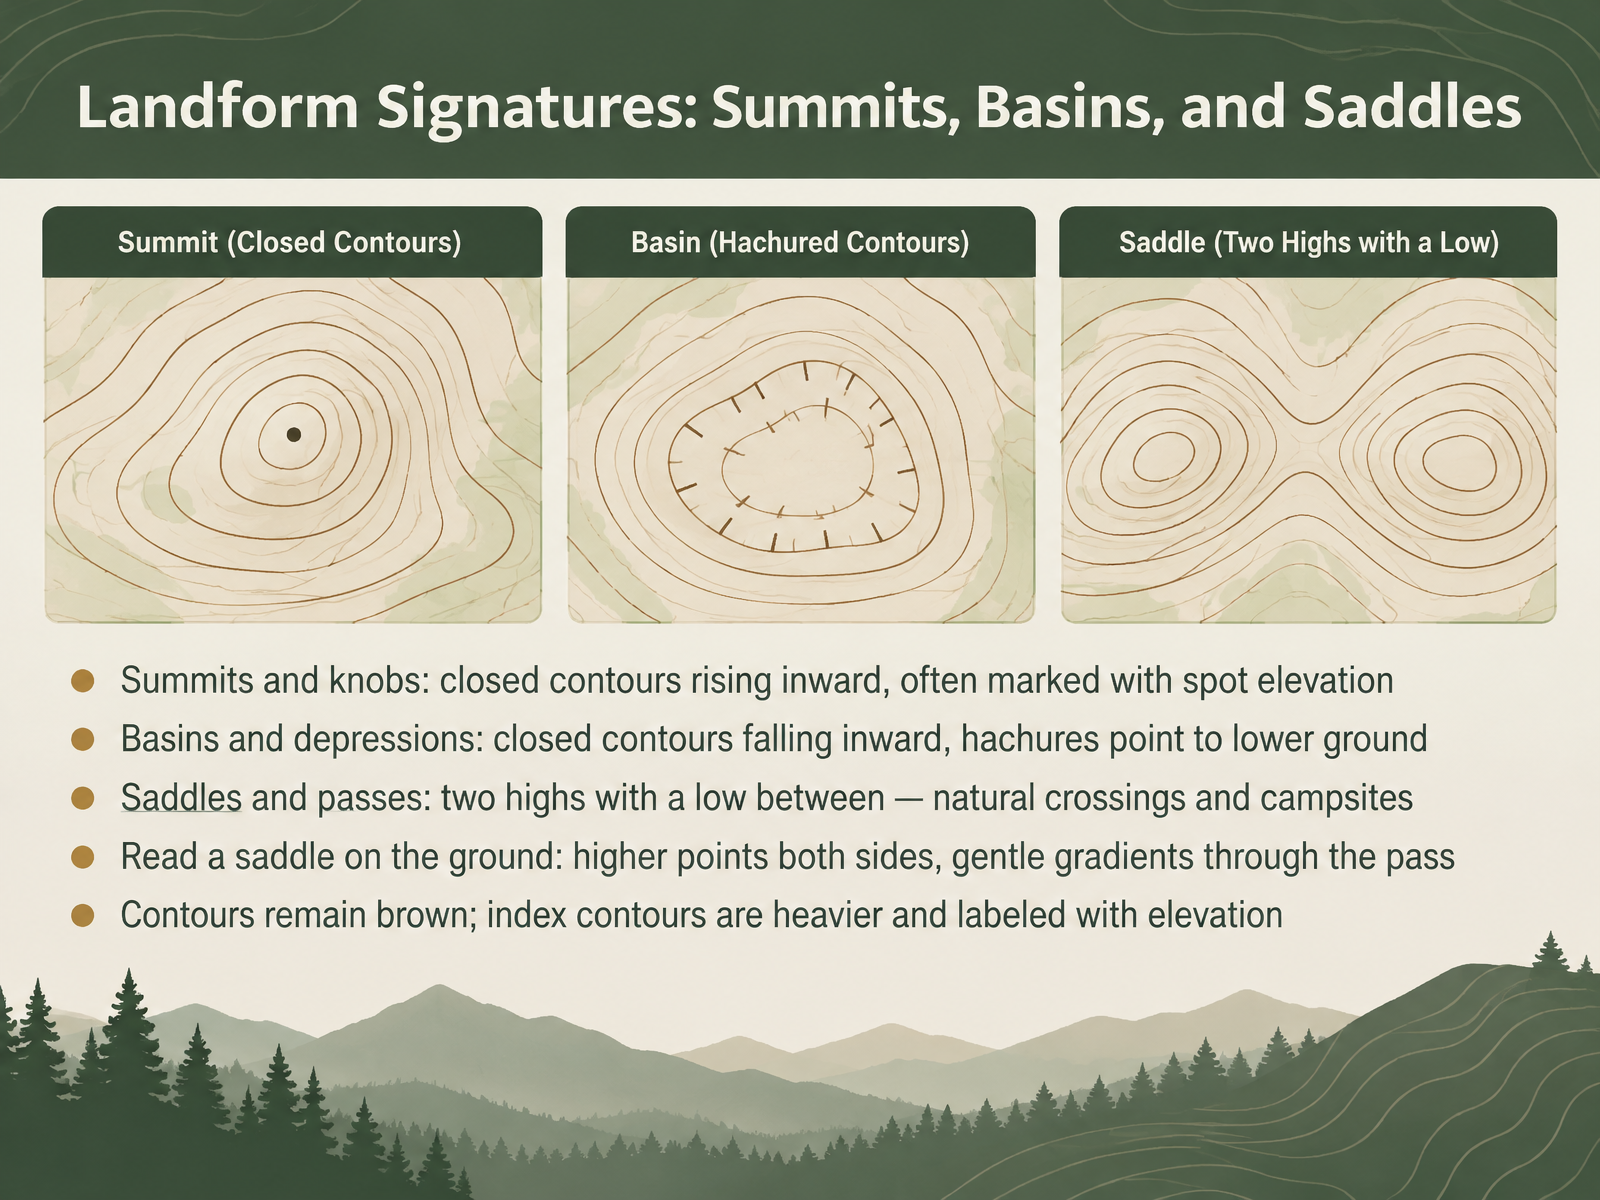
- 05Landform Signatures: Summits, Basins, and SaddlesNow let's look at three landform signatures you can recognize on almost any map: summits, basins, and saddles. Notice how closed contours reveal each one. For a summit or knob, look for closed contours that rise inward. Elevation increases toward the center. Many summits carry a spot elevation, a printed number giving the exact height. For a basin or depression, the contours also close, but they fall inward. The center is lower than the rim. Hachures, short tick marks on the contour, point toward lower ground. Compare the two: rising inward means a high point. Falling inward means a low point. Now look at a saddle. It is a low point between two highs, a natural crossing, and often a practical campsite. On the ground, you stand between higher ground on both sides, with gentle gradients through the pass. Finally, remember that contours stay brown. Index contours are heavier and labeled with elevation, so use them to read heights quickly. Next, we'll examine ridges, spurs, valleys, and gullies.
 usgs.govusgs.govusgs.gov+22 min
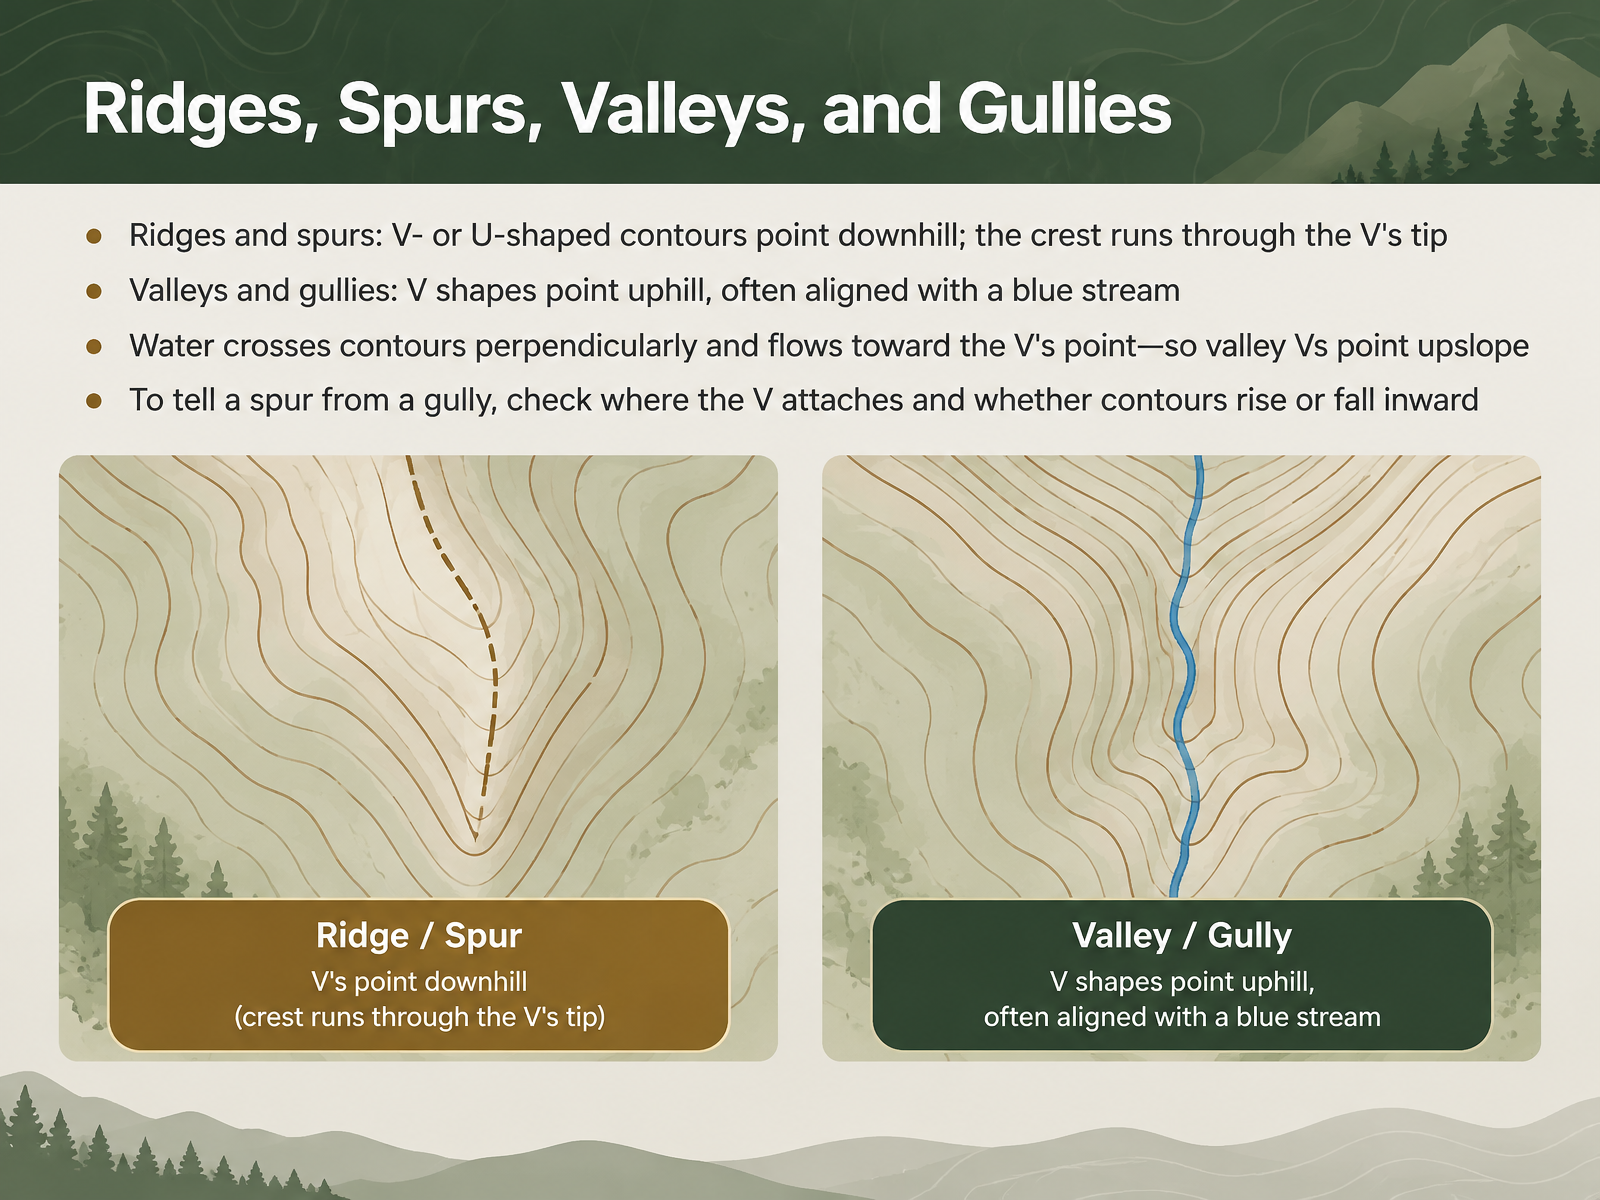
- 06Ridges, Spurs, Valleys, and GulliesNow let's tell ridges, spurs, valleys, and gullies apart. Look at a ridge or spur. The contours form a V or a U that points downhill. The crest of the ridge runs through the tip of the V. Notice the shape. Now compare that with a valley or gully. Here the V shapes point uphill, and they often line up with a blue stream. Water crosses contours at right angles and flows toward the point of the V. So valley Vs point upslope. To tell a spur from a gully, check where the V attaches and whether the contours rise or fall inward. On a spur, the ground falls away from the crest. In a gully, it rises on both sides. Keep that test in mind as you read the map. Next, we'll look at cliffs, canyons, and special terrain.
 usgs.govusgs.govusgs.gov+21 min
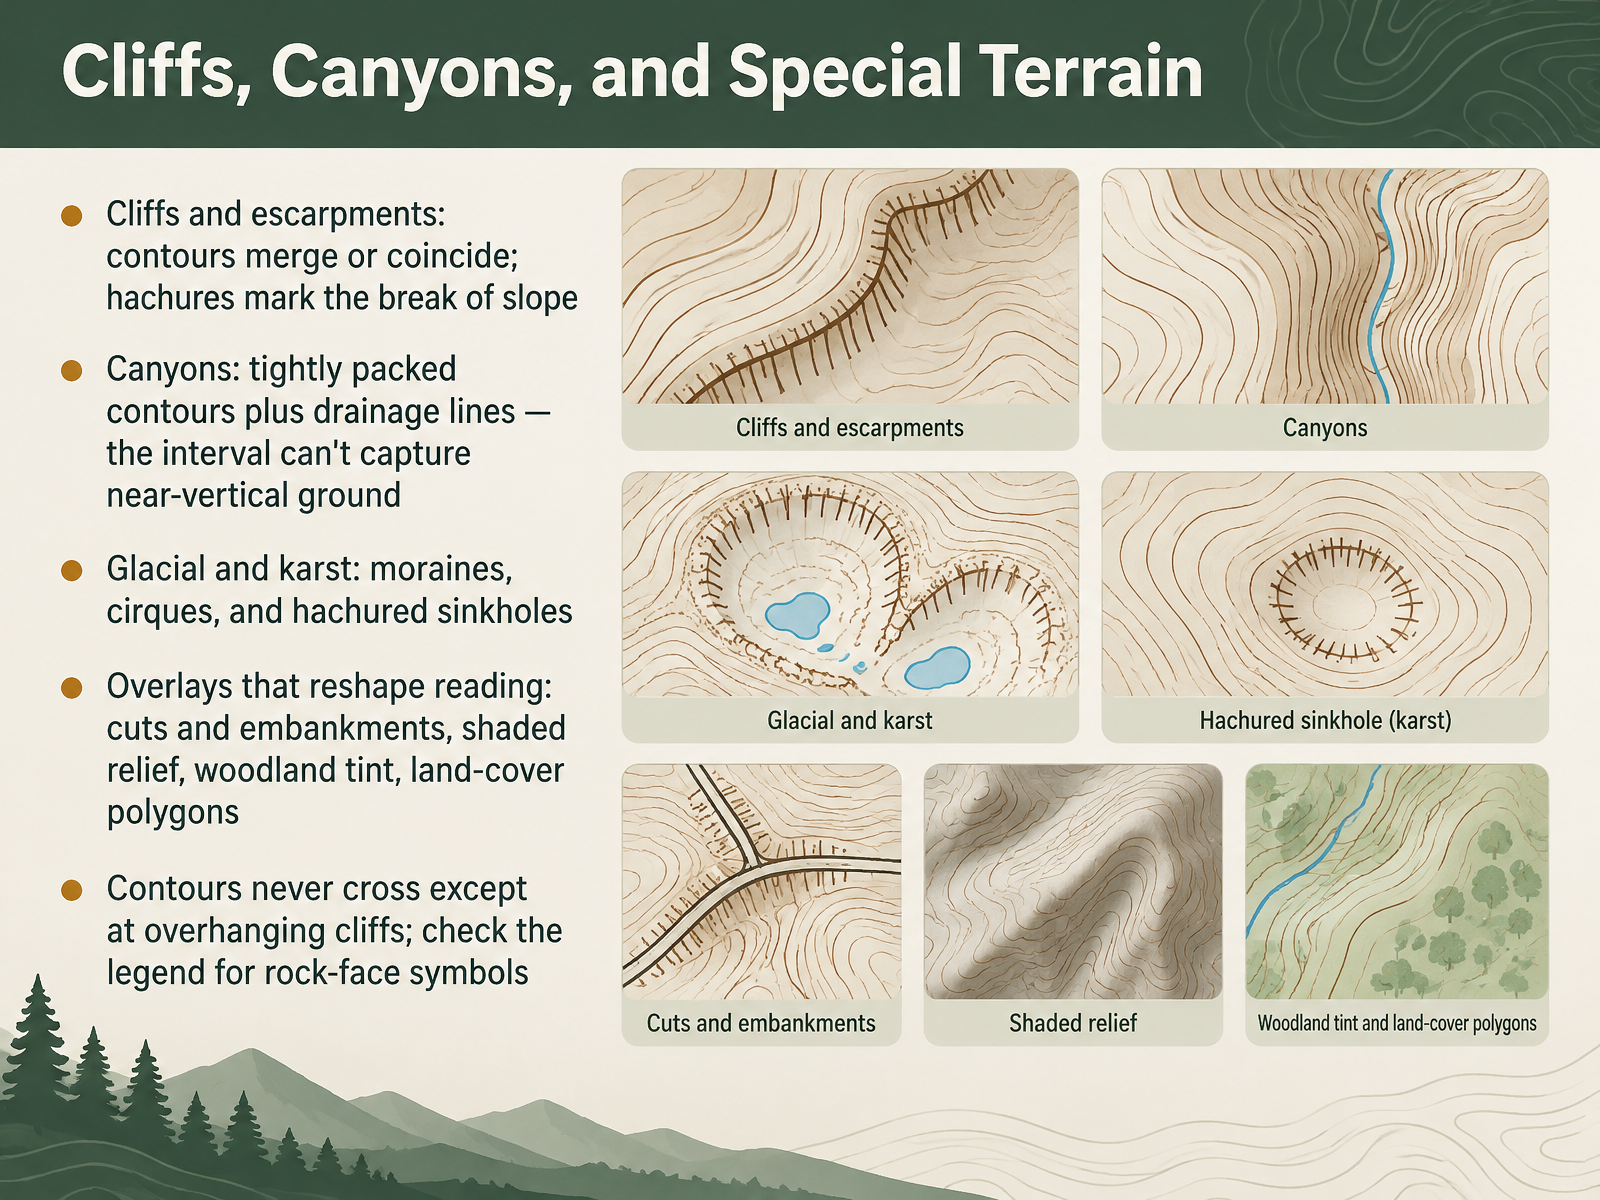
- 07Cliffs, Canyons, and Special TerrainNow let's look at cliffs, canyons, and special terrain. On the map, cliffs and escarpments are where contours merge or coincide. Hachures, the short tick marks that point downslope, mark the break of slope. For canyons, expect tightly packed contours plus drainage lines. The contour interval simply cannot capture near-vertical ground, so the lines crowd together. Glacial and karst terrain bring other clues: moraines, cirques, and hachured sinkholes. Notice the overlays that reshape your reading, such as cuts and embankments, shaded relief, woodland tint, and land-cover polygons. Compare these overlays with the base contours before drawing conclusions. One rule stays firm: contours never cross, except at overhanging cliffs. Check the legend for rock-face symbols. Hikers should treat merged contours as a serious warning of steep, exposed ground. Next, we move into terrain reasoning for route planning.
 pubs.usgs.govusgs.govusgs.gov+22 min
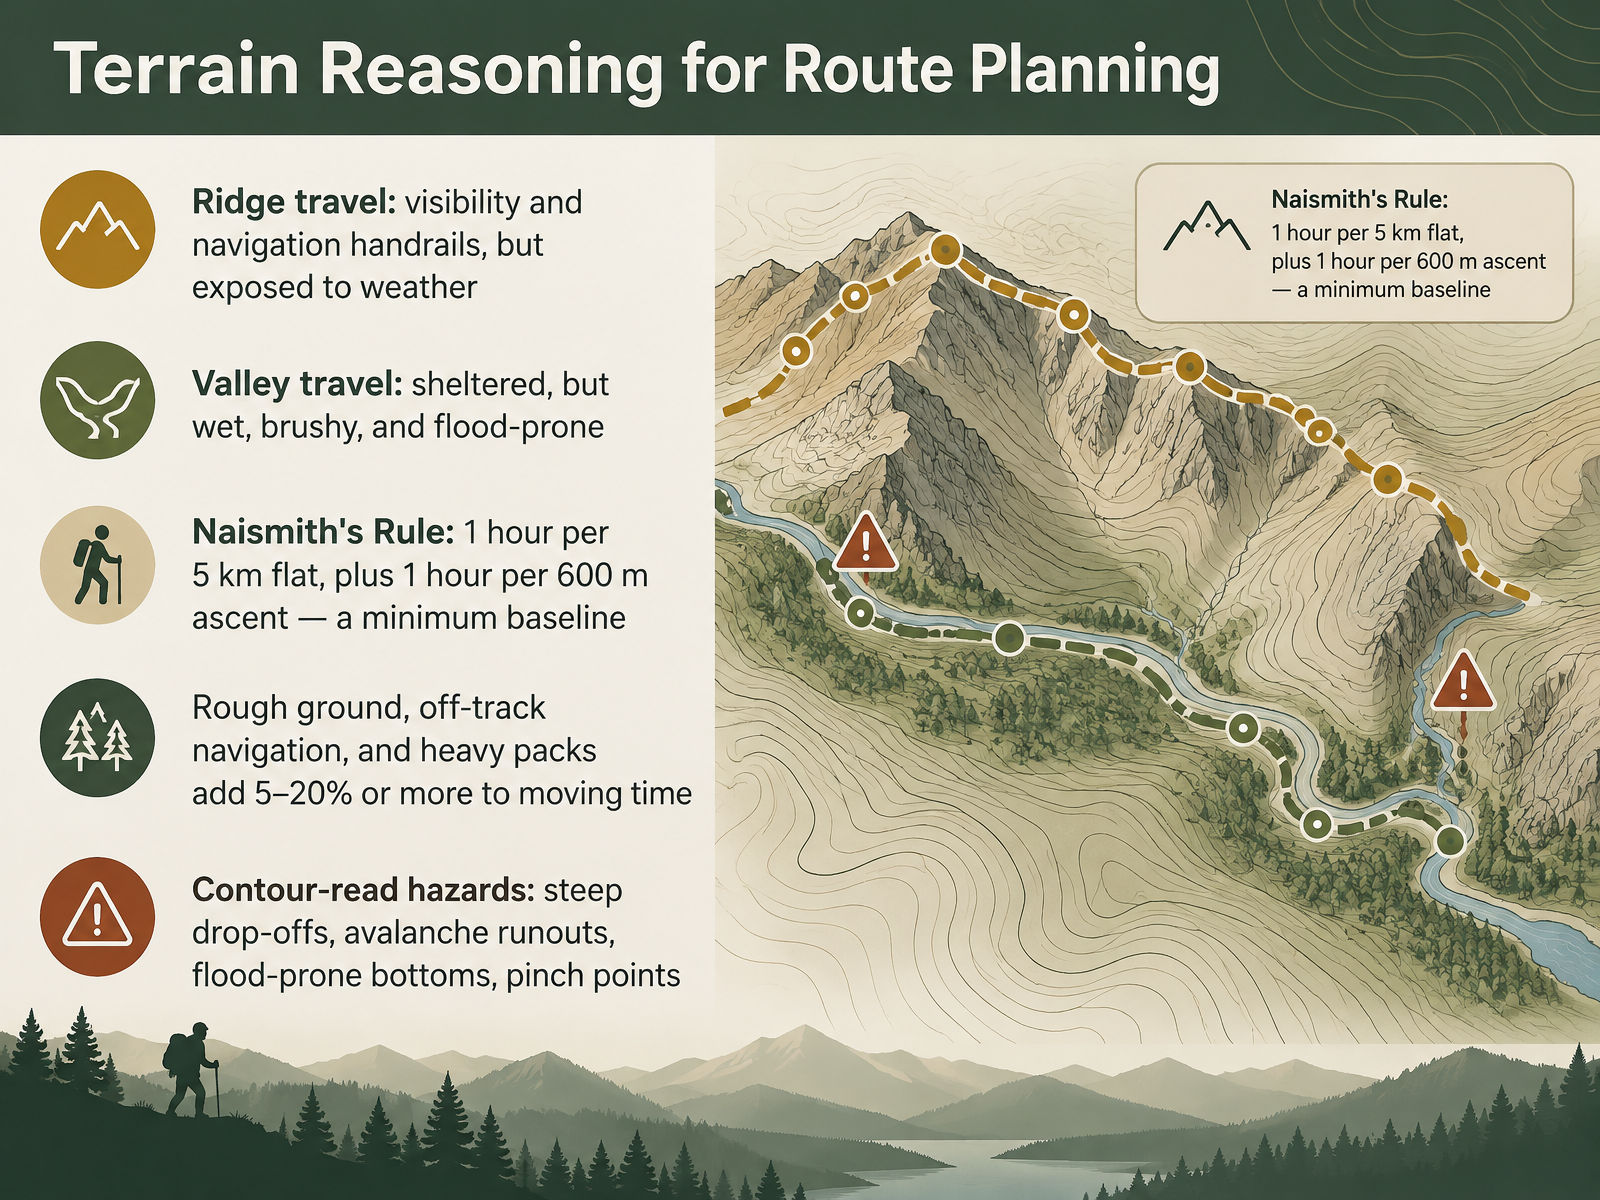
- 08Terrain Reasoning for Route PlanningNow let's turn map reading into route decisions. A ridge gives you visibility and a natural handrail, meaning a clear line to follow. But ridges leave you exposed to wind and weather. A valley is sheltered, yet often wet, brushy, and prone to flooding. For timing, use Naismith's Rule: one hour for every five kilometers on flat ground, plus one hour for every six hundred meters of ascent. Treat that as a minimum baseline, not a prediction. Rough ground, off-track navigation, and heavy packs can add five to twenty percent or more to moving time. Finally, read the contours for hazards: steep drop-offs, avalanche runouts, flood-prone valley bottoms, and pinch points where the terrain narrows. Next, we look at handrails, catching features, and attack points.
 mountainsafety.org.nzdoi.orgen.wikipedia.org+22 min
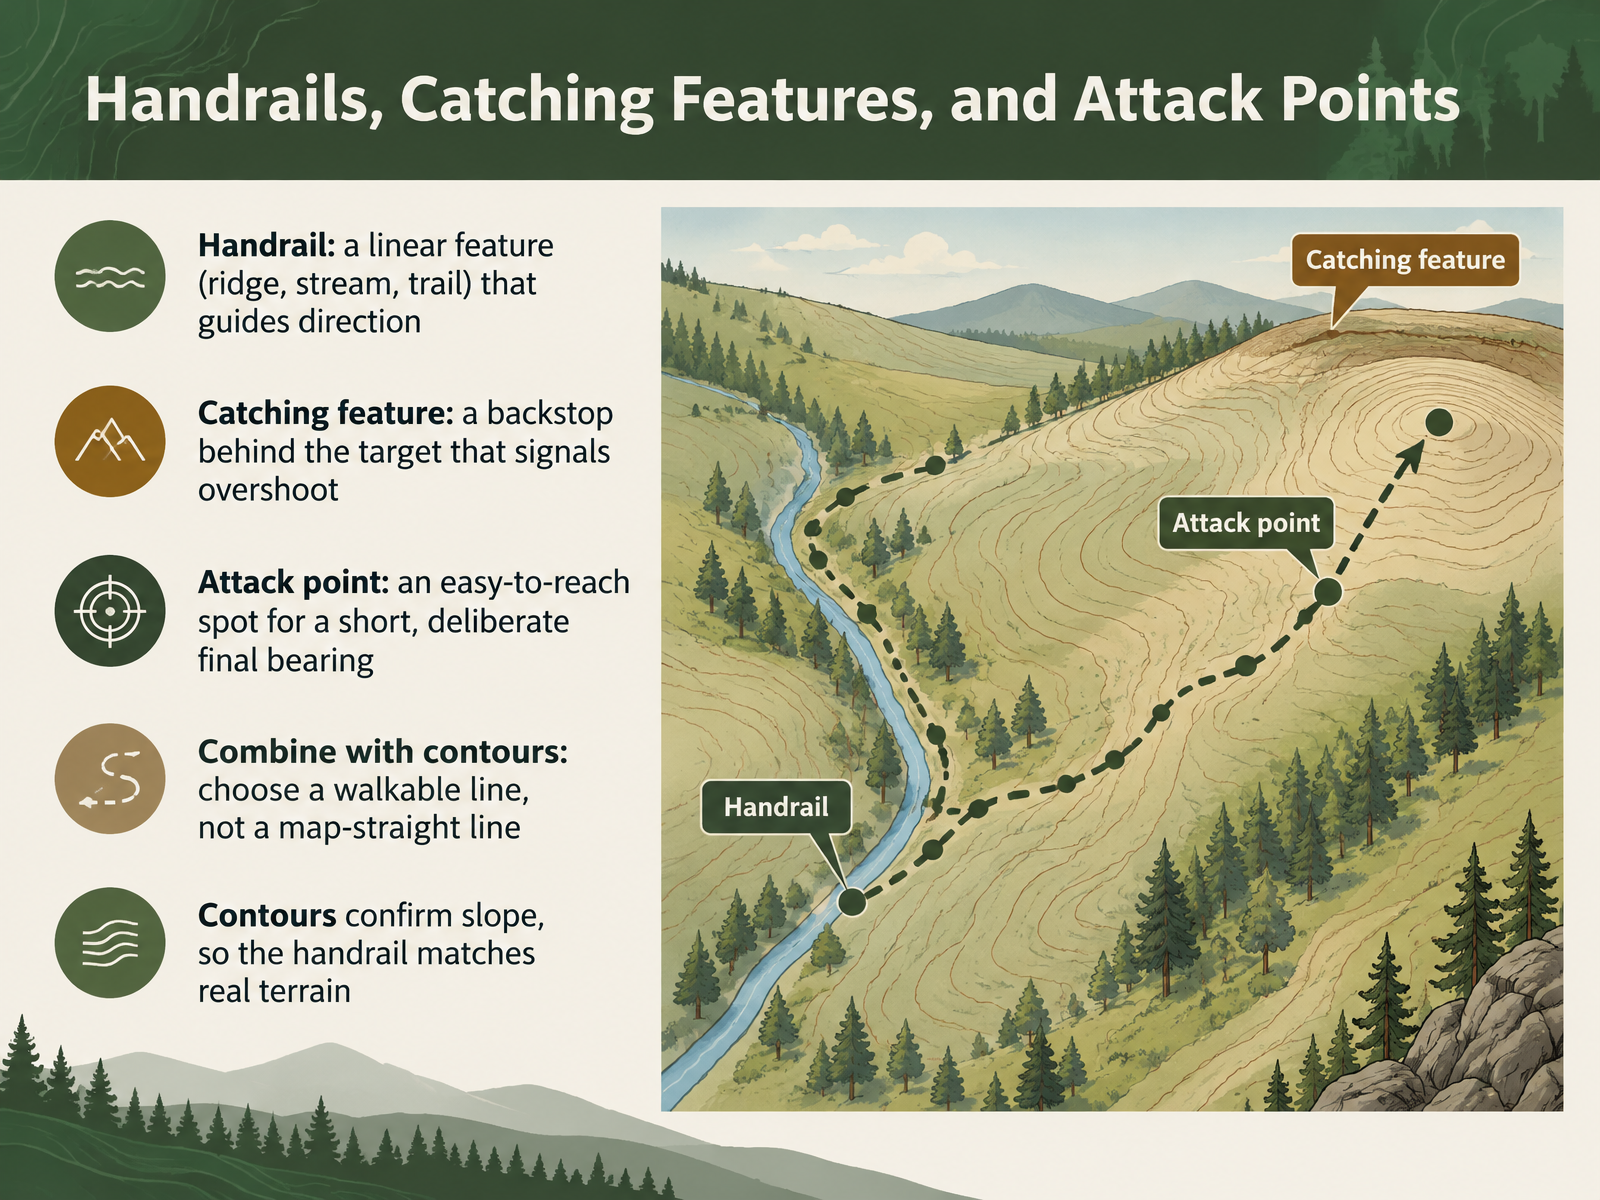
- 09Handrails, Catching Features, and Attack PointsNext, let's look at three navigation aids that work together: handrails, catching features, and attack points. A handrail is a linear feature that guides your direction. Think of a ridge, a stream, or a trail. Look at the map, and notice any long line that runs toward your goal. A catching feature is a backstop behind your target. It signals that you have gone too far. Compare it to a stream beyond a junction. If you reach the stream, you have overshot. An attack point is an easy-to-reach spot near your target. From there, you take a short, deliberate final bearing. Now combine these with contours. Choose a walkable line, not a map-straight line. Contours confirm the slope, so the handrail matches the real terrain. Read the shape of the ground, then commit. In the next lab, you will put these ideas to work. Practice Lab: Read the Terrain, Tell the Story.
 mountainsafety.org.nzdoi.orgen.wikipedia.org+22 min
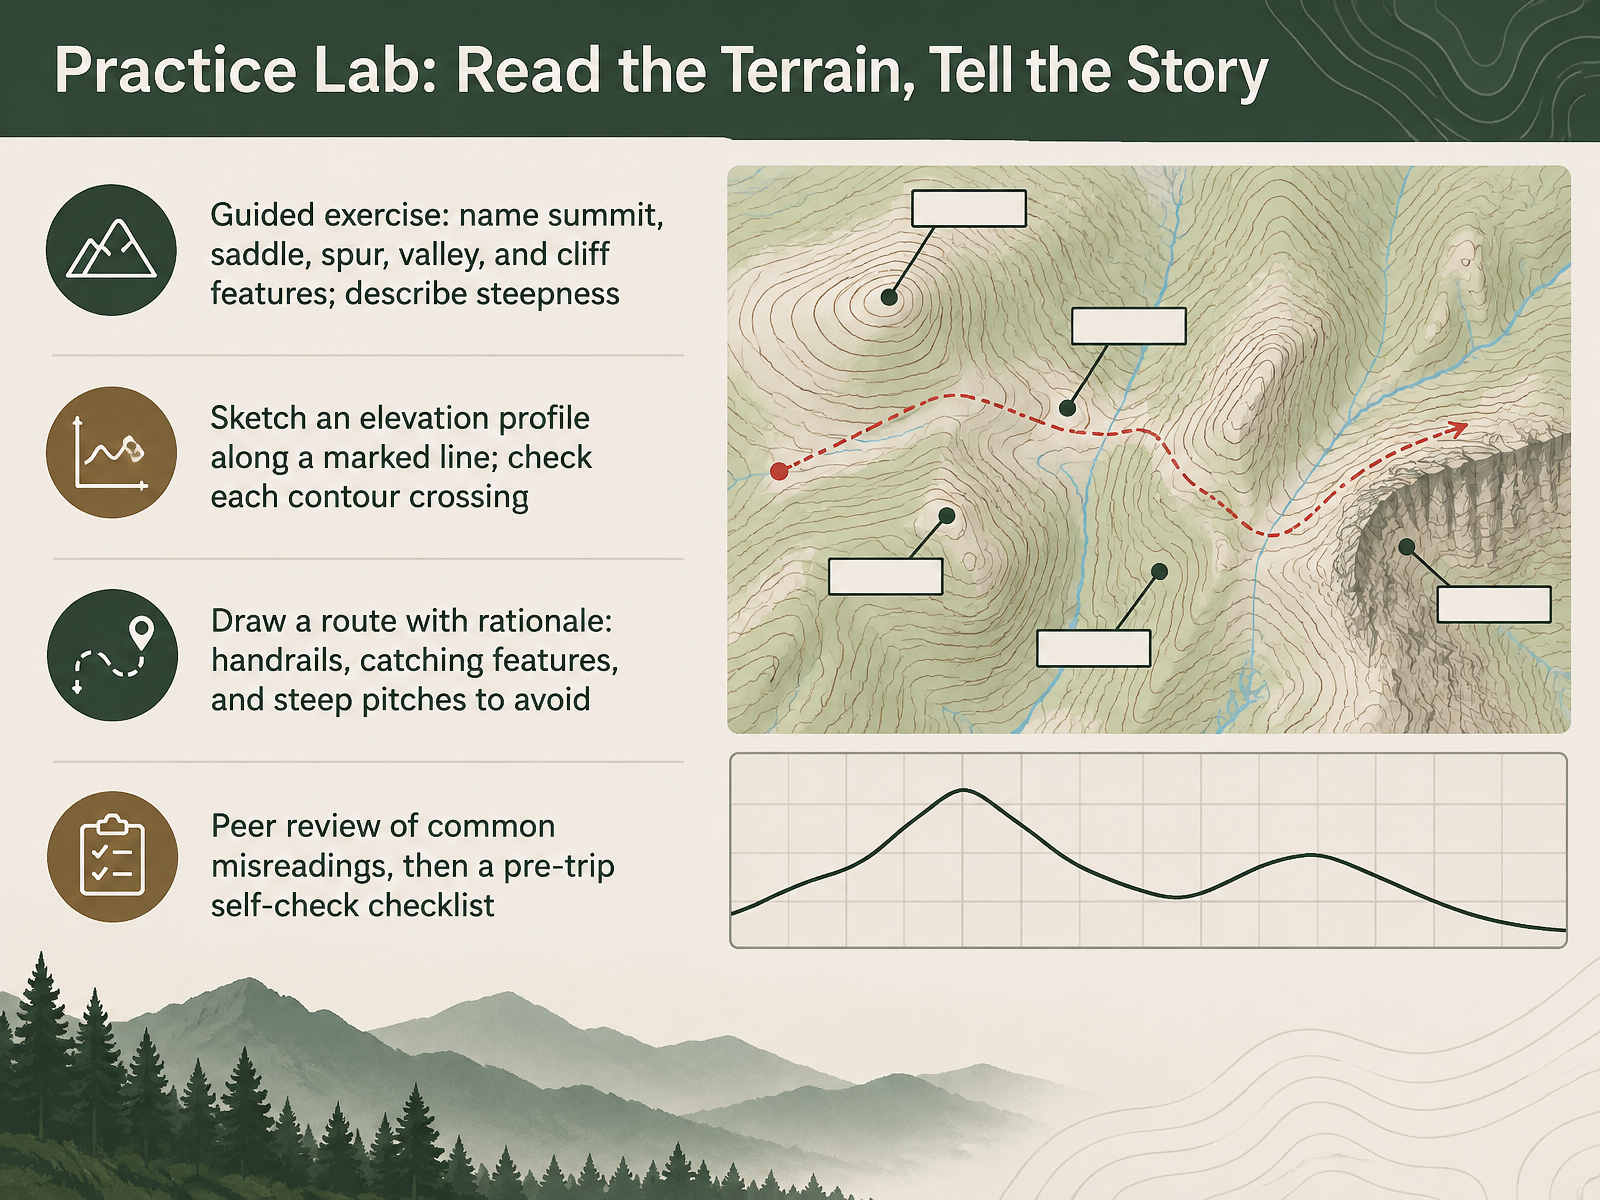
- 10Practice Lab: Read the Terrain, Tell the StoryNow it is your turn to practice. In this lab, you read the terrain and tell the story. Start by naming five features on the map: the summit, the saddle, the spur, the valley, and the cliff. Then describe steepness using contour spacing. Closely spaced contours mean a steep slope, and widely spaced contours mean gentler ground. Next, sketch an elevation profile along the marked line. Check every contour crossing one at a time. Then draw a route, and write your rationale beside it. Name your handrails, your catching features, and the steep pitches you want to avoid. In peer review, compare common misreadings with a partner. Finally, work through the pre-trip self-check checklist before you close the map. Next, we will put these skills to work in Reading the Terrain Under Pressure: A Scenario Walkthrough.
 usgs.govusgs.govusgs.gov+22 min
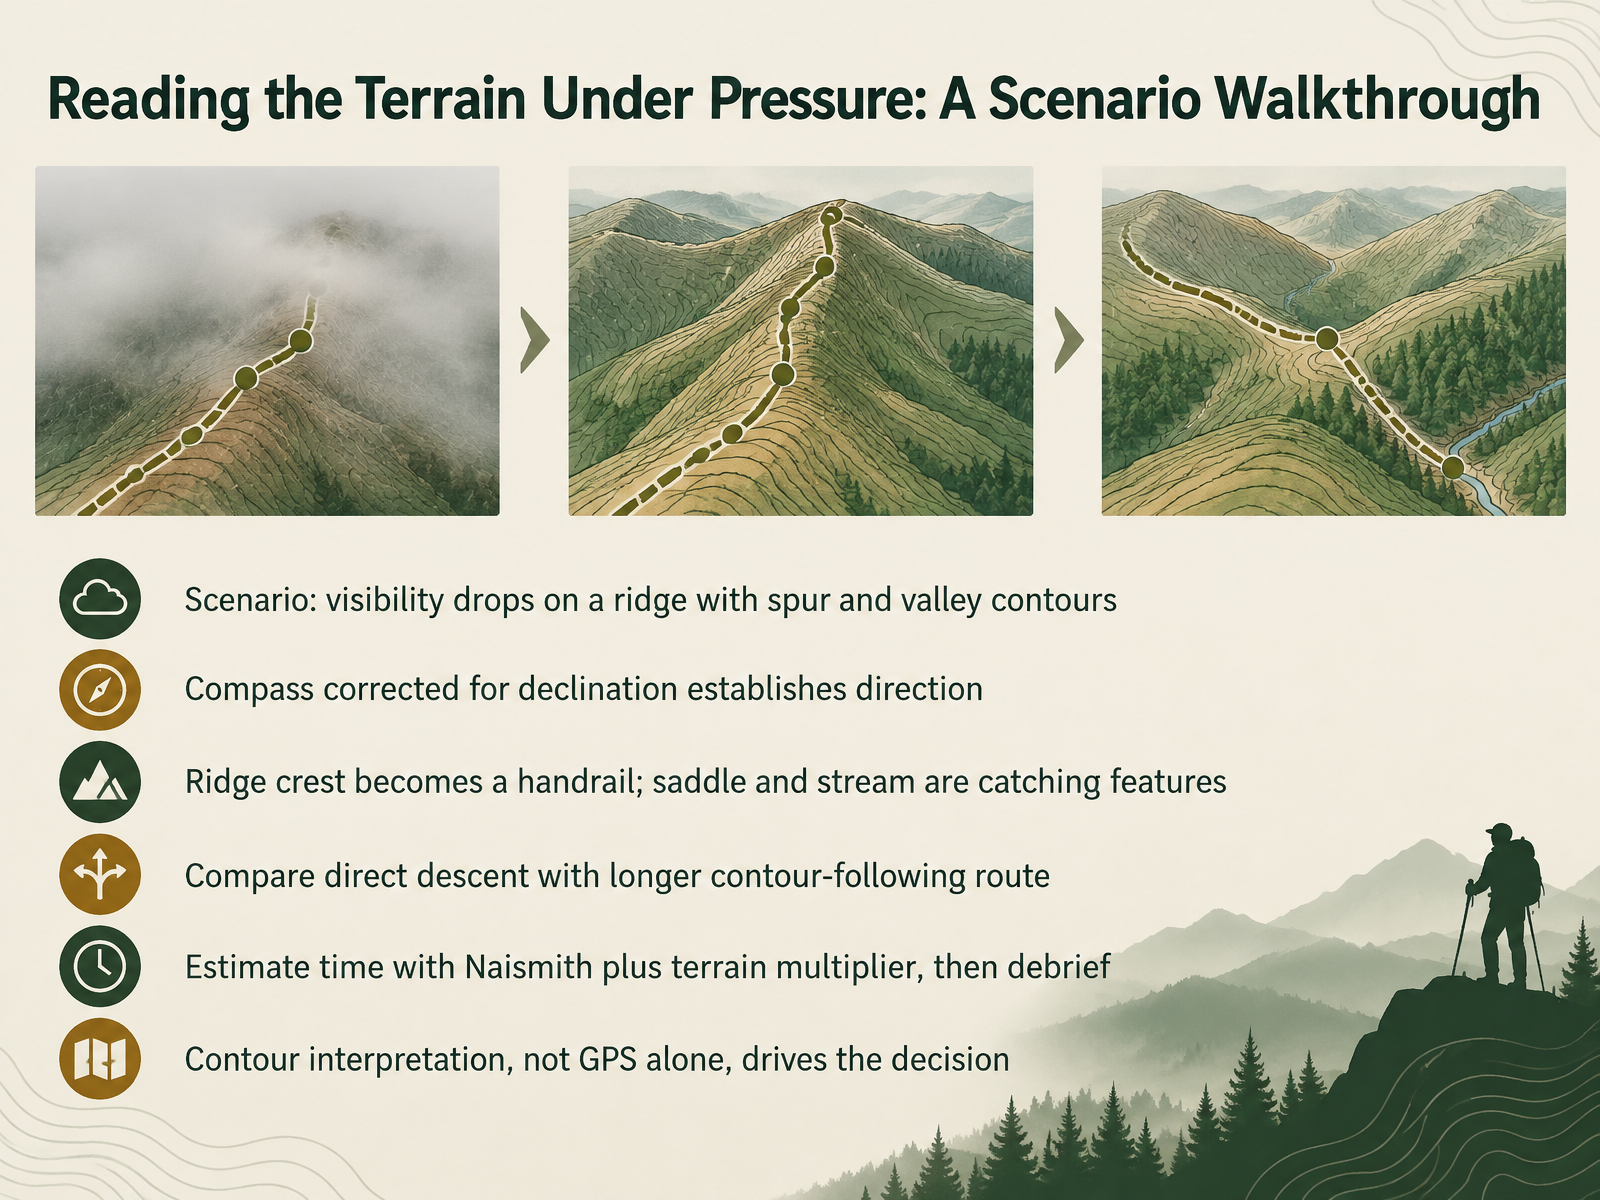
- 11Reading the Terrain Under Pressure: A Scenario WalkthroughLet's walk through a scenario. You're on a ridge when visibility drops, so the terrain must guide you. First, correct your compass for declination, the angle between true north and magnetic north. That gives you a reliable direction. Next, look at the map. The ridge crest has a spur, a short side ridge, on one side and a valley on the other. Walk with the ridge crest as your handrail, a continuous feature that keeps you on line. Note the saddle, the low point between two high areas, and the stream in the valley as catching features, places that stop a drift. Now compare routes. A direct descent is shorter, but steep and risky. A longer route that follows a contour line, a line of equal elevation, is steadier. Estimate time with Naismith's rule: about one hour per five kilometers, plus one hour per six hundred meters of ascent. Then apply a terrain multiplier to slow the estimate for rough ground. Afterward, debrief: did the contours, not the GPS alone, drive your decision? That is the habit to keep. Next, we'll look at common pitfalls and how to avoid them.
 mountainsafety.org.nzdoi.orgen.wikipedia.org+22 min
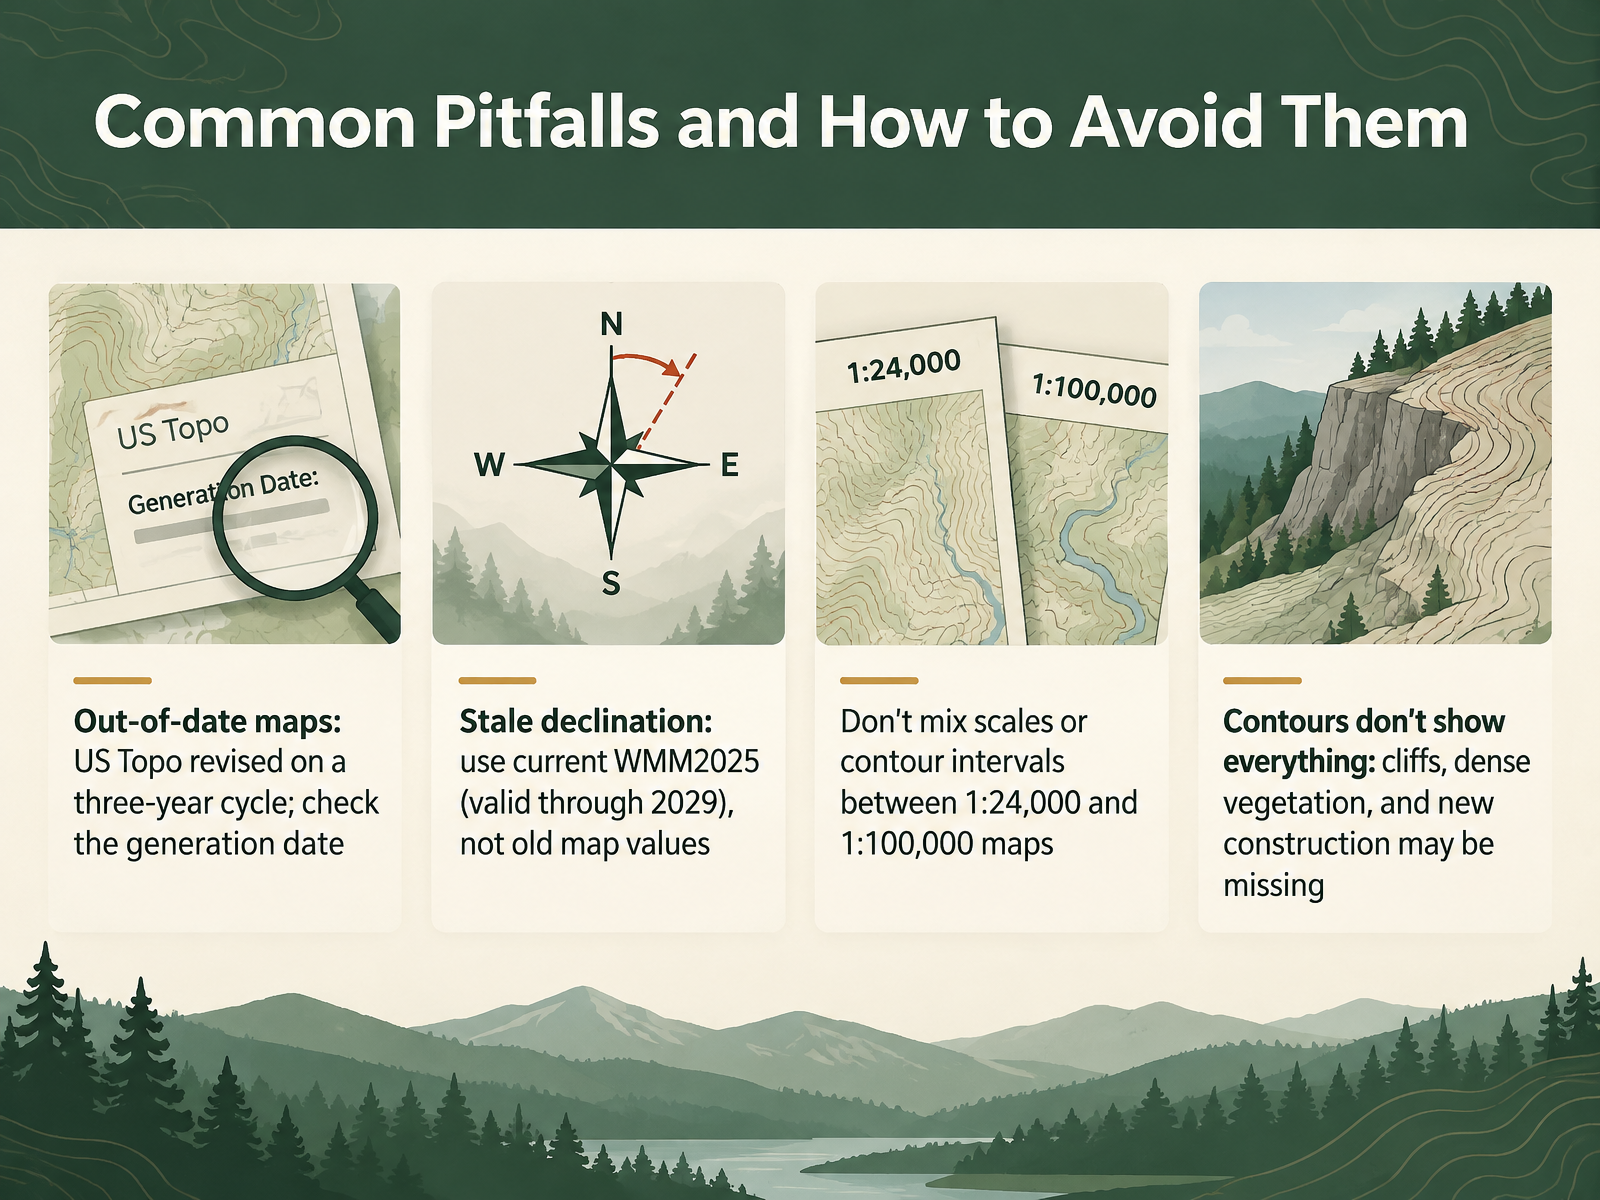
- 12Common Pitfalls and How to Avoid ThemNow let's look at common pitfalls and how to avoid them. First, out-of-date maps. US Topo maps are revised on a three-year cycle, so look at the generation date. From 2026, US Topo maps update based on changes in the underlying data, so verify the publish date. Second, stale declination. Use the current World Magnetic Model, WMM2025, which is valid through 2029, not the old value printed on a map. Third, don't mix scales or contour intervals between 1:24,000 and 1:100,000 maps. Compare the contour interval in the margin before you read the terrain. Last, contours don't show everything. Cliffs, dense vegetation, and new construction may be missing, so check the imagery and your eyes in the field. Remember, a quick check of the date, the declination, and the interval prevents most errors. Next, we'll bring it all together in our quick reference on contour rules and landform signatures.
 usgs.govtopobuilder.nationalmap.govusgs.gov+22 min
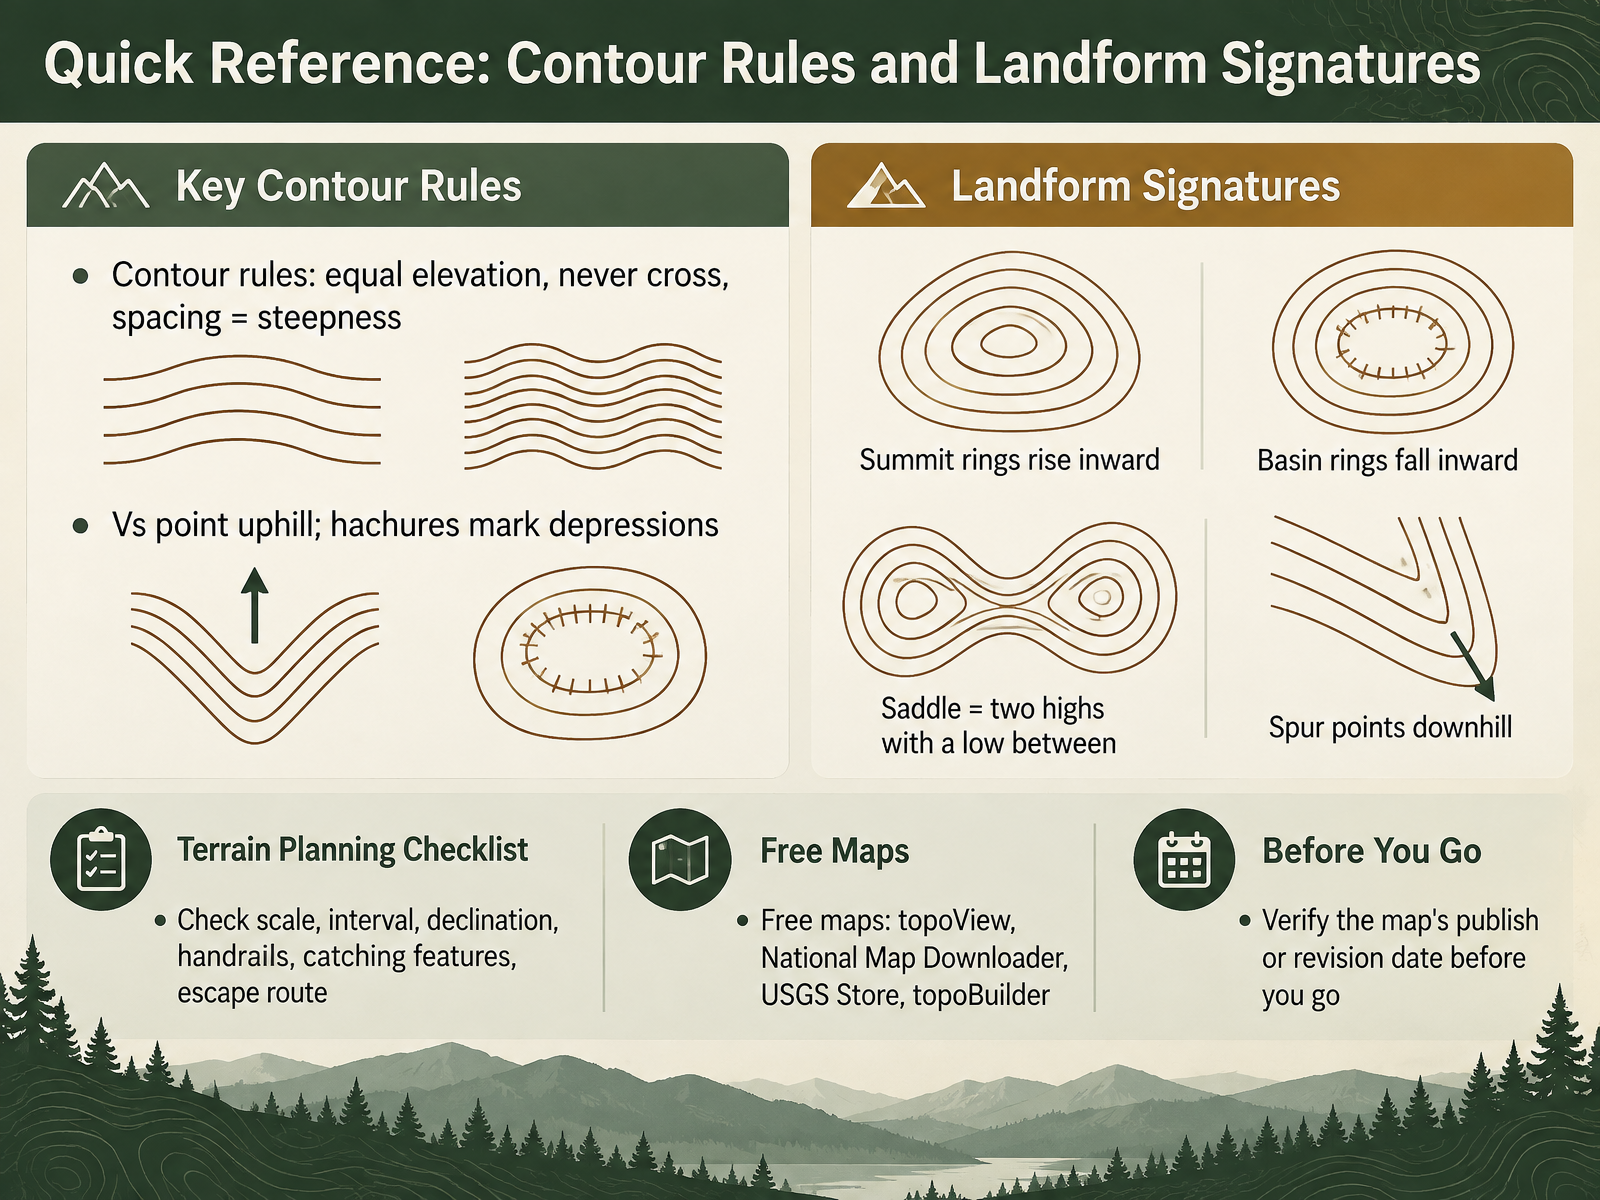
- 13Quick Reference: Contour Rules and Landform SignaturesLet's bring the contour rules together on one quick reference page. Contours join points of equal elevation. They never cross. Spacing shows steepness, so look at how close the brown lines sit. Notice the V shapes. A V points uphill, and hachures mark a depression. Compare landforms now. Summit rings rise inward. Basin rings fall inward. A saddle is two highs with a low between them. A spur points downhill. Before you go, check the scale, the contour interval, declination, handrails, catching features, and an escape route. Free maps are available through topoView, the National Map Downloader, the USGS Store, and topoBuilder. Always verify the map's publish or revision date. Now let's move on to next steps, practice resources and further learning.
 usgs.govtopobuilder.nationalmap.govusgs.gov+22 min
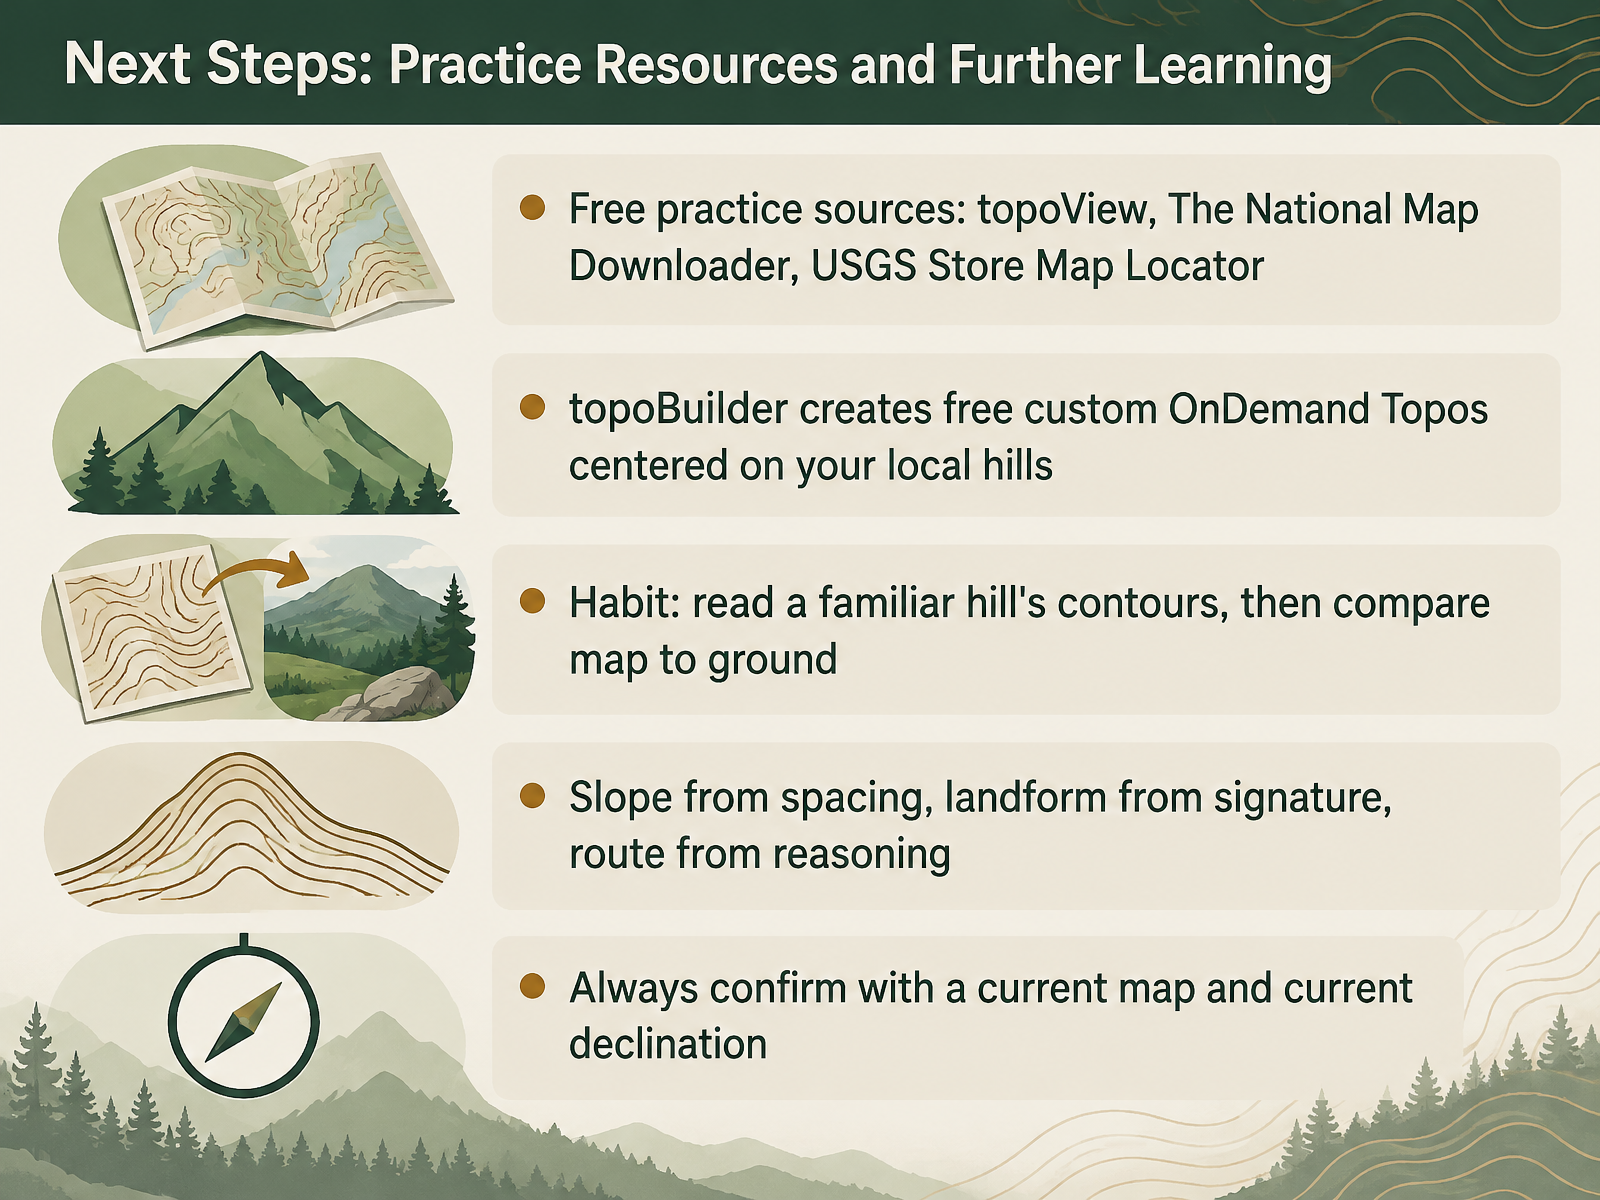
- 14Next Steps: Practice Resources and Further LearningNow let's set you up to keep practicing after this course. For free maps, start with topoView and The National Map Downloader. Both offer all dates and all scales of USGS topographic maps. The USGS Store Map Locator is another option. For a map centered exactly on your local hills, use topoBuilder. It creates free OnDemand Topos, custom maps built from the best available National Map data. Here is a habit worth keeping. Pick a hill you know well. Read its contours on the map, then compare the map to the ground. Notice where the spacing tightens or eases, and check whether your reading held up. Carry the three habits forward. Slope comes from contour spacing, landform from the contour signature, and route from your reasoning. And always confirm with a current map and current declination. Declination is the angle between true north and magnetic north, and it changes over time. So check it near your hike date with a current calculator. You now have the tools and the practice path. Thank you for learning with me. Get outside, read the contours, and enjoy the terrain.
 usgs.govtopobuilder.nationalmap.govusgs.gov+22 min
Take the deck with you
Download this course as a file — free, no sign-up needed.
- PDF handoutEvery slide page, ready to print or share.15 pages · 4.6 MBDownload
- Narrated PowerPointThe deck that presents itself — every slide carries the digital human's narration video.15 pages · 14.9 MBDownload
- PowerPoint slidesThe full deck as a .pptx — open it in PowerPoint, Keynote, or Google Slides.15 pages · 4.5 MBDownload
Free to use in your own training — please keep the PersonWise credit page at the end.
Have your own deck? Turn it into a course
Sources consulted
Web sources consulted while building this course.
- Topographic Maps Standards and Specifications | U.S. Geological Survey — usgs.gov
- US Topo Product Standard | U.S. Geological Survey — usgs.gov
- US Topo Cartographic Specifications - Map Symbol Guide | U.S. Geological Survey — usgs.gov
- 7.5-Minute OnDemand Topo Cartographic Specifications - Version History | U.S. Geological Survey — usgs.gov
- How current are US Topo maps? | U.S. Geological Survey — usgs.gov
- Topographic Map Symbols — pubs.usgs.gov
- Topographic Map Symbols | U.S. Geological Survey — usgs.gov
- Where can I find a topographic map symbol sheet? | U.S. Geological Survey — usgs.gov
- 100K OnDemand Topo Cartographic Specifications - Map Symbol Guide | U.S. Geological Survey — usgs.gov
- US Topo Cartographic Specifications - Geographic Names | U.S. Geological Survey — usgs.gov
- Estimating distance and duration — mountainsafety.org.nz
- Hiking-time formulas: a review — doi.org
- Naismith's rule — en.wikipedia.org
- Backpacking basics: How to plan an overnight hiking trip — mec.ca
- Measuring and modeling the speed of human navigation — doi.org
- How do I find, download, or order topographic maps? | U.S. Geological Survey — usgs.gov
- topoBuilder — topobuilder.nationalmap.gov
- Topographic Map Access Points | U.S. Geological Survey — usgs.gov
- GIS Data Download | U.S. Geological Survey — usgs.gov
- USGS National Map Apps - The National Map — apps.nationalmap.gov